58
WSHP-SVX01Y-EN
WWAARRNNIINNGG
PPrrooppeerr FFiieelldd WWiirriinngg aanndd GGrroouunnddiinngg
RReeqquuiirreedd!!
FFaaiilluurree ttoo ffoollllooww ccooddee ccoouulldd rreessuulltt iinn ddeeaatthh oorr
sseerriioouuss iinnjjuurryy..
AAllll ffiieelldd wwiirriinngg MMUUSSTT bbee ppeerrffoorrmmeedd bbyy qquuaalliiffiieedd
ppeerrssoonnnneell.. IImmpprrooppeerrllyy iinnssttaalllleedd aanndd ggrroouunnddeedd
ffiieelldd wwiirriinngg ppoosseess FFIIRREE aanndd EELLEECCTTRROOCCUUTTIIOONN
hhaazzaarrddss.. TToo aavvooiidd tthheessee hhaazzaarrddss,, yyoouu MMUUSSTT ffoollllooww
rreeqquuiirreemmeennttss ffoorr ffiieelldd wwiirriinngg iinnssttaallllaattiioonn aanndd
ggrroouunnddiinngg aass ddeessccrriibbeedd iinn NNEECC aanndd yyoouurr llooccaall//
ssttaattee//nnaattiioonnaall eelleeccttrriiccaall ccooddeess..
FFoorr HHoorriizzoonnttaall 00..55--55 ttoonn uunniittss
The following steps were sequenced to aid in the
installation and mating of a water side economizer to a
0.5–5 ton horizontal water-source heat pump.
1. Remove the control side service panel of the water-
source heat pump unit.
2. Remove rubber isolation grommets from the
return-air section. Place them in a convenient
location.
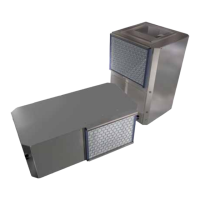
3. Attach ducted panel to the water-source heat pump
unit with six factory provided screws. This panel is
shipped loose with the water-source heat pump but
must be field installed to the unit.
Figure 64. Step 3
4. Attach the water side economizing unit to the
ducted panel of the water-source heat pump with
10-factory provided screws. The economizing
package fits to the outside of the of the water-
source heat pump. Trane recommends the mating
of the systems be made via 3-screws spaced evenly
across the top, 3-screws spaced evenly across the
bottom (installed immediately after hanging the
unit), and 2-screws on each side.
NNoottee:: Waterside economizer option is configured for
right return. Left return requires additional field
piping.
Figure 65. Step 4
5. Install the 18-inch steel braided hose between the
upper most piping connection of the economizer,
and the water-in of the heat pump. The hose is
shipped loose with the water-side economizer.
Figure 66. Step 5
6. Install the SUPPLY and RETURN hoses to the:
a. position valve’s threaded connection.
b. water-out threaded connection of the water-
source heat pump.
IInnssttaallllaattiioonn
 Loading...