EasyManua.ls Logo

Traxxas 6795 User Manual

Traxxas 6795
2 pages
To Next Page IconTo Next Page
Page #1 background imageLoading...
Page #1 background image
Covers Part #6795
LED Light Kit Installation Instructions
Kit contents:
3-volt accessory power supply
Electronic speed control (ESC) power tap
3x10mm button-head cap screws (2)
Roof skid plate with front and rear LED light bars
Front bumper with LED light bar
Body template
Zip ties (3)
TRAXXAS.com
Traxxas, 6250 Traxxas Way, McKinney, TX 75070,
Phone: 972-549-3000, Fax: 972-549-3011, e-mail: support@Traxxas.com
HKC19045-R04 Rev 201023
CAUTION: RISK OF INJURY!
Use care with hobby knives, tapered reamers, and other cutting tools as
they are extremely sharp and can cause severe injury, deep cuts, and/or punctures.
12mm
0.5"
12mm
0.5"
3x12mm CS
Remove the existing roof skid plate.
1
3x12mm CS
Install the new roof skid plate; feed the wire harness
connector through the hole in the roof.
3
Tools needed:
2.0mm hex wrench
2.5 mm hex wrench
Tapered body reamer (part #3433 or #3433X, sold separately)
Body scissors (part #3431 or #3432, sold separately)
Visitez Traxxas.com/manuals pour télécharger
les instructions dans votre langue.
Visite la página Traxxas.com/manuals para
descargar el instrucciones en su idioma.
Auf Traxxas.com/manuals, können Sie
anleitung in Ihrer Sprache downloaden.
2
Tapered Body Reamer
Diameter Measurements
Body modification:
Before installation of the new roof skid plate, the vehicle body will need modification.
Peel the backing from the included self-adhesive cutting template. Install the template on
the vehicle body, aligning the holes in the template with the front screw holes in the roof.
Using a tapered body reamer, carefully cut holes in the roof to the dotted lines on the
template (note the hole diameters indicated on the template and the corresponding
diameter measurements on the body reamer). Use body scissors to cut out the section
between the two holes as indicated.
4x10mm CCS
Remove the existing front bumper.
4
4x16mm BCS
4x10mm CCS
Install the new front bumper. See step 9 for wire routing.
5
4x16mm BCS
CAUTION: RISK OF DAMAGE TO BATTERIES!
Do not attach the power tap to the battery connector. Attach to the
electronic speed control (ESC) connector only. Always disconnect the battery
from the ESC when not in use to prevent the possiblity of over-discharge.
Question and Answer IconNeed help?

Do you have a question about the Traxxas 6795 and is the answer not in the manual?

Traxxas 6795 Specifications

General IconGeneral
Part Number6795
Vehicle Type1/10 Scale
Length521mm
Width324mm (12.75 inches)
Height232mm (9.13 inches)
Wheelbase325mm
MotorTitan 12T 550 Modified
ESCXL-5 Electronic Speed Control
Top Speed30+ mph (48+ km/h)
ShocksOil-Filled
BodyPre-Painted and Decaled
Radio System2.4GHz Radio System
Battery CompatibilityLiPo
Weight2.5 kg (5.5 lbs)

Summary

Safety Precautions

Risk of Injury

Use care with hobby knives, tapered reamers, and other cutting tools as they are sharp and can cause severe injury.

Risk of Battery Damage

Do not attach power tap to battery connector. Connect only to ESC. Disconnect battery from ESC when not in use to prevent over-discharge.

Installation Steps - Initial

Roof Skid Plate and Front Bumper

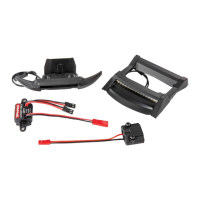
Remove existing roof skid plate and front bumper, then install new versions with integrated LED light bars.

Body Modification

Roof Hole Cutting

Modify vehicle body by cutting holes in the roof using a template and reamer for new roof skid plate installation.

Power Supply Installation

Chassis Mounting

Install the accessory power supply on the chassis using 3x10mm BCS.

ESC Power Tap Connection

Attach the power tap to the High-Current Connector of the ESC, ensuring correct polarity (red +, black -).

Power Tap Cover

Install the cover on the power tap using 2.6x8mm BCS.

Wiring Diagram and Connections

Harness Routing

Route wire harness from front bumper to accessory power supply, securing with zip ties and avoiding moving parts.

Accessory Power Supply Connections

Plug black connectors from accessory power supply into front bumper/roof skid plate. Connect red power tap to red female connector.
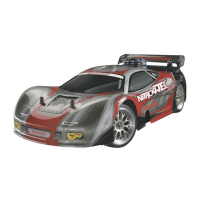
Related product manuals