Do you have a question about the Traxxas RUSTLER 4x4 67064-1 and is the answer not in the manual?
Provides contact information and support options for Traxxas.
Outlines procedures to get the model running quickly.
Instructions to register the product online for customer service.
Explains icons used in the manual for warnings and hints.
Key safety points for operating the model safely.
Precautions for operating the electronic speed control.
Critical warnings related to LiPo batteries and fire hazards.
General precautions for charging and handling all battery types.
Lists tools and equipment supplied with the model.
Lists additional equipment needed to operate the model.
Lists optional but recommended tools for an R/C toolbox.
Instructions for removing and installing the model's body.
Instructions on how to apply decals to the model.
Defines key terms related to the radio and power systems.
Crucial precautions for the radio system antenna.
Explains the 2-channel radio system components and features.
Illustrates the wiring connections for the XL-5 ESC and components.
Overview of the transmitter and receiver components.
Details the XL-5 ESC connections and features.
Instructions for installing AA batteries in the transmitter.
Guide on using the Traxxas battery charger.
Advice on selecting and using appropriate batteries.
Explains the Traxxas Battery iD feature for chargers.
Steps for installing the battery pack into the model.
Details the benefits of the Traxxas High-Current Connector.
Identifies and describes the transmitter controls.
Essential rules for operating the radio system safely.
Covers steering trim and channel reversing adjustments.
Steps to reverse the throttle channel on the transmitter.
How to operate the radio system and check model functions.
Procedure to test radio range before each running session.
Discusses the relationship between speed and radio range.
Steps to re-bind the transmitter and receiver.
Explains the Failsafe function for signal loss.
Explains the meaning of transmitter and receiver LED indicators.
Lists the technical specifications of the XL-5 ESC.
How to configure Low-Voltage Detection for battery types.
Step-by-step guide to program the ESC and transmitter.
How to operate the speed control and test programming.
Describes and selects ESC profiles (Sport, Race, Training).
Quick guide for switching between ESC profiles.
Explains the feature preventing accidental acceleration.
Explains ESC LED codes and protection modes.
Key precautions to keep in mind before driving.
Advice on maximizing battery run time.
Guidance for operating the model in wet environments.
Post-run maintenance for wet conditions.
Instructions for maintaining the receiver box seal.
Guide for correctly setting up the receiver antenna.
How to adjust gear mesh to prevent stripped gears.
How to change shock mounting for suspension tuning.
Adjusting shock pistons, springs, and oil for handling.
Steps to re-center the steering servo.
Discusses motor types and gearing principles.
Chart showing recommended pinion and spur gear combinations.
How to adjust the slipper clutch for tire spin control.
Information on selecting and experimenting with wheels and tires.
How to tune differentials using silicone oil.
Steps for removing and refilling differential fluid.
Checks for physical damage and wear on the vehicle.
Lists additional periodic maintenance tasks.
Cleaning and lubricating the motor.
Maintaining shock oil levels and inspecting for leaks.
Inspecting suspension and driveline for wear and binding.
Proper procedures for storing the model.
Instructions for removing suspension and slipper clutch assemblies.
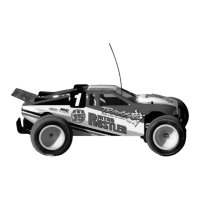
This manual describes the Traxxas Rustler 4X4, a 1/10-scale electric stadium truck designed for off-road excitement and high-speed performance. It comes equipped with a powerful Titan 12T 550 motor and a smooth XL-5 electronic speed control, ensuring durability and long-lasting operation. The model features new wheels and tires with advanced tread patterns and rubber compounds for superior driving. Innovative technology, such as the patent-pending Torque-Control slipper, is incorporated from Traxxas' top-of-the-line Revo models.
The Rustler 4X4 is controlled by a Traxxas TQ 2.4GHz radio system, which automatically locates and locks onto an available frequency, allowing multiple models to be raced without interference. The transmitter has two channels: one for steering and one for throttle. The receiver in the model has three output channels, with one servo and an electronic speed control connected. The radio system is factory-programmed for correct operation, but adjustments can be made for optimal performance. The transmitter requires four AA alkaline or rechargeable batteries (sold separately).
The model features an innovative latching system for securing the body to the chassis, allowing for easy removal and installation. To remove the body, the handle is turned 90 degrees counterclockwise to unlock the latch, which then releases the truck body from the rear shock tower. The body slides backward to release the front tab and can then be gently lifted straight up from the chassis.
The electronic speed control (ESC) is a powerful device capable of delivering high current. It has a 15-turn modified motor limit for 540-size motors and a 12-turn modified motor limit for 550-size motors with 0 timing. The ESC is designed to be used with 4-7 NiMH cells or 2 LiPo cells (2s) only, with a maximum input voltage of 8.4 volts (NiMH) or 7.4 volts (2s LiPo). It is crucial to use neutrally timed motors (0° timing) for reverse operation to prevent excess current draw and overheating. Three 0.1µF (50V) ceramic capacitors are required for the motor to prevent radio interference. The ESC is not compatible with external Schottky diodes.
The XL-5 electronic speed control is equipped with built-in Low-Voltage Detection, which monitors battery voltage. When LiPo battery voltage reaches its minimum discharge threshold, the XL-5 limits power output to 50% throttle. If the voltage drops further, the motor output shuts down, indicated by a slowly blinking red LED. This feature is disabled by default for NiMH batteries but must be activated when using LiPo batteries. The XL-5 offers three driving profiles: Sport Mode (100% Forward, 100% Brakes, 100% Reverse), Race Mode (100% Forward, 100% Brakes, No Reverse), and Training Mode (50% Forward, 100% Brakes, 50% Reverse). Training Mode is particularly useful for beginning drivers to improve control.
The model is designed with water-resistant features to protect the electronics, allowing operation in puddles, wet grass, and snow. However, it is not fully submersible, and additional care and maintenance are required after wet conditions to prevent corrosion. The Traxxas TQ 2.4GHz transmitter is not water resistant and should not be exposed to wet conditions.
Maintenance is crucial for the Rustler 4X4 to remain in top running condition. Regular inspection for cracked, bent, or damaged parts, binding in the wheels and steering, and proper shock absorber operation is recommended. Wiring should be checked for fraying or loose connections, and the mounting of the receiver, servos, and speed control should be secure. Wheel nuts should be tight, and the radio system's operation, especially battery condition, should be verified. Loose screws in the chassis or suspension should be addressed, and the steering servo should operate freely without binding. Gears should be inspected for wear, broken teeth, or debris. The slipper clutch tightness should also be checked.
Periodic maintenance includes inspecting the slipper clutch pads for wear; if any pad is 1.8mm or less, it should be replaced. The chassis should be kept clean of dirt and grime. Over time, increased looseness in the steering system may occur due to wear in bellcrank bushings and tie rod ends, which should be replaced as needed. The motor should be removed, cleaned with an aerosol motor cleaner, and lubricated with lightweight electric motor oil every 10-15 runs. Shock oil levels should be kept full with 100% pure silicone shock oil, and rebuilds should be performed if leakage occurs. The driveline should be inspected for wear, unusual noise, or binding.
The model's front and rear gear differentials can be tuned for different driving conditions by changing the viscosity of the silicone oil. From the factory, the front differential is filled with SAE 30,000W viscosity silicone oil, and the rear differential is filled with grease. Higher viscosity oil reduces power transfer to wheels with less traction, which can be beneficial for climbing or racing on low-traction surfaces. The differentials must be removed from the vehicle and disassembled to change the oil.
The slipper clutch is adjustable and built into the large spur gear. It regulates power to the wheels to prevent tire spin. To adjust, the slipper gear assembly is removed, and the adjusting nut is turned clockwise to tighten or counterclockwise to loosen. A good starting point is to tighten the nut until the spring fully collapses, then turn it counterclockwise one full turn. The manual advises against running the model with the slipper clutch adjusting spring fully compressed.
The model's suspension can be adjusted for different terrains. For off-road performance, the factory setting uses position 2 on the front suspension arms and position 3 on the rear. For hard surfaces, it's recommended to move front shocks to position 3, rear shocks to position 4 or 5, and add preload spacers. The four shocks greatly influence handling, and any changes to pistons, springs, or oil should be made in pairs (front or rear). The model's ride height can be adjusted using clip-on spring preload spacers.
When storing the model, the battery should always be disconnected and removed. For long-term storage, batteries should also be removed from the transmitter.
| Scale | 1/10 |
|---|---|
| Wheel Diameter | 2.8 inches (71mm) |
| Transmission | Single-Speed |
| Steering | Bellcrank |
| Motor | Titan 12-Turn 550 |
| Drive Type | 4WD |
| Battery Type | NiMH or LiPo |
| Speed Control | XL-5 HV |
| Battery | 7-cell NiMH or 2-3S LiPo |
| Chassis | Composite |
| Suspension | Independent |