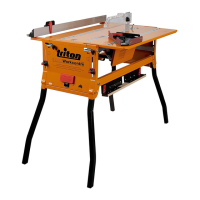
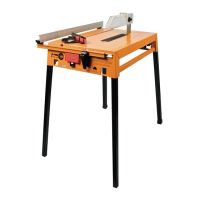
H Overhead Guard
G Overhead Guard Support
A Main Body
F Protractor
(
with Side Pressure
Finger)
E Captive
Push-stick
D Rip Fence
C Front Legs (packed inside Rear Legs)
B Rear Legs (packed in Main Body)
Page 2
L Storage
Hooks
K Trigger
Strap
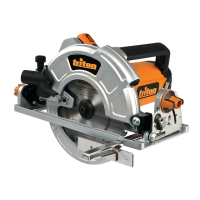
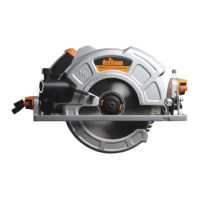
I 184mm Power Saw
(fitted to Main Body)
PARTS LAYOUT
Safety 3
Set-Up 4
Removing and Fitting the Legs (B & C) 4
Fitting the Saw Slot Insert (J) 4
Fitting the Trigger Strap (K) 5
Removing the Saw 5
Fitting the Saw Blade (N) 5
Fitting the Rip Fence (D) 6
Fitting the Overhead Guard (H & G) 6
Connecting the Power 7
Fitting the Storage Hooks (L) 7
Features & Functions 8
Rip Fence (D) 8
Protractor (F) 9
Captive Push-Stick
and Side Pressure Finger 10
The Overhead Guard (H) 12
Accuracy Tests 13
Trouble-shooting / Fine-Tuning 15
Cuts out of square 15
Workpiece jams 16
Adjusting the protractor pointer 16
Operation 17
Basic Ripping 17
Narrow Ripping 17
Ripping Long Pieces 17
Ripping Larger Sheets 18
Double Ripping 18
Planing an Edge 18
Planing a Face 19
Planing a Wide Sheet 19
Edge Rebating 19
Tongue and Grooving 20
Edge Work on Thin Material 20
Working on End-Grain 20
Taper Ripping 21
Cross-Cutting 22
Multiple Cross-Cutting 22
Multiple Cross-Cutting
against an End Stop 22
Halving Joints & Tenons 23
Mitre Cutting 23
Mitre Cutting Moulding 24
Mitre Cutting to a Length Stop 24
Cutting Sharp Points or Wedges 25
Optional Accessories 25
Bevel Ripping Guide 25
Wheel Kit 25
Router Kit 26
Mini Sliding Extension Table 26
Dust Bag & Collector 26
184mm Saw Instructions 27
Saw Safety 28
Saw Features and Functions 29
Fitting & Removing the Saw Blade 29
Adjusting Cut Depth 29
Bevel Adjustment 30
90˚ Check 29
Power Switch 30
Sighting the Cut Line 31
Saw Operation 31
Hand-Held Operation 31
Ripping 31
Saw Maintenance 32
CONTENTS PG#
J Saw Slot
Insert
N Blade
(packed
separately)
 Loading...