7
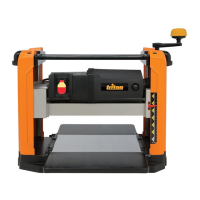
12. Circuit Breaker Reset Button
13. On/Off Switch
14. Brush Access Cap
15. Hex Key
16. Blade Cover Panel Hex Screws
17. Blade Cover Panel
18. Dust Chute Fixing Positions
19. Magnets
Intended Use
Worktop-mounted, mains-powered planer for heavy duty planing tasks on
sheets of hard and softwood timber.
Unpacking Your Tool
• Carefully unpack and inspect your tool. Fully familiarise yourself with all its
features and functions
• Ensure that all parts of the tool are present and in good condition. If any
parts are missing or damaged, have such parts replaced before attempting
to use this tool
Before Use
WARNING: ALWAYS disconnect from the power supply before carrying out any
adjustments, inspection, maintenance or cleaning.
WARNING: ALWAYS wear suitable cut proof gloves when handling the
rollercase and its sub-components.
Bench mounting
• Set up the unit on a firm, flat surface so the table is horizontal and the unit
cannot tip over
• If the planer/thicknesser is to be used in a permanent position, it is
recommended that it is secured to a rigid work surface, as follows:
1. Use the holes in the base of the planer/thicknesser (Image A) as a template
to mark and drill four holes in your intended mounting surface (i.e.
workbench). Secure the unit in position using large bolts, washers and nuts
(not supplied)
2. If the planer/thicknesser is intended to be more portable, fix a board to the
base which can be easily clamped and removed from various mounting
surfaces
3. If using bolts, make sure they are long enough to penetrate the workbench
or board sufficiently for a secure fix
Crank Handle Installation
Mount the Crank Handle (9) in position (see main image) on the right hand side
of the planer:
1. Thread the spring washer onto the Crank Handle Retaining Bolt (7)
2. Fit the Crank Handle onto the elevation screw (Image B)
3. Use the Crank Handle Retaining Bolt to secure the Crank Handle in position.
Use the Hex Key (15) to tighten the bolt
4. Insert the Crank Handle Fixing Cap (8) to conceal the fixing
Attach the dust chute
The Dust Chute (5) can be mounted for extraction of waste at either end of
the planer
1. Use the 2 x Dust Chute Thumb Screws (6) to mount the dust chute onto the
Rollercase (1) using the Dust Chute Fixing Positions (18) (Image C)
2. Having fixed the chute in position, connect the extraction system hose
3. Turn the extraction system on before operating the planer
Checking the rollercase is level
• The Rollercase (1) is aligned and checked in the factory. However, it can
become out of alignment during shipping and handling
• If the Rollercase is not level with the Centre Table (11), this will result in a
tapered cut where the thickness on one side of the workpiece is different
from the other. It can also cause uneven wear of the blade
• Check the blades are aligned correctly with a test run: run two pieces
through each side (left and right) of the planer
• Measure and compare results to check the blades are correctly aligned
and/or to determine the amount of correction required
• If the blades need to be re-aligned, see ‘Maintenance – Re-aligning the
Rollercase’ for guidance
Operation
WARNING: ALWAYS disconnect from the power supply before carrying out any
adjustments, inspection, maintenance or cleaning.
WARNING: ALWAYS wear suitable cut proof gloves when handling the
Rollercase and its sub-components.
Important guidance for the safe use of this tool
• Disconnect the machine from power source whenever adjusting or
replacing any parts
• Ensure the On/Off Switch is in the ‘OFF’ position before connecting the tool
to mains power
• Keep limbs away from all moving parts
• Wear eye protection and a face mask when using this tool
• Make sure all mobile parts move freely and are free from interference
• Keep blades sharp, aligned and properly secured to the cutter head
• Never turn the machine on with the workpiece in contact with the blades
• Whenever the planer is not in use, switch off and disconnect from power
• Keep the planer in good order. Follow the maintenance instructions (see
‘Maintenance’)
• Never use the planer to make partial cuts - allow the planer to cut the full
length of the workpiece
• Do not use the planer to cut recesses, tenons or moulds
Workpiece capacity
• The workpiece must comply with the following minimum and maximum
dimensions:
i. Min thickness: 3.2mm
ii. Min length: 125mm
iii. Min width: 18mm
iv. Max width: 317mm
• Do not use weak, dry or damaged, heavily knotted wood that could break
up in the planing mechanism damaging the mechanism and motor and
causing kickback
• Ensure all wood is free of embedded objects including screws, nails and
staples. Embedded objects can cause major damage to the tool and are a
safety risk if ejected as well as a cause of kickback
• Do not plane badly bowed/warped wood where there is inadequate contact
with the infeed table
• This planer is designed for natural wood material only
• Remove glue and any foreign objects from the workpiece before planing
• Use the entire width of the cutter head to avoid uneven wear of blades
Rollercase height adjustment
• The Rollercase (1) contains the motor, cutting head with blades, and the
in-feed and out-feed rollers
679678_Z1MANPRO1_AUS.indd 7 24/07/2015 10:34
 Loading...