EasyManua.ls Logo

TroposAir Captiva - User Manual

TroposAir Captiva
6 pages
Print Icon
To Next Page IconTo Next Page
Loading...
Owner’s ManualOwner’s Manual
Captiva
Toll Free 1-855-676-7247
WARNING: Read and follow these instructions carefully and be mindful of all warnings shown throughout.
Net Weight
6.6 KGS
7.8 LBS
These instructions contain 5 pages:
Page 1: Foreword
Page 2: Unpack and inspect parts contained, and pre-installation notes
Page 3: Hanging system installation
Page 4: Wiring connections and Canopy and Blade installation
Page 5: Light/Cover installation and Remote Setting
Model No:
HE-15072
Question and Answer IconNeed help?

Do you have a question about the TroposAir Captiva and is the answer not in the manual?

Overview

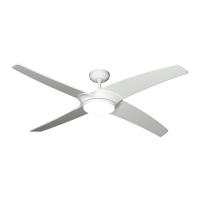
This document describes the installation and operation of the TroposAir Captiva ceiling fan, model HE-15072.

Function Description:

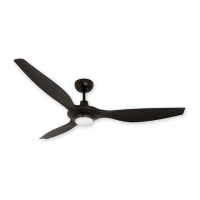
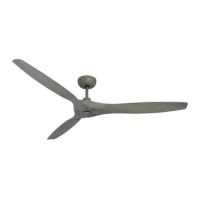
The TroposAir Captiva is a ceiling-mounted fan designed for indoor use, providing air circulation and illumination. It features four blades, an integrated LED array for lighting, and is controlled by a remote. The fan is electrically reversible, allowing for seasonal adjustment of airflow direction. It is suitable for sloped ceilings.

Important Technical Specifications:

  • Model Number: HE-15072
  • Weight: 6.6 KGS (14.55 lbs) for the fan, 7.8 LBS (17.2 lbs) for the entire package.
  • Blade Count: 4 blades
  • Light Source: LED Array
  • Control Method: Remote control
  • Ceiling Compatibility: Suitable for sloped ceilings.
  • Electrical Reversibility: Yes
  • Mounting: Requires a metal outlet box suitable for fan support, capable of supporting a minimum of 35 lbs. A 4" x 2 1/8" deep METAL octagon box is required if mounted on a ceiling outlet box, and it must be UL listed as "suitable for fan support."
  • Blade Clearance: Blades should be at least 7 feet from the floor when in operation.

Usage Features:

  • Remote Control: The fan is operated via a dedicated remote control, offering functions such as High, Medium, and Low fan speeds.
  • Light Control: The remote includes a Light On/Dim Selector, allowing for turning the light on/off and dimming the LED array. The light selector switch on the remote should remain on the "DIM" setting for the dimmable LED array.
  • Reversible Function: The fan is electrically reversible, enabling users to change the direction of airflow. This feature is useful for optimizing comfort in different seasons (e.g., downdraft for cooling in summer, updraft for circulating warm air in winter). The fan must be turned off and stopped before reversing fan direction.
  • Indoor Use: The fan is specifically designed and suitable for indoor environments.

Maintenance Features:

  • Lubrication: The fan's bearings are adequately charged with grease at the factory, so further lubrication should not be necessary under normal conditions.
  • Cleaning: While not explicitly detailed in the provided excerpts, general maintenance for ceiling fans typically involves periodic cleaning of blades and motor housing to prevent dust buildup and maintain efficiency.
  • Troubleshooting (Remote Pairing): The manual provides instructions for pairing the remote control (transmitter) with the receiver, which is necessary after initial installation or if the transmitter/receiver module is replaced. This process also helps circumvent Radio Frequency Interference. The pairing involves turning off power at the breaker, restoring power, and then pressing and holding the "Learn Switch" button on the remote for 3 to 5 seconds within 30 seconds of restoring power. The fan light will flash three times upon successful pairing.
  • Secure Connections: After installation, it is important to check that all connections are secure to prevent the fan from falling or causing damage.
  • Blade Integrity: The manual advises checking for loose screws or cracked blade holders, and ensuring that blades are adequately charged with grease (though this seems to be a typo and likely refers to the bearings as mentioned in point 9 of the "READ AND SAVE THESE INSTRUCTIONS" section).

Safety Warnings and Installation Guidelines:

  • Electrical Safety: Always turn off electricity at the main power box before wiring to avoid electric shock. All electrical connections must comply with local codes, ordinances, and the National Electrical Code. If unfamiliar with electrical wiring, a qualified and licensed electrician should perform the installation.
  • Structural Support: The ceiling joist or outlet box must be strong enough to support the fan's weight and motion. A metal outlet box (4" x 2 1/8" deep, UL listed for fan support) is required for ceiling outlet box mounting. Plastic boxes are explicitly prohibited.
  • Blade Clearance: Ensure fan blades will not contact any objects and maintain a minimum clearance of 7 feet from the floor.
  • Component Handling: Keep the fan motor housing in its carton until ready for installation to protect its finish. Do not mix fan blade sets if installing multiple fans.
  • Wiring: After electrical connections, spliced conductors should be carefully pushed upward into the outlet box, with grounded/equipment-grounding conductors on one side and "HOT" wires on the other.
  • Light Kits: If a light kit is not packed with the fan, it must be UL/ETL listed and installed according to its instructions. The fan includes a light.
  • Remote Control Batteries: The remote requires 2 AAA batteries.
  • Installation Sequence: The manual details a step-by-step installation process: hanging system installation (mounting bracket, downrod, and fan assembly), receiver installation, wiring connections, canopy installation, blade arm installation, blade installation, light pan installation, LED array installation, light cover installation, and remote setting.

TroposAir Captiva Specifications

General IconGeneral
BrandTroposAir
ModelCaptiva
CategoryFan
LanguageEnglish

Related product manuals