Qperation
TILLING
IN
THE
GARDEN
Here are tips and suggestions to
help you get the most satisfaction
and performance from your tiller.
Tilling
Depths
When you begin tilling in the
garden, please go slowly and easily
at first. It's very important that
you not try to dig too deeply too
quickly. Soil that
hasn't
been tilled
for some time must be tilled up
gradual1y-
it's almost impossible
to dig down 4"-to-5" on the first
pass with the til1er in compact soil.
IMPORTANT -
Start
tilling
at
a very shallow
depth
regulator
setting, only
1"
or
2"
deep the
first time
through
the
garden
area.
With each succeeding pass, you
can adjust the depth regulator lever
upward so the tines
wil1
dig an-
other
Inch or two deeper.
Hint-
water your garden area
afew
days
before tilling
to
make the job much
easier.
If
it is difficult to dig down
real1y deep, let the newly-worked
soil "rest" for a day or two. It
wil1
then be easier to till.
Don't
til1
when the soil is too
wet. Wet soil will leave large
clumps after til1ing - and will only
harden later.
Hint - test the soil by
squeezing it -
ifit compresses too
easily it's too wet
to
till.
Seedbed
Preparation
In a wel1-prepared seedbed, the
soil will be loose and fine-textured.
Try to
til1
the first time a few
weeks before the planting date;
til1
the second time a few days later;
then till the third time on the day
of
planting. This will make the
seedbed as loose and wel1-aerated
as possible.
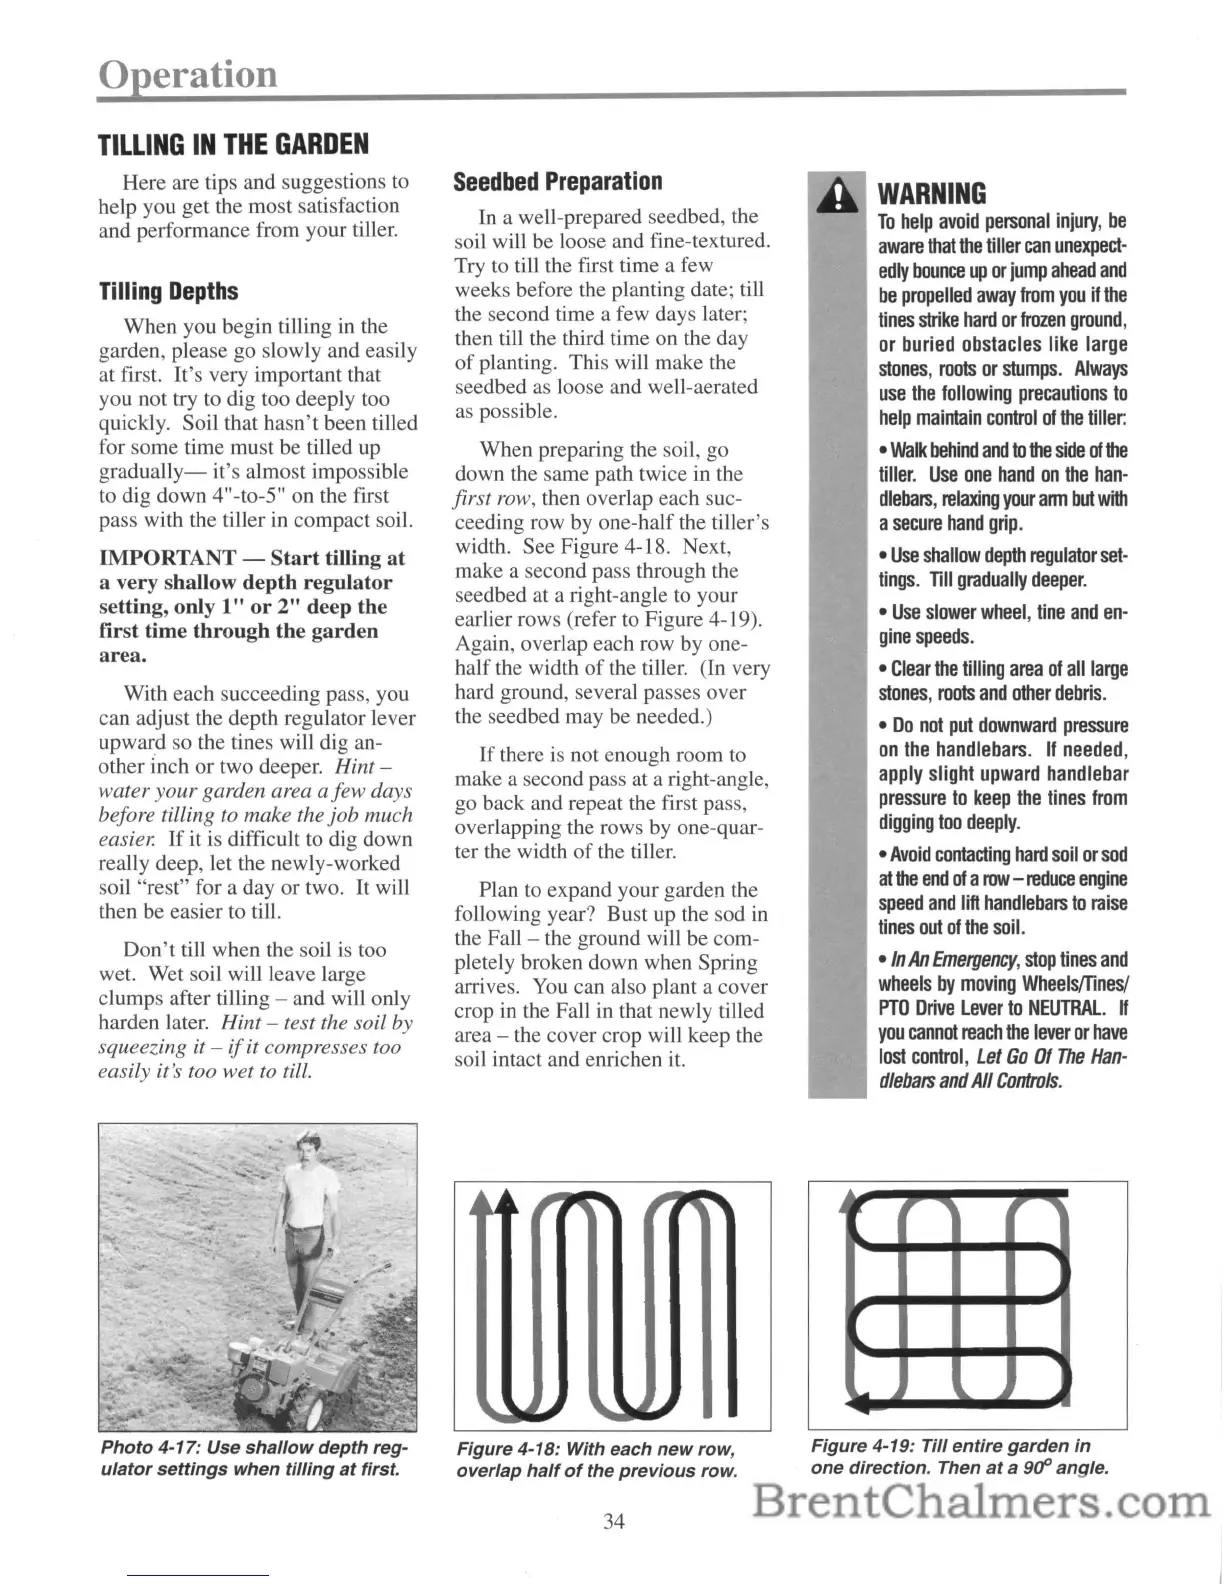
When preparing the soil, go
down the same path twice in the
first row, then overlap each suc-
ceeding row by one-half the tiller's
width. See Figure 4-18. Next,
make a second pass through the
seedbed at a right-angle to your
earlier rows (refer to Figure 4-19).
Again, overlap each row by one-
half the width
of
the
til1er.
(In very
hard ground, several passes over
the seedbed may be needed.)
If
there is not enough room to
make a second pass at a right-angle,
go back and repeat the first pass,
overlapping the rows by one-quar-
ter the width
of
the
til1er.
Plan to expand your garden the
following year? Bust up the sod in
the Fall - the ground
wil1
be com-
pletely broken down when Spring
arrives. You can also plant a cover
crop in the Fall in that newly til1ed
area - the cover crop
wil1
keep the
soil intact and enrichen it.
WARNING
To
help
avoid
personal
injury,
be
aware
that
the
tiller
can
unexpect-
edly
bounce
up
or
jump
ahead
and
be
propelled
away
from
you
if
the
tines
strike
hard
or
frozen
ground,
or
buried
obstacles
like
large
stones,
roots
or
stumps.
Always
use
the
following
precautions
to
help
maintain
control
of
the
tiller:
•
Walk
behind
and
to
the
side
of
the
tiller.
Use
one
hand
on
the
han-
dlebars,
relaxing
your
arm
but
with
a
secure
hand
grip.
•
Use
shallow
depth
regulator
set-
tings.
Till
gradually
deeper.
•
Use
slower
wheel,
tine
and
en-
gine
speeds.
•
Clear
the
tilling
area
of
all
large
stones,
roots
and
other
debris.
•
Do
not
put
downward
pressure
on
the
handlebars.
If
needed,
apply
slight
upward
handlebar
pressure
to
keep
the
tines
from
digging
too
deeply.
•
Avoid
contacting
hard
soil
or
sod
at
the
end
of
a
row
-
reduce
engine
speed
and
lift
handlebars
to
raise
tines
out
of
the
soil.
•
In
An
Emergency,
stop
tines
and
wheels
by
moving
Wheelsmnes/
PTO
Drive
lever
to
NEUTRAL
If
you
cannot
reach
the
lever
or
have
lost
control,
Let
Go
Of
The
Han-
dlebars
and
All
Controls.
Photo
4-17: Use
shallow
depth
reg-
ulator
settings
when
tilling
at
first.
4
~~
r n
""Ill
...
..,j
......
.....
--
Figure 4-18: With each
new
row,
overlap
half
of
the
previous
row.
34
.4
,.
r"~
r
""Ill
r
....
.....
Figure 4-19: Till
entire
garden
in
one
direction. Then
at
a 900 angle.


 To Next Page
 Loading...