............ www.truemfg.com ............
True Food Service Equipment, Inc.
9
9
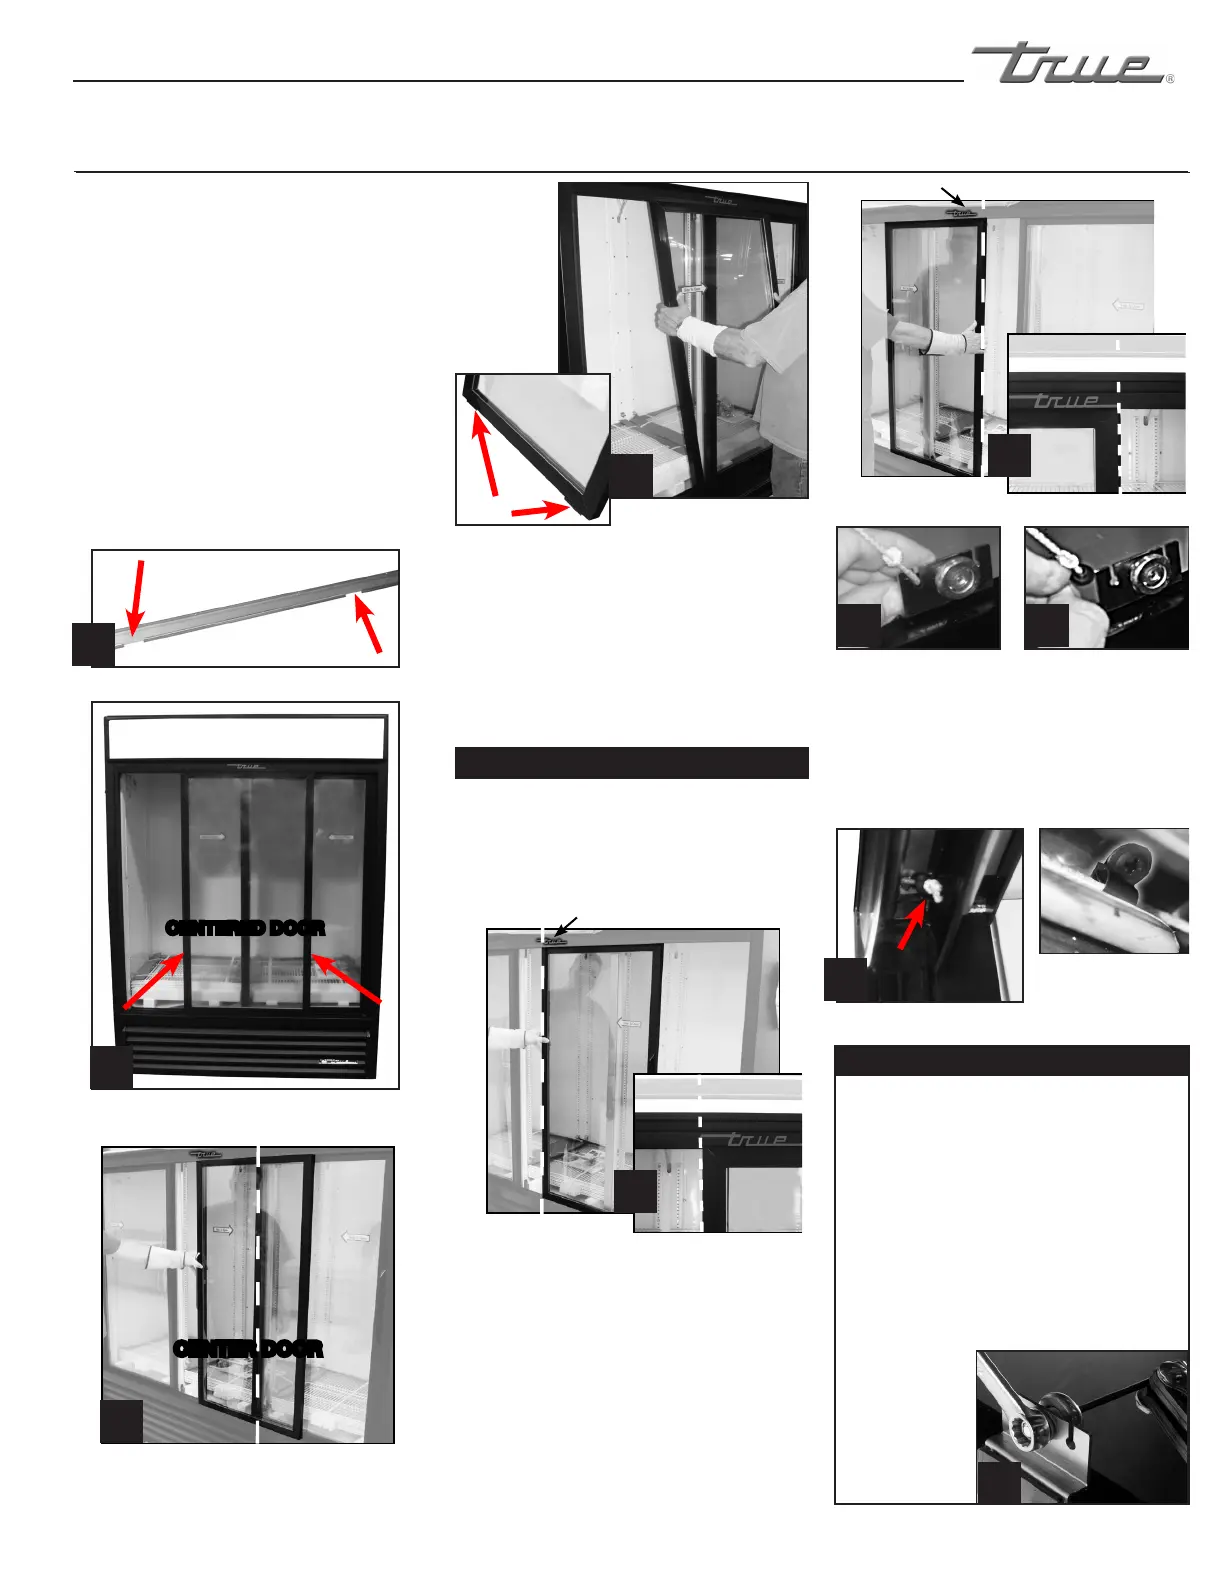
INSTALLATION / OPERATION INSTRUCTIONS
STEP 2
Usinga7/16”wrenchoradjustablewrenchand
1/8”allenwrenchloosenrollerandmove
alongslottedhole.Afteradjustmenthasbeen
madetightenthe
rollerintoplace.
Seeimage10.
TO ADJUST SLIDE DOOR
P-Clip keeps cord
in-place (prevents
cord damage).
Image 6 (Three Door Units ONLY)
STEP 6
Removedoorcordfromrollerbracket.Theblack
plastictabholdingthedoorcordslidesoutthe
back.Seeimages7&8.
STEP 1
Aftercabinetisinstalledinafinallocationand
correctlyleveledcheckforanyopeningswhenthe
slidedoorsarecompletelyclosed.Ifthereare
anygaps/openingsbetweenthecloseddoors
andcabinet,thedoorswillneedtobe
adjusted.
STEP 7
Letthedoorcordslowlyretractbackintothe
doorsidechannel.Theknottiedattheendof
thedoorcordwillkeepthecordfromretracting
allthewaybackintothedoorchannel.See
image9.
(Three Door Units ONLY)
STEP 1
Beforeremovingslidedoordonotusetheside
latch.Tensiononthedoorcordisneededto
executetheseoperationinstructions.Doorscan
notberemovedunlessplacedinspecificlocations
statedintheseinstructions.
STEP 2
Two Door Units:Slidethefrontdoorsoitis
centeredonthecabinet.Thedoorcannotbe
removedunlessitiscentered.Seeimage1for
doorchannelopeningsandimage2for
centeringdoor.
Three Door Units:Slidethemiddledoorto
therightsidesotheglassiscenteredwiththeleft
edgeoftherightsidedoor.Seeimage3.
(Two Door Units ONLY)
(Two Door Units ONLY)
CENTERED DOOR
(Three Door Units ONLY)
TRUE Logo
STEP 5
Slideleftdoortotherightsorightedgelinesup
withtheendoftheTRUELogolocatedatthe
topofthedoorframe.Seeimage6.Thenlift
dooroutoftracksamewayasimage4.
STEP 4
Sliderightdoortotheleftsoleftedgelinesup
withtheleftedgeofTRUELogolocatedabovethe
door.Seeimage5.Thenliftdooroutoftrack
samewayasimage4.
STEP 3
Aftercenteringthedoorliftitupandtilttopof
doortowardsthebackoftheunitsotherollersare
outofthetopchannel.Swingthebottomofthe
dooroutofthebottomchannel.Thenremovethe
doorandsetitdown.Seeimage4.
(TWO DOOR UNITS SKIP TO STEP 6)
TRUE Logo
Gasket fasten to door bottom assures door will
remain in track when unit is placed on uneven
surface.
Door Cord
Knot
SLIDE DOORS
CENTER DOOR
1
2
3
4
5
6
7 8
9
10