9
Please contact cs@conglomkb.com or 1-888-449-9194 for further assistance.
Installation (continued)
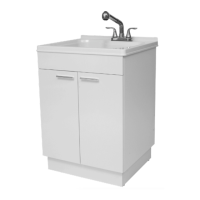
MOUNTING THE UTILITY SINK
SEALANT
Sink (D)
Cabinet (E)
Position the cabinet (E) in the intended location. If required, level the cabinet (E)
by adjusting the four leveling legs and checking the alignment of the top using a
carpenter’s level.
Carefully place a bead of sealant all around the top of the cabinet.
Ease the sink (D) onto the cabinet, and ensure it is placed evenly and centered on the
cabinet (E). Wipe off any excess sealant. Use masking tape to hold the sink (D) in place
until the sealant dries.
PLACEMENT
Push the cabinet (E) against the wall. If required, level it by adjusting the four leveling
legs and checking the alignment of the sink (D) using carpenter’s level.
IMPORTANT:
- Secure the cabinet to the wall using hardware best suited for your wall type. Failing to
do so could result in property damage or personal injury.
- Use silicone sealant to seal the sink to the wall and any adjacent surfaces to keep those
surfaces dry. Failing to do so could result in moisture damage.
DRAINAGE
The tailpipe (not supplied) previously installed to the drain can now be connected
to your household plumbing. In some cases, your household plumbing will have to
be modied to ensure proper drainage. If so, please consult a licensed plumber to
complete needed modications.
SUPPLY LINES
Connect the supply lines to your home’s water supply as per manufacturer’s instructions.
Open the hot and cold water supply valves and check to make sure they have
been installed to appropriate inlet ports. Check for leaks. Run hot and cold water
uninterrupted for about one minute to remove any residue from the lines.
Maintenance
CARTRIDGE REPLACEMENT
Faucet Body (23)
Spring (22)
Gasket (21)
Cartridge (20)
Washer (19)
Cartridge Cover (18)
Set Screw (16)
Water Indicator (15)
Handle (17)
To replace the cartridge, please follow these steps:
1. Turn off the water supply to the faucet.
2. Remove water indicator (15) and set screw (16) with a hex key.
3. Remove the handle (17).
4. Unscrew the cartridge cover (18).
5. Remove the washer (19).
6. Pull out the cartridge (20) by hand, make sure gasket (21) and
spring (22) remain in the faucet.
7. Install the new cartridge.
8. Place the washer (19) back in its original position.
9. Secure the cartridge cover (18). Do not over tighten.
10. Place the handle (17) over top and secure the set screw (16)
with a hex key, reinsert the water indicator (15).