How to Manage a Curling Tape
Use Narrow Tape / Use Two Rolls in a Same Time
◆Remove the first piece of tape.
◆When the second piece of the tape is removed, both side of tapes are also
dispensed.
Other Functions
◆Press the HOLD DOWN ROLLER RELEASE BUTTON in order to open
the HOLD DOWN ROLLER UNIT.
◆Extend the ROLLER LOCK LEVER so that the roller will not turn.
◆Close the HOLD DOWN ROLLER UNIT.
With the rollers locked, the tension may cause the length to vary.
Cut several test pieces in order to adjust the length if needed..
If the tape is lesser than 15 mm wid
th or you want to dispense two rolls in a
same time, use the SEPARATOR.
Cut lesser than 10 mm width of tape, put the GUIDE PLATE on the SEPA-
RATOR.
◆Remove the SEPARATOR from the bottom of body.
◆Open the HOLD DOWN ROLLER UNIT.
◆Insert the SEPARATOR into the body by slotting in to the bottom of the cavity.
◆When you cut the tape lesser than 10 mm, put the GUIDE PLATE onto the
Separator.
◆Place one roll of the tape or either side by inserting a SEPARATOR for
loading tape.
◆To hold the tape by adjusting TAPE HOLDERS, it is unnecessary to push
the SEPARATOR out of position.
When dispensing two roll of tapes in a same time, it is a must to feed-in
both of its' length in a same time.
FLEXIBLE TAPE SUPPORT
When you cut the tape longer or
cut non-adhesive tape / film, use
FLEX-IBLE TAPE SUPPORT in
order to avoid the tape fall down.
ASSIST STAND
Based on the tape
material
or workpiece
purpose, use the
ASSIST STAND in
order to let the body of
machine towards a
lower level.
SEPARATOR
GUIDE PLATE
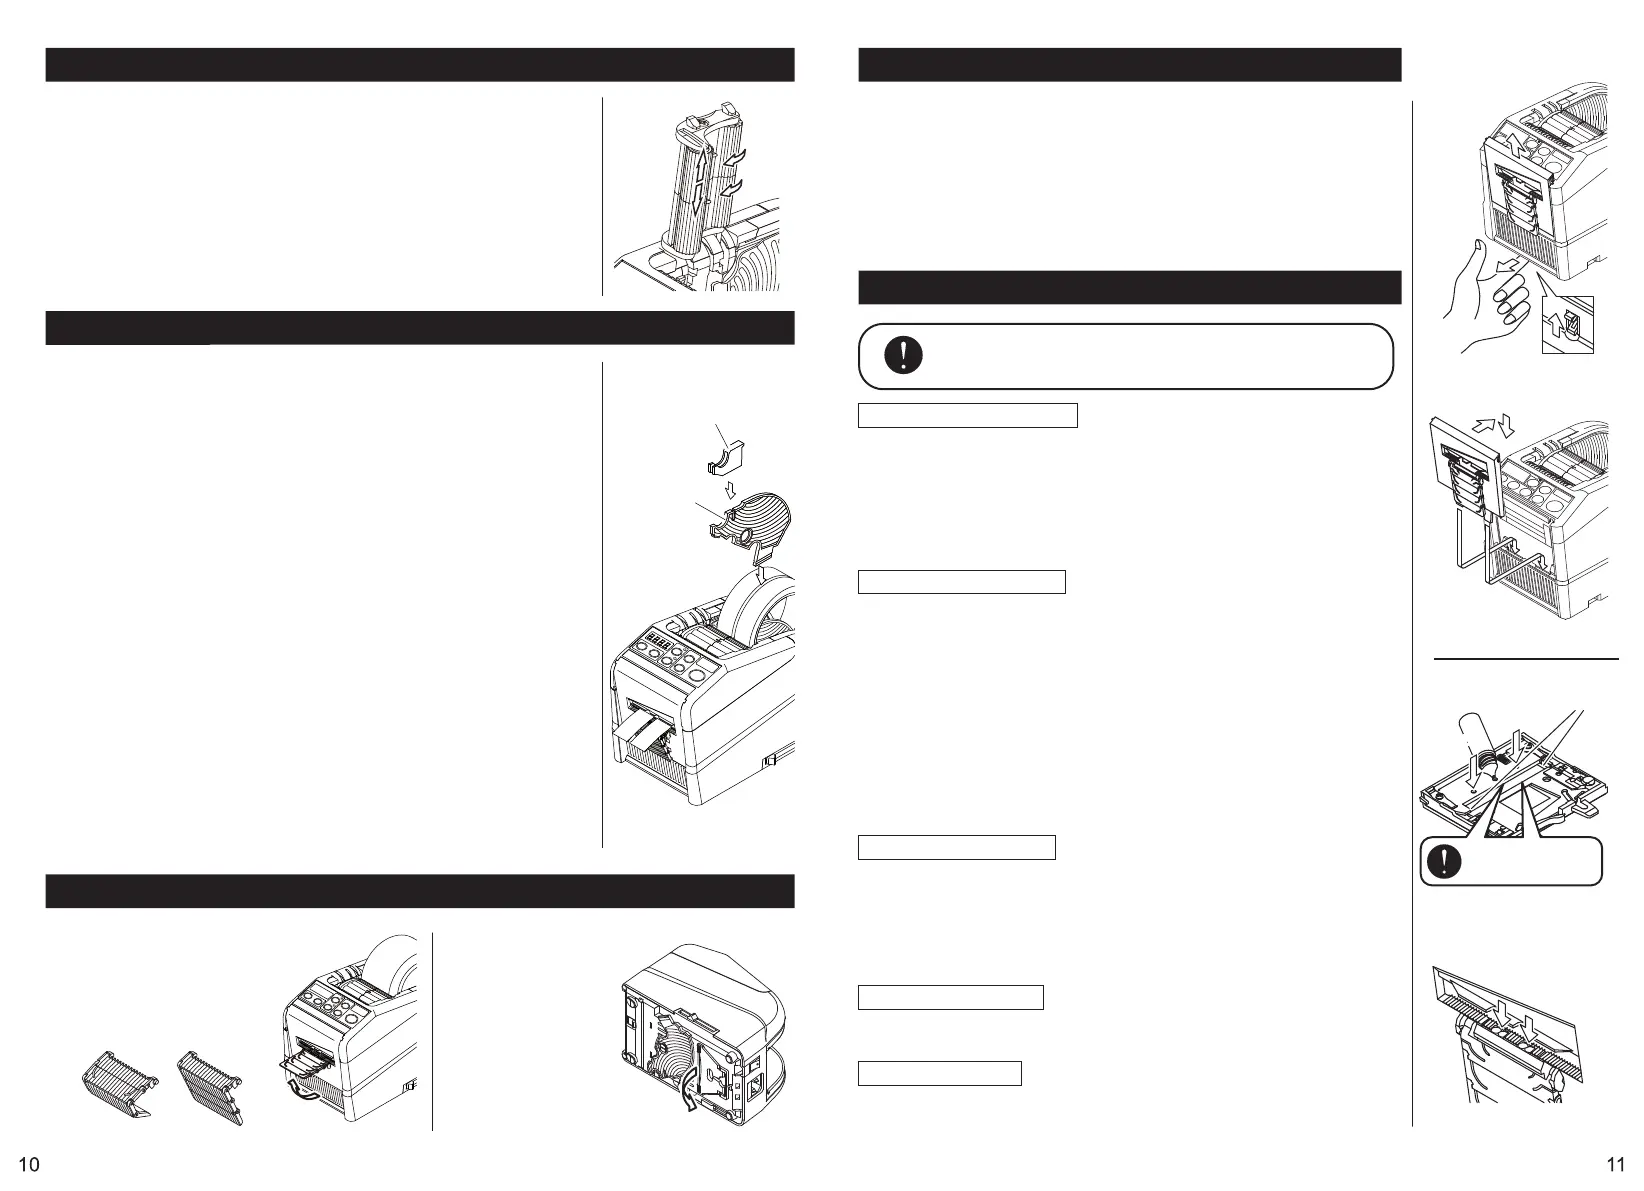
INSTALL BLADE UNIT
②
③
①
Whenever you clean or replace the BLADE UNIT,
do not touch the sharp edge of the blade.
Only Blade is not accepted to be replaced.
It needs to change with the whole Blade Unit.
◆Turn the POWER SWITCH off.
◆Remove the BLADE UNIT by releasing the BLADE UNIT RELEASE LEVER.
◆Install the new BLADE UNIT into the body.
◆Push down on the housing firmly until it is locked.
Make sure that the lower blade is positioned properly, turn the BLADE
UNIT over and take a look the bottom edge of the lower blade.
Clean the Blade Unit
When cutting tapes with heavy adhesive, the residue will remain on the
blade gradually.
It is necessary to remove the BLADE UNIT for cleaning.
◆Turn the POWER SWITCH off.
◆Remove the BLADE UNIT by releasing BLADE UNIT RELEASE LEVER.
◆Put some alcohol on a clean dry cloth, or use a swab to remove the residue.
◆Replace the BLADE UNIT.
Lubricate the Blade
Lubricate the blade in order to prevent residue stick on the blade.
◆Turn the POWER SWITCH off.
◆Remove the BLADE UNIT from the body.
◆Locate three oil holes on the back side of the top blade.
◆Drip one drop of BLADE OIL into each hole.
◆Also lubricate LOWER BLADE GUIDE.
◆Do not lubricate over and over again.
Wipe the spare oil away by using cotton cloth.
◆Replace the BLADE UNIT into the body.
◆Turn the POWER SWITCH on.
Make several test cuts in order to make sure the tape will not fall down
from the TAPE OUTLET.
Clean the Sensors
There are two pairs of SENSORS below the TAPE OUTLET.
If the opening is covered by tape residue or debris, the SENSORS will
not detect the presence tape.
Always keep clean around the SENSORS.
To protect the SENSOR, clean the openings after removed the BLADE
UNIT carefully.
Replace the Blade Unit
Maintenance
BE CAREFUL TO HANDLE
THE SENSORS
REMOVE BLADE UNIT
EXTREME CARE
OF BLADE
LOWER BLADE GUIDE
OILOIL HOLES HOLES
Clean the Body
Put neutral detergent on a damp cloth to clean the body.
Do not use alcohol or solvent to clean the plastic parts.
Clean the Rollers
When waste of tape glue is found, please refer to page 13 and follow
the procedure for cleaning the inside of the machine.
 Loading...