EasyManua.ls Logo

VADO ALTITUDE - User Manual

VADO ALTITUDE
6 pages
Print Icon
To Next Page IconTo Next Page
Loading...
Guarantee
WHERE
INSPIRATION
FLOWS
ALTITUDE
3 handle, 3 outlet thermostatic shower valve
1
5
y
e
a
r
g
u
a
r
a
n
t
e
e
User Guide
Keep for future reference
All VADO products come with a 2 year guarantee as standard. Within this guarantee period
VADO will provide replacement parts and any labour [SEE NOTE 1] needed to complete the
product repair.
This standard guarantee may be extended by registering your product to give up to a 15 year
guarantee period. Once registered:
VADO chromed brassware and stainless steel products have a 15 year guarantee
(2 years parts and labour plus 13 years parts only).
VADO Sensori SmartTouch and SmartDial products have a 5 year guarantee
(parts and labour).
VADO Identity and i-tech products have a 5 year guarantee (2 year parts and labour plus 3
years parts only).
All other VADO products have a 3 year guarantee (2 years parts and labour plus 1 year parts only)
[SEE NOTE 2].
Guarantee Conditions
Our products are guaranteed against manufacturing defects from the date of purchase until
the expiry of the relevant guarantee period shown above.
The guarantee is only valid if:
•The product has been installed, used and maintained in accordance with VADO’s
instructions and subjected to normal use only.
•The defect is not due to use of an unsuitable or inadequate water or power supply.
•The defect is not due to accident, misuse, neglect or incorrect/inappropriate repair (other
than by VADO or VADO authorised agents) or damage caused by foreign objects
or substances.
•The extended guarantee is only available if you have completed the Guarantee
Registration Process.
This can be done via the VADO website or via phone to our aftersales team.
Registration must be completed within 6 months from date of purchase.
Under the extended guarantee period VADO will, at its option, offer to supply any
replacement product (or component part) assessed to be defective [SEE NOTE 3].
The guarantee (whether standard or extended) is non-transferable to any subsequent owner.
All claims under the guarantee should be notified in the first instance to our Aftersales
department, contact details below, this must be done no later than the last day of the
relevant guarantee period.
All claims must be accompanied by proof of purchase (sales receipt or delivery note) from
an official VADO dealer.
The guarantee does not extend to any consequential loss or damage.
After repair or replacement, the relevant guarantee period will be calculated from the
original date of purchase.
VADO operates a policy of continuous product development and therefore reserves the right
to change the product, packaging and documentation specifications without notice. E&OE.
NOTES:
[1] Labour via our engineer network is only available in the UK. Attendance by a VADO
engineer or sub-contract engineer will be under our standard terms and conditions.
[2] VADO spare parts and shower hoses are under a parts only guarantee.
[3] VADO reserves the right to charge in advance for a product (or replacement part)
pending collection and investigation (at VADO expense) to confirm a defect is due to a
manufacturing issue.
If a defect is found the charge will be refunded or cancelled.
This guarantee is in addition to and does not affect your statutory rights as a consumer.
Tel: 01934 745163
Email: aftersales@vado.com
Question and Answer IconNeed help?

Do you have a question about the VADO ALTITUDE and is the answer not in the manual?

Summary

VADO Guarantee Information

Guarantee Conditions

Conditions for product guarantee validity, including installation and usage requirements.

Guarantee Notes

Clarifications on labour, spare parts, and charges for VADO product guarantees.

Welcome and Cleaning

Cleaning Instructions

Guidance on cleaning VADO products to maintain appearance and preserve guarantee validity.

Product Operation Guide

Flow Control Operation

Instructions for operating the flow control handle to manage water distribution.

Temperature Control Operation

Guidance on adjusting water temperature using the thermostatic control handle.

Maintenance Procedures

Thermostatic Cartridge Maintenance

Procedure for cleaning filters within the thermostatic cartridge for optimal performance.

Isolation and Maintenance

Isolation Procedure

Step-by-step guide for safely isolating the thermostatic valve before maintenance.

Parts Identification

Product Parts List

List and visual guide to all components of the VADO Altitude shower valve.

Detailed Parts List

Component Codes and Quantities

Detailed list of VADO Altitude shower valve components with their respective codes and quantities.

Overview

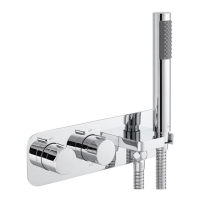
The VADO Altitude is a 3-handle, 3-outlet thermostatic shower valve designed to provide a luxurious and reliable showering experience. This product is backed by a 15-year guarantee, reflecting its high quality and durability. VADO products are found in prestigious hotels, commercial, and residential developments worldwide, known for their exceptional product quality and outstanding customer service. The Altitude shower valve has undergone stringent quality assurance processes and demanding lifecycle mechanical testing to ensure it meets exacting standards.

Function Description

The Altitude shower valve features separate controls for flow and temperature, allowing for precise adjustment of your showering experience. The flow control handle, when in the "Off" position, is typically at the 12 o'clock mark. Turning this handle in the direction of the arrows increases the flow of water to the selected outlets. The valve supports multiple outlets, including a handset and two additional outlets (Outlet 1 and Outlet 3), providing versatility in showering options.

The temperature control handle allows you to adjust the water temperature from cold to hot. Turning this handle in the direction of the arrows increases or decreases the temperature, giving you complete control over your comfort. The thermostatic cartridge ensures that the water temperature remains consistent, preventing sudden changes and enhancing safety.

Usage Features

The Altitude shower valve is designed for ease of use and integration into various bathroom styles. Its harmonious design ensures it coordinates seamlessly with other sanitaryware, offering unlimited choices for a cohesive bathroom aesthetic.

The valve's 3-outlet configuration allows for a customized showering experience. You can switch between the handset and other outlets as desired, providing flexibility whether you prefer a focused spray or a broader flow. The clear markings for "Hot" and "Cold" on the temperature control ensure intuitive operation.

For any technical or operational queries, VADO's experienced aftersales team is available to provide support, ensuring a smooth and satisfying user experience.

Maintenance Features

Regular maintenance is crucial to ensure the longevity and optimal performance of your Altitude shower valve, and failure to do so may invalidate the warranty. It is advised to carry out maintenance annually. Before any maintenance work, the water supply to both hot and cold inlets must be shut off.

Cleaning Instructions:

The electroplating on the product is finished to the highest standard, requiring careful attention to retain its appearance. All products should be cleaned with a soft, damp cloth ONLY. Aggressive or corrosive cleaning products, such as powders and liquids, should be strongly avoided, as their use may invalidate your guarantee if a problem occurs.

Thermostatic Cartridge Maintenance:

The thermostatic valve is fitted with a single filtering facility within the thermostatic cartridge. Depending on water quality, these filters can become dirty, leading to reduced flow and inefficient valve operation. To clean the filters, the cartridge must first be removed from its housing.

Removing the Cartridge:

  1. Remove the handle assemblies and faceplate to access the isolation points on the valve.
  2. Screw down the isolation screws clockwise until resistance is felt (do not overtighten). This ensures the thermostatic valve is successfully isolated.
  3. Remove the screw, spline adaptor, connecting rod, and stop ring.
  4. Unscrew and remove the securing nut.
  5. Carefully pull out the thermostatic cartridge.
  6. Clean the filters by rinsing them under running water to remove any debris.
  7. If limescale deposits are present, immerse the cartridge for a few minutes in a 50% white vinegar and 50% hot water solution. Gently brush the filters and then rinse under running water to remove all particles. If this is ineffective, a replacement cartridge should be fitted.

Reassembling the Cartridge:

  1. Before reassembly, clean the cartridge housing with a wet cloth and grease the O-rings with suitable silicone grease. Insert the thermostatic cartridge into the valve body, ensuring the grub screw aligns with the slot.
  2. Screw on and tighten the securing nut.
  3. Place the temperature stop ring on the cartridge so that the step is located at 8 o'clock.
  4. Place the connecting rod, spline adaptor, and screw back onto the cartridge.
  5. Turn on the water supply via the isolating valves.
  6. Check the water temperature to ensure correct commissioning.
  7. Replace handle assemblies and faceplate.

Isolation Procedure (Important):

This procedure is for isolating the thermostatic valve.

  1. Remove handles/faceplate and trim parts to access the isolation points.
  2. Screw down the isolation screws clockwise until resistance is felt (do not overtighten).
  3. Turn the shower on to check isolation. Ensure your body/hands are not under the flow of water due to potential hot water delivery.
  4. Remove the temperature stop ring (essential).
  5. With the shower in the on position, replace the temperature handle on the thermostatic valve (ensure the temperature stop ring is removed).
  6. Turn the temperature handle fully anti-clockwise until the stop point is reached and it cannot be turned further. Again, ensure your body/hands are not under the flow of water if isolation was unsuccessful.
  7. Turn the temperature handle fully clockwise until resistance is felt.
  8. If no water flows from the outlet during both points 6 and 7, isolation has been successful, and you can now remove and maintain the cartridge.
  9. If water continues to flow at any of the above points, isolate at an alternative point within the system for both hot and cold water and repeat points 3-9.

VADO ALTITUDE Specifications

General IconGeneral
TypeControl Unit
BrandVADO
ModelALTITUDE
Protection RatingIP65
CommunicationRS-485 Modbus RTU
Inputs4 Digital Inputs
Outputs4 Relay Outputs
DisplayLCD

Related product manuals