S
Stephen ChavezJul 30, 2025
Why VELOWAVE Bicycle speed is reduced?
- MMeredith NorrisJul 30, 2025
If your VELOWAVE Bicycle has reduced speed, it's likely due to low battery power. Try charging the battery.
Why VELOWAVE Bicycle speed is reduced?
If your VELOWAVE Bicycle has reduced speed, it's likely due to low battery power. Try charging the battery.
Why are the throttle and pedal assist not working on my VELOWAVE GRACE Bicycle?
Several factors can cause the throttle and pedal assist to fail. First, ensure the battery is turned on. Then, check if the battery is correctly installed. Also, verify that the LCD display is on and the battery is charged. Finally, inspect the brake lever, as engaged brake sensors can prevent the throttle and pedal assist from functioning.
What to do if my VELOWAVE GRACE Bicycle battery does not charge?
If your VELOWAVE Bicycle battery isn't charging, start by inspecting the charger connections to ensure they are properly connected. If the connections are fine, consider the battery temperature and follow the user manual for best practices. Finally, if the charger is damaged, replace it.
Why VELOWAVE GRACE battery range is reduced?
A reduced battery range on your VELOWAVE Bicycle can stem from several factors. Ensure the battery is fully charged. Also, check tire pressure. A heavy load on the bike, rough terrain, or relying solely on the throttle can also diminish the battery range. Consider adjusting the bike load, route, and including pedal assist.
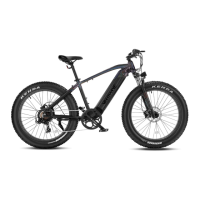
Identifies the display unit, thumb throttle, and brake levers on the handlebar.
Shows the battery, charge port, and frame structure including seat and fork.
Highlights the motor, rear derailleur, pedals, torque sensor, and disc brakes.
Points out the kickstand and headlight for functionality and support.
Ensure battery is seated/charged and tires are properly inflated before the first ride.
Verify pedals, screws, and gears/brakes are secure and adjusted for optimal performance.
Learn LCD display functions and always wear a helmet during riding.
Contact support via email for setup assistance, providing order ID.
Read all instructions carefully, work in a clean area, and remove the battery before assembly.
Inspect the bike for shipping damage and ensure all parts are tight and properly fixed.
Adjust saddle position and handlebar tilt for comfort, and perform a pre-trip inspection.
Place handlebar in mount, align brackets outward, and secure with four screws using 6Nm torque.
Verify front tire alignment with headset and ensure all headset items are tight.
Adjust the right brake lever to be parallel with the left lever for proper use.
Use a 4mm allen wrench and 8Nm torque to secure the brake lever screws after adjustment.
Insert front wheel into the fork, ensuring it rests on the outside of the axle.
Align disc with caliper and insert skewer, noting spring and cam follower placement.
Tighten skewer nut and lift lever parallel to fork to secure the axle.
Attach headlight bracket to fork gantry and secure with screw, washer, and nut.
Connect the headlight cable to the wire emerging from the downtube.
Identify Left (L) and Right (R) pedals and install them on the correct crank arms.
Hand-screw pedals horizontally, then tighten with a 15mm wrench to 25-35Nm torque.
Re-tighten pedals after the first few rides to ensure security.
Carefully read all instructions and check the product page for detailed information.
Follow basic electrical safety rules to prevent issues or malfunctions.
Turn the key counterclockwise to release the battery lock mechanism.
Seat battery bottom-first, push upper side firmly, and turn key clockwise to lock.
Use key to release the first lock, then slide plastic tab to release the second lock.
Hold battery securely while releasing locks, as it may drop off.
Power on/off, adjust assist levels 0-5, and control headlight with '+' button.
Activate walking mode at a walking pace by pressing and holding the '-' button.
Access information (TRIP, ODO, TIME) and parameter settings via the power button.
Locate charge port on downtube, open cover, insert charger plug, and connect to power supply.
Remove battery, place on flat surface, insert charger into port, and connect to power.
Check charge status: Green (sufficient), Yellow (<30%), Red (<5%).
Do not leave charging unattended, max 14 hours. Avoid covering battery during charging.
Standard 2A charger takes 10-12 hours. Red LED means charging, Green means fully charged.
Avoid deep discharge. Charge to 60-80% for long storage. Recharge every two months.
Avoid charging immediately after riding in summer. Do not charge below 0℃ in winter.
Codes 03-05: Brake lever status, throttle faults, or stuck throttle.
Codes 06-09: Low/high voltage, motor hall/phase wire connection issues.
Codes 10-15: Motor/controller high temperature or sensor faults.
Codes 21, 27, 30, 35: Over-current, speed sensor, communication, conversion module issues.
Check battery, display, and brake sensors if throttle or pedal assist is not working.
Address reduced speed/range by checking tire pressure, bike load, terrain, and throttle use.
Inspect charger connection, battery temperature, and charger condition for charging issues.
Resolve strange noises by checking hardware, drivetrain, or motor; contact support if needed.
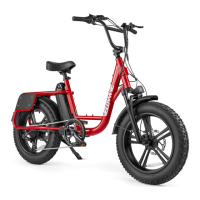
The VELOWAVE GRACE is an e-bike designed for comfortable and assisted riding. This manual provides instructions for setting up, operating, and maintaining the bicycle.
The VELOWAVE GRACE is an electric bicycle that combines traditional pedaling with electric motor assistance. It features a display for monitoring ride data, a thumb throttle for electric propulsion, and a battery for powering the motor and headlight. The bike is equipped with disc brakes for effective stopping power and a torque sensor to provide responsive pedal assistance.