EasyManua.ls Logo

Velux SML User Manual

Velux SML
16 pages
To Next Page IconTo Next Page
Page #1 background imageLoading...
Page #1 background image
VAS 450958 - 1206
SML
ENGLISH: Instructions for electrically operated roller shutter
DEUTSCH: Anleitung eines elektrisch bedienten Rollladens
FRANÇAIS : Notice du volet roulant électrique
DANSK: Vejledning for elektrisk betjent rulleskodde
NEDERLANDS: Instructies voor het elektrisch bediende rolluik
ITALIANO: Istruzioni per persiana avvolgibile elettrica
ESPAÑOL: Instrucciones de persiana exterior eléctrica
--62/--64

Other manuals for Velux SML

Question and Answer IconNeed help?

Do you have a question about the Velux SML and is the answer not in the manual?

Velux SML Specifications

General IconGeneral
BrandVelux
ModelSML
CategoryIndoor Furnishing
LanguageEnglish

Summary

Product Information and Safety

Motor Adjustment and Usage

Key information on motor adjustment, product operation, and safety guidelines.

Disposal, Support, and Removal

Guidelines for product disposal, technical support, and removal procedures.

Weather Protection and Compatibility

Advice on cold regions, damage prevention, and control unit compatibility.

Roller Shutter Installation Steps

Step 2: Cover Removal

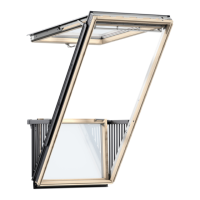
Temporarily remove covers, noting their position for later refitting.

Step 3: Attach Storm Brackets

Screw storm brackets and covers onto the window sash using existing holes.

Step 4: Fit Distance Blocks

Fit distance blocks on storm brackets and attach the bottom cover.

Step 5: Cover Screw Management

Remove cover screws, drill holes if marked, and seal screw holes.

Steps 6 & 7: Side and Top Covers

Fix side covers and adjust top cover screws for window covers.

Steps 8 & 9: Top Casing Installation

Fit the top casing into grooves and lower it without touching roofing material.

Steps 10 & 11: Securing and Plastic Parts

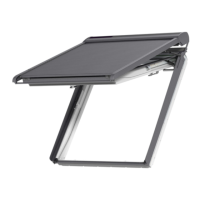
Fit securing screws and plastic pieces onto the roller shutter side profiles.

Step 12: Side Profiles and Restrictors

Fit side profiles, hinge pins, and attach opening restrictors.

Step 13: Wiring Connection

Connect the wire to the terminal block according to wiring instructions.

Declaration of Conformity

Related product manuals