EasyManua.ls Logo

Venga VG RVC 3002 - User Manual

Venga VG RVC 3002
98 pages
Print Icon
To Next Page IconTo Next Page
Loading...
I/B V 210621
VG RVC 3002 DC 14.4V Li-ion 3200mAh
Robot vacuum cleaner
Roboterstaubsauger
Aspirateur robot
Robot aspirador
Robot aspirapolvere
Robotstofzuiger
EN
DE
FR
ES
IT
NL
Question and Answer IconNeed help?

Do you have a question about the Venga VG RVC 3002 and is the answer not in the manual?

Overview

This document describes the Venga! VG RVC 3002 robot vacuum cleaner.

Function Description

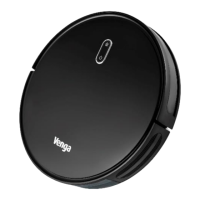
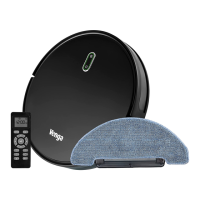
The Venga! VG RVC 3002 is a robot vacuum cleaner designed for indoor cleaning of various floor types, including wood floors, rubber floors, ceramic tiles, and short-haired carpets. It features both vacuuming and mopping functions. The device can be controlled via an ON/OFF button, a remote control, or a dedicated app with Alexa/Google Assistant integration. It offers multiple cleaning modes, including Auto Cleaning, Spot Cleaning, Edge Cleaning, and Max Cleaning, as well as a scheduling function. The robot is equipped with anti-fall sensors to prevent it from falling down stairs and anti-collision sensors to avoid obstacles. It automatically returns to its charging station when the battery is low or cleaning is complete.

Important Technical Specifications

The robot vacuum cleaner operates on a 14.4V Li-ion battery with a capacity of 3200mAh. It supports 2.4GHz Wi-Fi for app connectivity. The dust tank and water tank are integrated, allowing for both dry vacuuming and wet mopping. The device includes a primary filter and a HEPA filter for efficient dust collection. The charging station has a signal emitter window, an indicator light, a power adaptor plug, and load contact points.

Usage Features

Charging: Before first use, the battery needs a full charge, which takes approximately 4 hours. The robot should be charged at room temperature between 4 and 40°C. To charge, connect the power adapter to the charging station and plug it into an electrical outlet. The robot will automatically return to the charging station if it's connected. A flashing green LED indicates a low battery, breathing green means charging, permanent green means fully charged, flashing blue means standby, and permanent blue means vacuuming is operating.

Installation: Side brushes are installed by pushing them into the slots on the underside of the robot, ensuring the correct "L" or "R" placement. The main power switch is located on the side of the robot.

Quick Start: Turn on the main power switch. Press the ON/OFF button to wake up the robot from sleep mode or to start cleaning. Press it a second time to pause cleaning, and again to resume. Press the "Back to Base" button on the remote control to send the robot back to the charging station.

Remote Control: The remote control requires 2 AAA batteries. It allows users to start/stop cleaning, return the robot to the charging station, and guide the robot forward/backward and left/right.

Cleaning Modes:

  • Auto Cleaning Mode: The robot cleans and combines different cleaning modes to optimize cleaning of the house. It returns to the charging station when cleaning is finished.
  • Spot Cleaning Mode: The robot focuses on a designated spot, cleaning with horizontal and vertical paths.
  • Edge Cleaning Mode: The robot cleans along the walls.
  • Max Cleaning Mode: Increases suction power for thorough cleaning.

Floor Mopping: To use the mopping function, fill the water tank and attach the mop. The robot is equipped with a water tank with drip-stop control. The water flow can be adjusted via the remote control (closed, low, medium, high). It is important not to use the mop outdoors or on carpets.

Time Setting: The robot's clock can be set using the remote control, including the date and time, and a cleaning schedule can be programmed.

App Operation: The Venga! VG RVC 3002 can be connected to an app for advanced control, including:

  • App Settings: Connects to Alexa / Google Assistant, manages notifications.
  • Current status: Displays the robot's current status.
  • Position: Shows the robot's position on the map.
  • Restricted Area/Virtual Wall: Allows setting virtual walls or restricted zones where the robot should not enter.
  • Room Editing: Enables naming different rooms in the house.
  • Robot Settings: Creates a cleaning schedule, adjusts mop dripping, volume settings.
  • Automatic Cleaning Mode: Starts cleaning and combines different modes.
  • Spot Cleaning Mode: Designates a spot for focused cleaning.
  • Select Room: Cleans a specific room.
  • Cleaning Zone: Assigns a cleaning zone on the map.
  • Return to the charging station: Stops the cleaning cycle and instructs the robot to return to the charging station.

Maintenance Features

Regular maintenance is crucial for the robot's performance and longevity.

Dust Tank:

  • Empty the dust tank after each use.
  • Remove the primary filter and HEPA filter by grasping the yellow tab.
  • Shake off debris and dust from the filters.
  • Wash the dust tank frame with clear water and ensure it is completely dry before re-inserting the filters. The HEPA filter should not be washed with water.

Water Tank:

  • Empty and clean the water tank after each use.
  • Remove the primary filter and HEPA filter from the water tank assembly.
  • Shake off debris and dust from the filters.
  • Wash the water tank frame with clear water and ensure it is completely dry before re-inserting the filters.

Mop:

  • Remove the mop from the water tank.
  • Wash the mop with water and let it dry.

Central and Side Brushes:

  • Remove the central brush's cover by pressing the two locks, take out the brush, clean the compartment and the vacuuming channel with a damp cloth.
  • Clean the rolling brush from hair, threads, or yarn using the cleaning tool.
  • Remove the side brushes, clean them with a damp cloth, and ensure they are correctly placed ("L" or "R").

Wheels, Sensors, and Load Contacts:

  • Carefully pull out the swivel wheel with a flat screwdriver, clean it, and apply mechanical grease to the bar for better rotation.
  • Dust off the cliff sensors and the front bumper.
  • Clean the load contact points of the charging dock and the robot with a dry cloth.

Recommended Cleaning/Replacement Frequency:

  • Dust tank: After each use (cleaning), - (replacing)
  • Filters: Once every week (cleaning), Every 2 months (replacing)
  • Central brush: Once every week (cleaning), Every 6-12 months (replacing)
  • Side brushes: Once every month (cleaning), Every 3-6 months (or when visibly worn) (replacing)
  • Sensors: Once every month (cleaning), - (replacing)
  • Charging pins: Once every month (cleaning), - (replacing)
  • Swivel wheel: Once every month (cleaning), - (replacing)

Troubleshooting: The robot provides LED signals for distress.

  • Green and blue LED flashing alternately: Side brush/rolling brush failure. Check and clean the brushes.
  • Blue and turquoise LED flashing alternately: Front bumper / cliff sensor failure, Robot picked-up from the ground. Check and clean the cliff sensors and the front bumper. Put the robot on a stable surface.
  • Turquoise LED flashing quickly: Fan failure. Check the fan condition.

Environmental Protection: The device should be disposed of in an ecological manner, separating it from unsorted municipal waste. Batteries should be removed and disposed of at a designated collection point. If battery liquid comes into contact with skin or clothes, clean immediately with clear water and consult a doctor. Repairs should only be performed by a competent qualified electrician.

Venga VG RVC 3002 Specifications

General IconGeneral
BrandVenga
ModelVG RVC 3002
CategoryVacuum Cleaner
LanguageEnglish

Related product manuals