EasyManua.ls Logo

Venstar T1100RF User Manual

Venstar T1100RF
22 pages
To Next Page IconTo Next Page
Page #1 background imageLoading...
Page #1 background image
Venstar Inc. 08/07
Use with most Air Conditioning & Heating Systems including: 1 or 2 Stage
Electric Cooling & 2 Stage Gas Heating, Heat Pump, Electric or Hydronic Heat.
Thermostat
Thermostat
residential
T1100RF
PROGRAMMABLE
7-DAY
PROGRAMMABLE
7-DAY
up to
& 2-cool
up to
& 2-cool
2-heat
2-heat
WIRELESS
THERMOSTAT
OWNERS
MANUAL
OWNERS
MANUAL
Digital
Digital
HEAT
COOL
HEAT
PUMP
Control up to 2 Heat & 2 Cool Stages
Full Range of Compatibility for Use on
Gas/Electric, HP, Electri and Hydronic Heat
7-Day Programmable
4 Settings/Day
Auto Changeover
5 minute Built-In Compressor Protection
Self-Prompting Programming w/ Copy
Full Electronic
Display Either F or C
Back-Lit Display
Keypad Lockout
Large Easy-to-Read Display
Programmable Fan
Dual Setpoint w/ Adjustable Deadband
‘O’ or ‘B’ Terminal
Optional Power Supply (ACC0800)
Non-Volatile Memory
Wireless: Transmits up to 500 feet,
through walls and floors - 418 MHZ
will not interfere with other systems
Receiver capable of listening to up
to 4 thermostats
Thermostat capable of transmitting
to multiple receivers
No wires to run
Ideal for century old homes
Ideal for keeping the baby’s room
the perfect temperature
Unique Features
Applications
Question and Answer IconNeed help?

Do you have a question about the Venstar T1100RF and is the answer not in the manual?

Venstar T1100RF Specifications

General IconGeneral
DisplayLCD
WirelessYes
Temperature Range40°F to 99°F
Weight0.5 lbs
Power SourceBattery
Programmability7-Day
Remote Sensor CapabilityYes
RangeUp to 300 feet

Summary

Front Panel Overview

Liquid Crystal Display

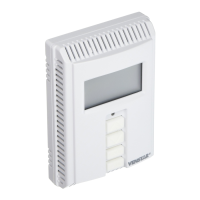
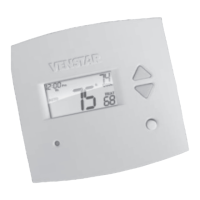
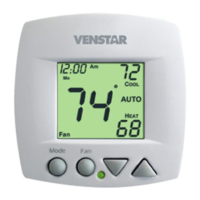
Primary display screen with Thermoglow technology.

Up/Down Buttons

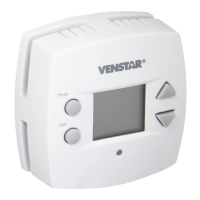
Buttons used for adjusting temperature setpoints.

Mode Button

Button to select operating modes like Heat, Cool, Auto.

Fan Button

Button to control fan operation modes.

Transmission Indicator

Shows wireless communication status with the receiver.

Display Screen Elements

Mode Indicators

Icons indicating system mode: HEAT, COOL, AUTO, PROGRAM ON, OFF.

Clock and Day Display

Shows current time and day, used for programming schedules.

Room Temperature Display

Indicates the current ambient temperature of the room.

Desired Setpoint Display

Shows the target temperature for heating or cooling.

Period Icons

Icons indicating program periods: Morning, Day, Evening, Night.

Status Icons

Icons for Setup mode, Fan On, and Keypad Lockout.

Quick Start Guide

Setting the Clock

Step-by-step instructions for setting the current time.

Setting the Day

Instructions for setting the current day of the week.

Selecting Operating Modes

Heating Only Mode

Configures the system to provide heat only.

Cooling Only Mode

Configures the system to provide cooling only.

Auto Mode

Automatically switches between heating and cooling based on temperature.

Program On Mode

Activates the programmed daily temperature schedule.

Off Mode

Turns off both heating and air conditioning systems.

Basic Operation

Adjusting Temperature Setpoints

How to change desired heating and cooling temperatures.

Fan Control

Manages continuous fan operation or auto fan mode.

Programming a Daily Schedule

Advanced Setup Procedures

Step 1: Adjust Clock Time

Procedure to set the current time of day.

Step 2: Select Day of Week

Procedure to set the current day of the week.

Step 3: Configure Zoning System

Setting for zoning system, typically left at 'No'.

Step 4: Set House Code

Assigns a house code for wireless communication.

Step 5: Assign Unit ID Number

Assigns a unique ID for thermostats in a multi-unit system.

Step 6: Set 1st Stage Deadband

Adjusts temperature differential for 1st stage heating/cooling.

Step 7: Set Heat/Cool Differential

Sets minimum difference between heat and cool setpoints.

Step 8: Configure Cycles Per Hour

Limits the number of heating/cooling cycles per hour.

Step 9: Control Backlight Operation

Manages the display backlight settings for power saving.

Step 10: Set Programmable Fan Timer

Configures the timer for the programmable fan feature.

Step 11: Select Temperature Units

Chooses between Fahrenheit and Celsius for temperature display.

Advanced Features and Operation

Calibration Procedure

Steps for calibrating the temperature sensor.

Deadband Operation Explained

How deadband affects stage operation.

Factory Defaults Reset

Instructions to restore all settings to factory defaults.

Heat/Cool Differential

Minimum difference between heat and cool setpoints.

Memory Backup

Explains how settings are retained during power loss.

Programmable Fan Timer

Details the programmable fan timing function.

Keypad Lockout

How to disable or enable the thermostat's keypad.

Battery Eliminator

Information about the optional RF power supply adapter.

Low Battery Warning

Indicates when batteries need replacement and its importance.

Battery Replacement

Steps for replacing the thermostat's batteries.

Product Warranty

Related product manuals