12
ELECTRICAL
MAINS
CONNECTION
Installation examples and various fan connection options are given on Fig. 65...71 and on
schematic diagrams 1-12.
To connect the fan to the power mains:
Route the cables through the sealed lead-in in the rear part of the casing;
Strip 7-8 mm of cable ends of insulation, insert them into the corresponding terminals to the
insulation and secure with screws (Fig. 64);
Secure the cables with the retaining clip (Fig. 64);
Assemble the fan: reinstall the cover, filter etc.;
Apply power voltage to the fan (Fig. 75).
ATTENTION
!
ATTENTION
!
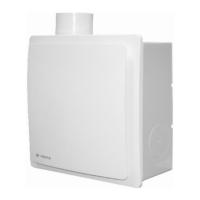
Prior to mounting the fan check the position of back valve 2 which should close under
its own weight at zero air pressure (Fig. 63).
By default the back valve position matches the outlet fitting orientation to the right
or upwards.
If the outlet fitting is faced left during the fan installation remove the back valve
from fitting 1, rotate the valve 180° and reinstall it into the fitting.
For modular air ducts use rectangular-section steel pipes or SPIROVENT spiral-wound
ducts. Use flexible ALUVENT or THERMOVENT ducts for joining air ducts.
The nominal diameter of joining air ducts is 80 mm.
If the joining air duct is mounted inside a brick wall it should be wrapped into PVC
self-adhesive tape to protect against corrosion or cement grout.
ATTENTION
!
VNVN