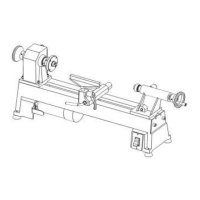
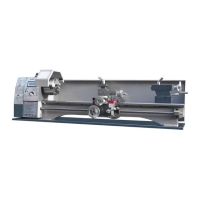
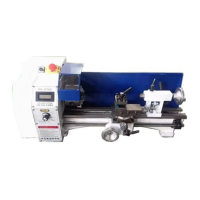
This document provides comprehensive instructions for the VEVOR Micro Wood Lathe, model WL1018, a tool designed for woodworking applications. It emphasizes safety, proper operation, and maintenance to ensure efficient and long-lasting use.
Function Description
The VEVOR Micro Wood Lathe is a machine tool primarily used for shaping wood by rotating a workpiece about an axis of rotation to perform various operations such as cutting, sanding, knurling, drilling, or deformation with tools that are applied to the workpiece to create an object with symmetry about that axis. It is designed for both experienced personnel and those new to lathe operation, provided they carefully read and understand the manual. The lathe allows for the adjustment of the main spindle's speed to accommodate different workpieces and cutting requirements. It facilitates the creation of various wooden objects, from simple turning to more complex disc and bowl work.
Usage Features
The manual outlines several key usage features and operational guidelines:
- Workpiece Preparation: Before cutting, users must first find the center of the square wood and then securely set it at the center of the lathe. For hard wood, a wooden hammer should be used to gently knock the block into place, avoiding metal hammers to prevent damage.
- Safety Precautions during Operation: Emphasizing safety, the manual instructs users to ensure the safety cover is in the correct position before starting the machine. It is crucial to remove the tool rest wrench and chuck key before operation. To prevent accidental starts, the motor power must be turned off before clamping any workpiece or tool. Users are advised not to force cuts, but rather to adhere to the set cutting speed, cutting depth, and feed speed. Only appropriate tools and workpieces should be used for machining.
- Tool Maintenance: Keeping tools sharp and clean is essential for normal and safe operation. Regular lubrication and replacement of accessories are also recommended.
- Machine Adjustments: Before making any adjustments or repairs, the power supply must be disconnected. The position of the rear seat should be adjusted to place the wood between the two tops, then the top sleeve locked, and the wood started. The tail seat hand wheel should be turned to tighten the wood's top into the wood, ensuring the wood becomes one with the top. For hard wood, a small pilot hole should be made in the middle of the wood before placing it between the two tops.
- Knife Frame Height: The knife frame's height should be set 3mm higher than the center line of the main shaft and tail seat. This height varies with the diameter of the wood being cut; larger diameter wood requires a higher knife, while smaller diameter wood requires a lower knife frame.
- Operator Positioning: When using the lathe for the first time, or when changing speed, the operator should stand away from the nose position.
- Cutting Techniques: When cutting wood, the cutting knife must be placed on the cutting holder. If the spindle top is found loose during cutting, the power should be immediately turned off, the tail seat hand wheel readjusted, the wood tightened, and then work resumed. The holder position should not be moved until the operation is complete. For cutting discs and bowls, the wood is installed vertically on the plate and secured with wooden screws. It's vital to ensure the plate is firmly fixed on the spindle before cutting. For larger turning operations, a low spindle speed should be selected first, and the cutting bowl/disc should not be removed from the tail seat to allow for more operating space.
- Environmental Considerations: The machine generates dust, sawdust, and other harmful chemicals during grinding, sawing, and drilling. To mitigate harm, operations should be conducted in a well-ventilated area, and safety devices such as particulate filter masks should be worn.
Maintenance Features
Maintaining the VEVOR Micro Wood Lathe is crucial for its accuracy and service life. The manual provides detailed instructions for proper care:
- Regular Cleaning and Lubrication: To preserve the machine's precision and functionality, it must be treated with care, kept clean, and regularly greased and lubricated. This ensures consistent working quality.
- Power Disconnection: Always disconnect the machine plug from the mains supply before performing any cleaning, maintenance, or repair work.
- Waste Disposal: Oil, grease, and cleaning agents are pollutants and must not be disposed of through drains or normal refuse. They should be disposed of according to current legal environmental requirements. Cleaning rags impregnated with these substances are highly flammable and should be collected in a suitable closed vessel for environmentally sound disposal, not with normal refuse.
- Slide Way Lubrication: All slide ways should be lightly lubricated before every use.
- Chip Management: During operation, chips falling onto the sliding surface must be cleaned promptly. Regular inspections should be conducted to prevent chips from accumulating between the machine tool saddle and the lathe bed guide way. Asphalt felt should also be cleaned periodically.
- Post-Operation Care: After each day's operation, all chips should be removed, different parts of the machine tool cleaned, and machine tool oil applied to prevent rusting.
- Maintaining Machining Accuracy: Care should be taken with the center to maintain machining accuracy. The surfaces of the chuck and guide way should be protected from mechanical damage and wear due to improper guidance.
- Prompt Repairs: If any damage is found, maintenance should be performed immediately.
- Qualified Personnel for Repairs: Repair work, especially electrical work, must only be carried out by qualified personnel with the corresponding mechanical and electrical knowledge. Unauthorized electrical work can lead to serious injury and damage to machinery and property.
- Grounding: In case of malfunction or breakdown, proper grounding provides a path of least resistance for electric current, reducing the risk of electric shock. The tool is equipped with an electric cord that has an equipment grounding conductor and a grounding plug. The plug must be connected to a matching, properly installed, and grounded outlet in accordance with local codes. The plug should not be modified. If it doesn't fit, a qualified electrician should install the correct outlet. Improper connection of the grounding conductor can result in electric shock. The conductor with green insulation (with or without yellow stripes) is the equipment grounding conductor. If the electric cord or plug needs repair or replacement, it's crucial not to connect the equipment grounding conductor to a live terminal. If unsure about grounding instructions, consult a qualified electrician or service person. Only three-wire extension cords with 3-prong grounding type plugs and 3-hole receptacles that accept the tool's plug should be used. Damaged or worn cords should be repaired or replaced immediately. The receptacle must be properly grounded; if unsure, a certified electrician should check it.