MAINTENANCE
AND
TECHNICAL
INFORMATION
WARNING:
Disconnect spark plug lead
from
spark plug and
wedge
the
terminal
between
cylinder head fins. Ensure
throttle
control
is
set in
"STOP"
position
to
eliminate
fire risk before
attempting
to
clean
mower,
fit
new
blades, or carry
out
any
maintenance
or repairs.
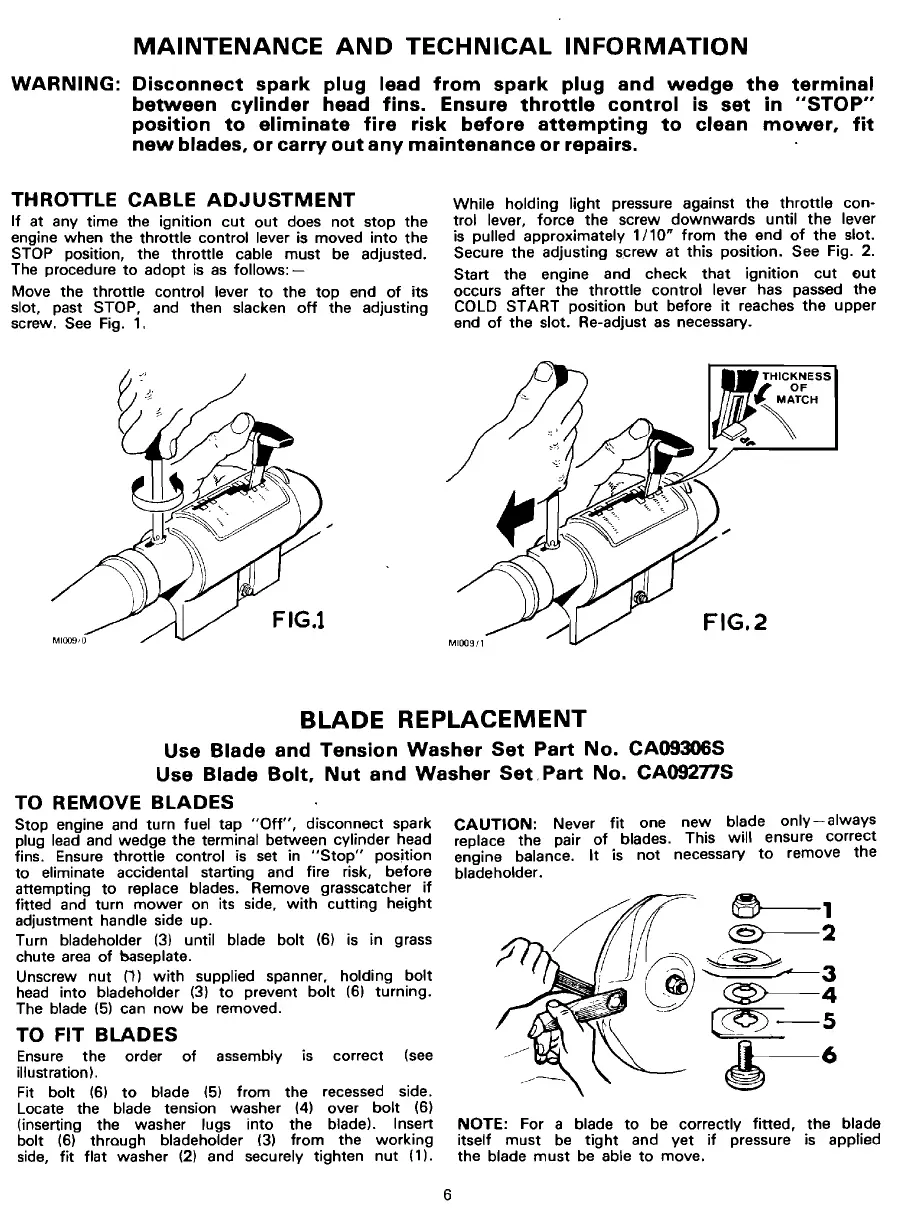
THROTTLE CABLE
ADJUSTMENT
If
at any time the ignition
cut
out
does
not
stop
the
engine when the
throttle
control lever is moved
into
the
STOP position, the
throttle
cable
must
be adjusted.
The procedure
to
adopt
is
as
follows:-
Move the
throttle
control lever
to
the
top
end
of
its
slot, past STOP, and then slacken
off
the adjusting
screw. See Fig.
1.
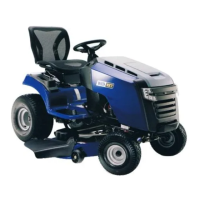
While
holding light pressure against
the
throttle
con-
trol lever,
force
the screw
downwards
until
the
lever
is pulled approximately
1/10"
from
the
end
of
the
slot.
Secure
the
adjusting screw
at
this
position. See Fig. 2.
Start the engine and check
that
ignition
cut
out
occurs
after
the
throttle
control
lever has passed
the
COLD
START
position
but
before
it
reaches
the
upper
end
of
the slot. Re-adjust as necessary.
I
THICKNESS
"
OF
",.~TCH
...
FIG.2
BLADE REPLACEMENT
Use Blade and Tension
Washer
Set
Part
No.
CA09306S
Use Blade
Bolt.
Nut
and
Washer
Set.
Part
No.
CA092nS
TO
REMOVE
BLADES
Stop engine and turn fuel tap
"Off",
disconnect spark
plug lead and wedge
the
terminal between cylinder head
fins. Ensure
throttle
control is set in
"Stop"
position
to
eliminate accidental starting and fire risk, before
attempting
to
replace blades. Remove grasscatcher
if
fitted and turn
mower
on its side,
with
cutting
height
adjustment handle side up.
Turn bladeholder
(3)
until blade
bolt
(6) is in grass
chute
area
of
baseplate.
Unscrew
nut
(1)
with
supplied spanner, holding
bolt
head into bladeholder (3)
to
prevent
bolt
(6)
turning.
The blade
(5)
can
now
be removed.
TO FIT BLADES
Ensure
the
order
of
assembly is correct (see
illustration).
Fit bolt
(61
to
blade (5) from the recessed side.
Locate the blade tension washer (4) over
bolt
(6)
(inserting the washer lugs into the blade). Insert
bolt
(6)
through bladeholder (3)
from
the
working
side,
fit
flat washer (2) and securely tighten
nut
(1).
CAUTION:
Never
fit
one
new
blade
only-always
replace the pair
of
blades. This
will
ensure
correct
engine balance.
It
is
not
necessary
to
remove
the
bladeholder.
NOTE: For a blade
to
be correctly
fitted,
the
blade
itself
must
be
tight
and
yet
if
pressure is applied
the blade
must
be able
to
move.
6