- V1.0 - 3820
- V2.9.21
www.vidaXL.com
vidaXL | Haba Trading B.V. | Mary Kingsleystraat 1| 5928SK Venlo | The Netherlands
vidaXL | HB Commerce PTY LTD | Level 16, 201 Elizabeth Street | Sydney NSW 2000 | Australia
vidaXL | vidaXL LLC | 2000 W. Baseline Road | Rialto CA 92376 | United States
SKU : 41172+43867
Batch Nr : 2001601009
EN
1 Introducon
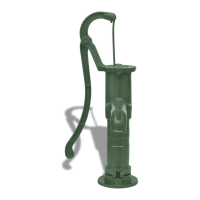
The shallow well hand pitcher pump can be used to pump water from rain barrels or ponds. Pitcher Pumps
can also be used as a drinking-water pump to draw water from a well. The water level must be less than 6m
from the boom of the pump. Note: This is where the water is actually being pulled from. It is aached to
common plumbing connectors, and it is very easy to install.
2 Warnings and personal safety
• Read and follow all safety instrucons given in this manual carefully.
• Do not allow the pump to freeze. Doing so will void the warranty.
• Only pump water with this pump.
• Inspect the pump for any damages periodically.
3 Parts list
Exploded view
See image 1
No. Designaon Quanty No. Designaon Quanty
1 Flange 1 2 Sealing Gasket 1
3 Plug Valve 1 4 Pump body 1
5 Spout 1 6 Plunger Valve 1
7 Cup Leather Holder 1 8 Plunger Valve Cage 1
9 Cup Leather 1 10 Fastening Bolt 2
11 Li Rod 1 12 Long Pin 1
13 Top Cap 1 14 Handle 1
15 Short Pin 1 16 Fastening Bolt For Top Cap 2
17 Fastening Bolt For Spout 2 18 Spout Gasket 1
19 Plug Valve Gasket 1 20 Short Pin For Plunger Valve Cage 1
4 Assembly instrucons
See image 2
Aach the pump to the pump stand with the M8 or M10 screws. Note: The screws are not included. Please
purchase it separately before installaon.
See image 3
5 Operaon Guide
5.1 Drop-Pipe Installaon
• You will need 1¼ inch steel pipe with threads or 1 ¼ inch PVC pipe with a 1¼ inch male adapter.
• Fasten a drop-pipe to the boom of the pump. Note: The drop-pipe should be the same size as the
connecon on the pump. The drop-pipe should be submerged at least 1.5m.
• Tighten the drop-pipe enough to prevent leaks. NOTE: Any small leaks can prevent the pump from
priming.
Sealing Pipe Joints
• Thread tape or a good quality thread sealant should be used on all pipe threads. NOTE: Do not use thread
tape with PVC pipe.
• Use only thread tape or Teflon-based joint compounds for connecng metal to metal on the pump itself.
• Make sure that all pipe joints in the sucon pipe are airght as well as waterght.
• If the sucon pipe draws air, the pump will not be able to pull water from the well.
5.2 Priming The Pump
• Do not operate the pump if it is dry. Operang the pump without water may damage the leather cup.
Always fill the pump with water before starng the pump.
• To prime the pump, pour water on the top of the pitcher pump unl it runs out of the spout.
• Wait 5 minutes unl the cup leather swells enough to make contact with the pump wall.
• Raise and lower the handle in short strokes unl the sucon pipe fills with water. (NOTE: Any leak on the
sucon side will prevent the pump from priming.)
5.3 Freezing Protecon
• During frost or cold weather, the plug valve gasket (19) and the cup leather (9) may freeze to the pump
body. If you start pumping while the parts are frozen, these two pieces may tear, damaging the pump.
• You can protect the pump against freezing by keeping the handle in the ‘upward’ posion. That way, the
pitcher pump will self-drain.
6 Maintenance and cleaning
6.1 Trouble Shoong
If your pump does not pump:
• Open the pump and make sure the sealing gasket (2) is not broken. Ensure it is centred over the hole.
• Make sure the cup leather (9) and the gaskets are not damaged.
• Reassemble the body and ensure the bolts are ghtened enough to prevent air from entering into the
base.
• Check for leaks around the joints. Tighten clamps or add thread tape as needed. Replace defecve
fasteners.
• Make sure the pipe end is submerged in the water.
• Use plenty of clean water when priming. The cup leather (9) will expand as it absorbs water. Let the cup
leather absorb water for a few hours and try again.
• Make sure you are not trying to li water more than 6m. Note: It must be measured from the water
surface to the spout.
• At higher elevaons, the depth of the water to be pumped is being reduced. At sea level and under ideal
condions, this pump will li to a maximum of about 6m.
6.2 Maintenance
See image 4
6 Note: Please refer to the maintenance secon.
Replacing The Cup Leather
1. Loosen the fastening bolt of the top cap (16) and li the plunger assembly out of the pump.
2. Unscrew the cup leather holder (7).
3. Remove the old cup leather (9) and put a new cup leather.
4. Screw the cup leather holder (7) back into the original posion.
5. Reinstall the plunger assembly and top cap (13).
6. Insert the fastening bolt (16) and ghten it.
Replacing The Plug Valve Gasket And The Sealing Gasket
1. Unscrew the fastening bolt (10) and remove the pump body (4) from the flange (1).
2. Take out the plug valve (3), remove the old plug valve gasket (19) from the plug valve and then put a new
plug valve gasket.
3. Remove the old sealing gasket (2) from the flange (1) and replace it with a new sealing gasket on the
flange. NOTE: Before placing the new sealing gasket on the flange (1), clean the flange by removing dirt/
debris that could be le in it.
4. Place the plug valve (3) back into the original posion.
5. Reaach the pump body (4) to the flange (1) by ghtening the fastening bolt (10).
DE
1 Einleitung
Mit der Schwengelpumpe für Flachbrunnen kann Wasser aus Regentonnen oder Teichen gepumpt werden.
Schwengelpumpen können auch als Trinkwasserpumpe verwendet werden, um Wasser aus einem Brunnen
zu ziehen. Der Wasserstand muss dabei weniger als 6 m vom Boden der Pumpe enernt sein. Hinweis: Von
hier wird das Wasser tatsächlich gezogen. Es wird an gängigen Sanitäranschlüssen befesgt und ist sehr
einfach zu moneren.
2 Warnung und persönliche Sicherheit
• Lesen und befolgen Sie alle Sicherheitshinweise aus dieser Bedienungsanleitung mit Sorgfalt.
• Lassen Sie die Pumpe nicht einfrieren. Andernfalls erlischt die Garane.
• Pumpen Sie nur Wasser mit dieser Pumpe.
• Überprüfen Sie die Pumpe regelmäßig auf Beschädigungen.
3 Liste der Bestandteile
Explosionszeichnung
Siehe Bild 1
Nr Bezeichnung Anzahl Nr Bezeichnung Anzahl
1 Flansch 1 2 Dichtung 1
3 Hahn 1 4 Pumpenkörper 1
5 Ausguss 1 6 Ringkolbenvenl 1
7 Lederdichtung-Halter 1 8 Ringkolbenvenl-Körper 1
9 Lederdichtung 1 10 Befesgungsschraube 2
11 Hubstange 1 12 Langer S 1
13 Oberkappe 1 14 Gri 1
15 Kurzer S 1 16 Befesgungsschraube für Oberkappe 2
17 Befesgungsschraube für Ausguss 2 18 Ausguss-Dichtung 1
19 Hahn-Dichtung 1 20 Kurzer S für Ringkolbenvenl-
Körper
1
4 Montageanleitung
Siehe Bild 2
Befesgen Sie die Pumpe am Pumpenständer mit M8- oder M10-Schrauben. Hinweis: Die Schrauben sind
nicht im Lieferumfang enthalten. Bie erwerben Sie sie separat vor der Installaon.
Siehe Bild 3
5 Bedienungsanleitung
5.1 Montage des Fallrohrs
• Sie benögen ein Stahlrohr von 1¼ Zoll mit Gewinden oder ein PVC-Rohr von 1 ¼ Zoll mit einem
Steckeradapter von 1¼ Zoll.
• Befesgen Sie ein Fallrohr an der Unterseite der Pumpe. Hinweis: Das Fallrohr sollte die gleiche Größe
haben wie der Anschluss an der Pumpe. Das Fallrohr sollte mindestens 1,5 m untergetaucht sein.
• Ziehen Sie das Fallrohr fest genug an, um Undichgkeiten zu vermeiden. Hinweis: Kleine Undichgkeiten
können das Ansaugen der Pumpe verhindern.
Abdichtung der Rohrverbindungen
• Für alle Rohrgewinde sollte ein Gewindeband oder ein Gewindedichtmiel guter Qualität verwendet
werden. HINWEIS: Verwenden Sie kein Gewindeband für das PVC-Rohr.
• Verwenden Sie nur Gewindeband oder Fugendichtstoe auf Teflonbasis, um Metall mit Metall an der
Pumpe selbst zu verbinden.
• Stellen Sie sicher, dass alle Rohrverbindungen im Saugrohr sowohl ludicht als auch wasserdicht sind.
• Wenn das Saugrohr Lu ansaugt, kann die Pumpe kein Wasser aus dem Brunnen ziehen.
5.2 Vorbereitung der Pumpe
• Betreiben Sie die Pumpe nicht, wenn sie trocken ist. Wenn Sie die Pumpe ohne Wasser betreiben, kann
die Lederdichtung beschädigt werden. Füllen Sie die Pumpe immer mit Wasser, bevor Sie die Pumpe
starten.
• Um die Pumpe betriebsferg zu machen, gießen Sie Wasser auf die Oberseite der Schwengelpumpe, bis
es aus dem Ausguss herauskommt.
• Warten Sie 5 Minuten, bis die Lederdichtung so stark anschwillt, dass sie die Pumpenwand berührt.
• Heben und senken Sie den Gri in kurzen Hüben, bis sich das Saugrohr mit Wasser füllt. (Hinweis: Eine
Undichgkeit auf der Saugseite wird das Ansaugen der Pumpe verhindern.)
5.3 Frostschutz
• Bei Frost oder Kälte können die Hahndichtung (19) und die Lederdichtung (9) am Pumpengehäuse
einfrieren. Wenn Sie die Pumpe starten, während die Teile eingefroren sind, können diese beiden Teile
zerreißen und die Pumpe beschädigen.
• Sie können die Pumpe vor Frost schützen, indem Sie den Gri nach oben halten. Auf diese Weise entleert
sich die Schwengelpumpe von selbst.
6 Pege und Reinigung
6.1 Fehlerbehebung
Wenn Ihre Pumpe nicht pumpt:
 Loading...