66550033-EN - V6.1 - 15/08/20
- 28 -
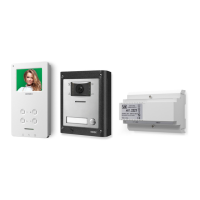
ESVK/6388 Series “2 wire Bus” videokit
ESVK/6388 Series - Installation handbook
Art.2321-2321/P Power supplies
65
157,5
105
Art.2321
0V
230V
+
_
BUS
Fig. 1
Fig. 2
DESCRIPTION
These two power supplies are specically designed for VX2300
digital system.
The Art.2321 can be used for systems with 1 entrance up to 20 users.
Art.2321/P is for systems with more than 1 entrance and up to 40 users.
For more than 40 users it is necessary to add a Art.2321/P to the BUS.
CONNECTION TERMINALS AND JUMPERS
0
Mains input
~230V
BUS +
BUS terminals
BUS –
BUS +
BUS terminals (only Art.2321/P)
BUS –
V1 Jumper to adjust the output voltage (only Art.2321/P).
V1=Low, V2=Medium, V3=Maximum. Set to maximum
(V3) when the unit is used together with Art. 2301N,
otherwise leave in a low or medium position.
V2
V3
CONNECTION TO MAINS
WARNING!
The system must be installed only by a qualied
eletrician and in accordance with national rules in force
and installation diagrams (if provided).
In particular we recommend that:
The system is connected to the mains through an all-pole
circuit breaker which has a contact separation of at least
3mm in each pole and shall connect all poles simultaneously;
The all-pole circuit breaker shall be placed for ease of ac-
cess and the switch shall remain readily operable.
Only for indoor use in dry places. Do not execed the maxi-
mum power load indicated.
MOUNTING INSTRUCTIONS
Fig. 3
1
2
Fig. 4 Fig. 5 Fig. 6
1. Remove the terminal side covers by unscrewing the retaining screws (Fig. 3);
2. Fix the power supply to a DIN rail (Fig. 4) or directly to the wall using two expansion type screws (Fig. 5);
3. Isolate the mains using the circuit breaker mentioned above then make the connections as shown on the installation diagrams (if provided);
4. Check all connections and secure the wires into the terminals;
5. When all connections are made replace and x the terminal covers with the relevant screws (Fig. 6);
6. Restore the mains.
SPECIFICATION
Housing/Mounting: 9 Module A Type DIN box (Art.2321) –
12 Module A Type DIN box (Art.2321/P)
/ DIN Bar or directly to the wall
Controls: Voltage amplication (3 levels)
Power Supply: 230 Vac
Working Temperature: -20 +60°C
ART.2321 ELECTRICAL DATA
Mains voltage: 230 Vac ~ 50/60 Hz
Output voltage: 32 Vdc 0.8 A
Internal fuse: -
ART.2321/P ELECTRICAL DATA
Mains voltage: 230 Vac ~ 50/60 Hz
Output voltage: 35 Vdc 1.5 A
Internal fuse: T 350 mA L 250