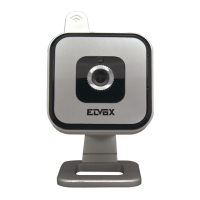
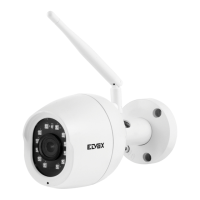
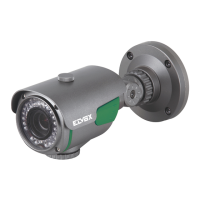
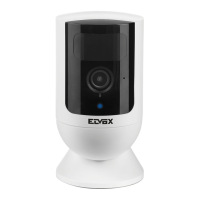
Telecamere Wi-Fi
17
IT
EN
11 - FAQ
- Come connettersi alla telecamera
Per poter accedere all’applicazione la prima volta, sarà necessario aver
eettuato il login con l’utente amministratore opportunamente creato e
registrato in fase di avvio.
Per eettuare il login, seguire le indicazioni riportate sulla pagina di
avvio dell’APP.
- Aggiunta della telecamera
1- Alimentare e accendere la telecamera.
2- Avviare l'APP sul telefono e fare clic su "+" nella parte superiore
destra della home page per aggiungere la telecamera.
3- Impostare la telecamera nello stato di congurazione e accesso
alla rete Wi-Fi.
Il led indicatore Wi-Fi lampeggia velocemente (2 lampeggi al secondo)
- Come impostare la telecamera nello stato di congurazione
Nel caso in cui l’indicatore non lampeggiasse, la telecamera è dotata
di pulsante di ripristino, premere il pulsante di ripristino per riavviare la
telecamera (circa 10 sec.) e abilitare lo stato di congurazione iniziale.
- Connessione alla propria rete Wi-Fi
1- Abilitare la connessione Wi-Fi del telefono e selezionare la rete Wi-Fi
del proprio router con connessione a Internet.
2- Quando verrà richiesta dall’app, inserire la password Wi-
Fi del router, fare clic su "OK" per accedere al processo di
congurazione della rete.
ATTENZIONE: è supportata solo la connessione alle reti Wi-Fi a
2.4GHz.
Vericare che il proprio router stia distribuendo il servizio Wi-Fi a
2.4GHz e che lo smartphone sia connesso alla stessa rete.
Verrà visualizzata una schermata con lo stato delle fasi di congurazione.
Attendere alcuni secondi per il completamento e vericare l’esito positivo
sull’APP.
- Come risolvere i problemi di rete se l'aggiunta della
telecamera non è riuscita
1- Assicurarsi che la telecamera sia alimentata e accesa.
2- Assicurarsi che la telecamera si trovi nello stato di congurazione
di rete Wi-Fi.
3- Assicurarsi che la telecamera, lo smartphone e il router siano vicini
l'uno all'altro.
4- Assicurarsi che il router e lo smartphone siano connessi tramite
Wi-Fi.
5- Assicurarsi che la password inserita per il Wi-Fi del router sia
corretta.
6- Assicurarsi di aggiungere la telecamera utilizzando la banda di
frequenza Wi-Fi 2.4GHz, il Wi-Fi deve essere acceso e non deve
essere impostato sullo stato nascosto.
7- Assicurarsi che la modalità di crittograa dell'impostazione
wireless del proprio router sia impostata su tipo WPA2-PSK, il
tipo di autenticazione impostato su AES o entrambi impostati sulla
modalità automatica. La modalità wireless non può essere 802.11n
only.
8- Assicurarsi che il nome del Wi-Fi del router (SSID) non sia
composto da caratteri speciali.
9- Se il numero di dispositivi a cui è stato permesso l'accesso alla rete
Wi-Fi ha raggiunto il limite massimo consentito dal router, si può
provare a disabilitare la funzione Wi-Fi di qualche dispositivo per
liberare spazio nel canale Wi-Fi.
10- Se nel router è abilita la funzione di ltraggio degli indirizzi MAC
wireless, provare a spostare la telecamera fuori dall'elenco di
ltraggio MAC del router per assicurarsi che il router non blocchi il
dispositivo in rete.
- Cosa fare se la telecamera risulta oine
1- Vericare che la telecamera sia correttamente alimentata
2- Vericare la stabilità della rete in cui si trova la telecamera.
Utilizzare per esempio un PC o il cellulare connesso alla stessa rete
Wi-Fi e posizionarlo nelle immediate vicinanze della telecamera,
quindi provare ad accedere ad una pagina web internet;
3- Vericare che la rete Wi-Fi domestica non abbia subito modiche,
11 - FAQs
- How to link up to the camera
In order to access the application for the rst time, you will need to log
in with the administrator username created specically and registered
during start-up.
To log in, follow the instructions provided on the App start-up page.
- Adding a camera
1- Power on and turn on the camera.
2- Start the App on your phone and click on "+" at the top right of the
home page to add the camera.
3- Set the camera in conguration mode and access the Wi-Fi
network.
The Wi-Fi indicator LED ashes quickly (2 ashes per second)
-
How to set the camera to conguration state
If the indicator does not ash, the camera has a reset push button;
press the reset push button to restart the camera (approx. 10 sec.) and
enable the initial conguration state.
- Own Wi-Fi network connection
1- Enable the Wi-Fi connection on the phone and select the Wi-Fi
network of your own router with Internet connection.
2- When prompted by the App, enter the Wi-Fi password of the router,
click on "OK" to access the network conguration process.
CAUTION: connection to 2.4Ghz Wi-Fi networks only is supported.
Check that your router is distributing the Wi-Fi service at 2.4GHz and
that the smartphone is connected to the same network.
The screen displayed shows the state of the conguration phases. Wait
a few seconds for completion and check the positive outcome on the
App.
- How to solve network problems if the camera addition was
unsuccessful
1- Make sure the camera is powered and turned on.
2- Make sure the camera is in the Wi-Fi network conguration state.
3- Make sure the camera, the smartphone and the router are close
together.
4- Make sure the router and the smartphone are connected via Wi-Fi.
5- Make sure the password entered for the Wi-Fi of the router is
correct.
6- Make sure you are adding a camera using the Wi-Fi 2.4GHz
frequency bandwidth, the Wi-Fi must be turned on and must not be
set to hidden state.
7- Make sure your router’s wireless setting encryption mode is set
to WPA2-PSK, the type of authentication set to AES or both set to
automatic mode. The wireless mode cannot be 802.11n only.
8- Make sure the name of the router Wi-Fi (SSID) does not comprise
any special characters.
9- If the number of devices granted access to the Wi-Fi network has
reached the maximum limit permitted by the router, you can try to
disable the Wi-Fi function of a device to free up space in the Wi-Fi
channel.
10- If the MAC wireless address ltering function is enabled in the
router, try to move the camera outside the list of MAC ltering of
the router to make sure the router does not block the device in the
network.
- What to do if the camera is oine
1- Make sure the camera is powered correctly
2- Check the stability of the network the camera is in.
Use for instance a PC or your mobile phone connected to the same
Wi-Fi network and place it in the immediate vicinity of the camera,
then try to access a website page;
3- Check that the domestic Wi-Fi network has not been modied, for
instance the Wi-Fi name (SSID), the password, etc. If this is the
case, reset the camera and add it again using the adding method
described above.
To remove the camera from the App, following the device removal
method set out below:
• Open the Vimar View Product App to access the live control page
of the camera, click on the "
...
" symbol in the top right corner to
 Loading...