!
D#305291!MCT#340!SMA!Insta llatio n !In str u ctio n s ! 1!
MCT$340 SMA
Door$/$Window$Sensor$
Installation$Ins tru c tio n s!
!
1.! INTRODUCTION
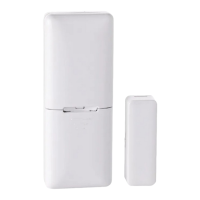
The! MCT#340! is! a! fully! supervised,! wireless! magnetic! door! /! window!
sensor,! for! use! with! ZigBee! enabled! home! security! panels.! The! sensor!
includes! a! built#in! reed ! switch! (that! opens! upo n ! removal! of! a! magne t!
placed!near!it).!!
The!MCT#340!tamper!switch!is!activated!when!the!cover!is!removed.!
A! periodic! supervision! message! is! transmitted! automatically.! The! target!
receiver! is! thus! informed,! at! regular! intervals,! of! the! unit’s! active!
participation!in!the!system.!
Operating!power!i s!obtai ned!from!an!on#boar d!3!V!Lithium!battery .!When!the!
battery!voltage!is!low,!a!“low!battery”!message!will!be!sent!to!the!receiver!60!
days!before!expiration!of! batter y!li fe!(for!operation!in!room!temperature).!
Figure'1'–'
External'
View!
2.! SPECIFICATIONS
WIRELESS$
Supported$Network:!ZigBee!H.A!1.2!
Frequency:!2.4!GHz!as!per!IEEE!802.15.4$
Tamper$Alert:!Reported!when!a!tamper!event!occurs!and!in!any!
subsequent!message,!until!the!tamper!switch!is!restored.!
ELECTRICAL$
Internal$Battery:!3V!Lithium!battery,!type!CR2032.!Use!Varta!only.!
Nominal$Battery$Capacity:$230!mAh!
Battery$Life$Expectancy:$3!years!(for!typical!use).!
Note:!Inability)to)co n n e c t)with)wireless)network,)or)wireless)link)qu ality )no)
higher)than)20%)may)significantly)reduce)the)expected)battery)life.)
Battery$Power$Test:$Performed!immediately!upon!battery!insertion!and!
periodically!every!several!hours.$
Battery$Supervisio n:!Automatic!transmission! of! batt ery! condi ti on!data!as!
part!of!any!status!report.!
ENVIRONMENTAL!!
Operating$Temperature:$0°C!to!55°C!(32°F!to!131°F).!
Dimensions:$66!x!25!x!10!mm!(2#9/16!x!1!x!6/16!in.)$
Weight$(including$battery):!15g!(0.5!oz)!
3.! ACTIVATING AND PAIRING THE SENSOR
To!pair!the!sensor!to!the!security!panel,!you!must!set!it!to!pairing!mode.!
1.!First!set!the!pane l!to!p a ir in g !m o d e !a n d !th e n !th e !s e n so r.!
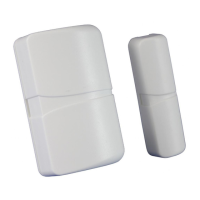
2.!To!activate,!pull!the!activation!strip!(from!either!side)!that!p ro tr u de s !
from!the!back!of!the !sensor.!
3.!The! LED!bli nks!3! times! every! 5!seconds!(repeated!for!up!to!20!times)!to!
indicate!that!the!sensor!is!searching!for!a!security!panel.!!
Note:)If)sensor)pairing)is)not)successful)during)the)searching)process)?)
by)tripping)the)door)/)window)sensor)or)by)pressing)the)tamper)switch)?)
the)searching)process)will)restart.)
4.!Complete!the!pairing!procedure!on!the!security!panel!(see!the!pairing!
instructions!in!the!security!panel’s!installation!guide).!
Note:)Pairing)should)be)performed)before)installation.)
!
Figure'2'–'Activation'Strip!
!
4.! INSTALLATION AND SENSOR TESTING
CAUTION:' Thi s' equipment' shall' be' installed' by' Service' Personnel' in'
nonHhazardous'indoor'locations'only.'
4.1 Mounting
NOTE:!It!is! highly!recommended!to! attach!the!door! /!window!sensor!to!the!
top! of!the!door/window! on! the! fixed! frame! and! the! magnet! to!the!movable!
part!(door!or!window).!Make!sure!that!the!magnet!is!located!not!more!than!6!
mm!(0.25!in. ) ! f ro m!t h e! sensor’s!marked!side.!!
The!sensor!should!be!mounted!on!the!fixed!surface!and!the!magnet!on!
the!moving!surface !( se e !Figure!3b).!
!
Fig.'3a'–'Attaching'the'Adhesive'Tape!
release!liners!from!
the!two!strips!of!
double#sided!
adhesive!tape!and!
attach!to!the!device!
and!magnet.!
!
!
Fig.'3b'–'Mounting'on'Fixed'
Surface!
2.$Align!the!device! with !th e!magne t!
according!to!the!location! marks!
and!fasten!the!device!and!magnet!
to!the!mounting!surface.!The!
sensor!should!be!mounted!on!the!
fixed!surface!and!magnet!on!the!
moving!surfa ce .!
A.$Double#sided!adhesive!tape!
B.!Magnetic ! l oc at i on! ma rk s!
Note:)Silicone) can) also )be) used) to)
securely)mount)the)device)and)
magnet.)
'
4.2 Sensor Testing
Close!the!door!or!window,!thus!restoring!it!to!the!undisturbed!state
!
Fig.'4a'–'Opening'Batter y'Cover!
!
Fig.'4b'–Replacing'Battery!
1.!Press!down!on!the!battery!cover!and!slide!in!the!direction!shown!in!
Figure!4a!to!open.!
2.!Pull!back!on!the!clip!and!remove!the!battery!as!shown!in!Figure!4b.!
3.$Insert!the!new!battery!into!the!sensor!while!observing!battery!polarity!
(see!Figure!4b).!
4.!Close!the!battery !co v e r.!
Note:)The)required)battery)is)CR2032)Lithium)3V,)manufactured)by)
VARTA.)