This document is an assembly guide for the Vita 12 x 12 Flat Top Pergola, available in Regency, Roosevelt, and Monterey models. It provides detailed instructions for setting up the pergola, along with a list of materials and optional accessories.
Function Description:
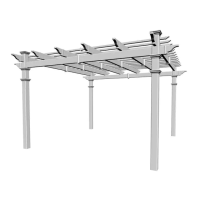
The Vita 12 x 12 Flat Top Pergola is a decorative outdoor structure designed to provide shade and enhance garden or patio areas. It is intended for aesthetic and light-duty use, not designed to carry additional weight loads such as swings, people, or other objects. The pergola can be installed independently in a garden or near a house, with a recommendation to keep it at least 4 inches back from eaves if placed close to a building. The design features graceful, solid-looking columns that slip over treated 4x4 wood posts, which can be embedded in concrete or mounted to a concrete or wood surface using bolt-down brackets. The assembly process involves constructing main support beams, rafters, and installing shade slats, all designed for a relatively straightforward build with basic carpentry knowledge.
Important Technical Specifications:
- Pergola Dimensions (Overall):
- Side View: 134 in (340.4 cm) length, 144 in (365.8 cm) width (including overhangs), 87 7/8 in (223.2 cm) height.
- Front View: 134 in (340.4 cm) length, 144 in (365.8 cm) width (including overhangs), 105 3/4 in (268.6 cm) height, 94 in (238.8 cm) column height.
- Top View: 171 1/2 in (435.6 cm) length, 171 1/2 in (435.6 cm) width, 8 11/16 in (22.1 cm) rafter spacing, 25 13/16 in (65.6 cm) overhang.
- Column Spacing (Center to Center): 134 in (340.4 cm).
- Shade Slat Spacing: 8 11/16 in (22.1 cm) between each slat.
- Shade Slat Overhang: Approximately 8 1/4 in (21 cm) past the last rafter.
- Material: Vinyl components (White/Composite), with pressure-treated wood inserts for structural integrity.
- Hardware: All included screws are self-auguring stainless steel.
- 2 1/2" (64 mm) screws: For locking vinyl columns to wood posts (bottom and top).
- 4" (102 mm) screws: For locking main support beams and first rafters to vinyl columns.
- 1 1/2" (38 mm) screws: For joiners (beams and rafters).
- 5/8" (16 mm) screws: For rafter brackets and rafter hangers.
- 3" (76 mm) screws: For shade slats (at each intersection with rafters).
- Adhesive: Vinyl Weld Glue (3 tubes included, only 1 necessary for Monterey model).
Usage Features:
- Assembly: Designed for assembly by two people with basic carpentry knowledge and tools. A 15' x 15' unobstructed area is recommended for assembly.
- Installation Options:
- In-Ground Application: Requires 4x4x10 (10x10x300cm) pressure-treated wood posts embedded in concrete ready mix.
- Concrete or Wood Surface Application (Optional Bolt Down Bracket Kit): Requires 4x4x7 (10x10x200cm) pressure-treated wood posts.
- For Concrete: Requires 1/2" x 3 1/2" x 12" wood shims, 1/4" x 2 3/4" (6x70mm) cement screws (countersunk head), and a 3/16" (5mm) concrete drill bit (minimum 3" long). Shims are used to level brackets on sloped concrete surfaces.
- For Wooden/Composite Deck with Accessible Underside: Requires 1/2" x 3 1/2" x 12" wood shims, 1/4" bolts and nuts (length depends on blocking material), 1/4" (6mm) washers, and a 1/4" (6mm) wood drill bit (minimum 3" long).
- Customization: Vinyl components can be cut, shortened, or modified with a circular saw and fine-tooth blade if moderate dimension changes are desired.
- Column Assembly: Vinyl columns are designed to slip over treated 4x4 wood posts. Internal wood post guides are used for in-ground applications.
- Beam and Rafter Assembly: Involves inserting pressure-treated wood into vinyl sections, connecting with joiners, and securing with screws. Rafter brackets are pre-installed on main beams.
- Shade Slat Assembly: Decorative end caps are glued onto slats, which are then inserted into joiners. No screws are needed for slat assembly itself, but screws are used to fasten slats to rafters.
- Flexibility: Vinyl columns naturally allow some measure of flex, which may require tensioning in opposite directions during beam and rafter installation to achieve a slight angle.
- Adjustments: Post heights can be trimmed if necessary to ensure level installation of beams and rafters on uneven ground. Final adjustments ensure equal spacing and overhangs of rafters and shade slats.
- Optional Accessories (Purchase Separately):
- Bolt Down Bracket Kit (4 for Pergola)
- Canvas Weave
- Shade Kit
- Privacy Wall (Regency Only)
- Pergola Planter (Regency Only)
Maintenance Features:
- Component Care: When assembling, components should be placed on a non-abrasive surface (e.g., shipping box) to avoid scratching.
- Structural Integrity: Ensure all screws are properly installed to prevent uplift during high winds.
- Post Stability: Pressure-treated wood posts may twist or crack; the design allows for some tolerance, but in extreme cases, posts may need to be shaved down for proper fit.
- Shade Enhancement: For additional shade, white resin lattice can be purchased from a local lumberyard, cut to size, and fastened directly to the top of shade slats using stainless steel screws. However, in areas with extreme snow or wind load, tight diamond privacy lattice is not recommended.
- Adhesive Curing: Vinyl Weld Glue has a sixty-second cure time and a twenty-minute dry time.
- Customer Support: A technical department is available for questions (1 800 282 9346, Mon-Fri 8:00 A.M. to 5:00 P.M. EST). Missing or defective parts can also be reported to this number.