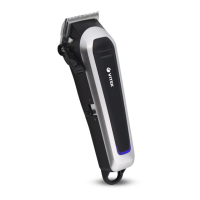
The VITEK VT-2580 is a hair clipper designed for cutting and styling hair.
Technical Specifications
- Nominal Voltage: 220-240 V, ~ 50 Hz
- Rated Input Power: 7 W
- Unit Operating Life: 3 years
Function Description
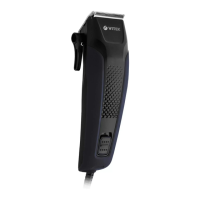
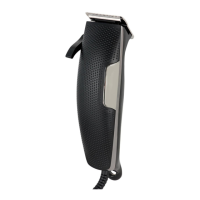
The hair clipper features a set of blades (1) protected by a cover. The cutting length can be adjusted using a blade shifter (2). The main body (3) houses the power switch (4) with "0/I" positions for off and on, respectively.
The device comes with four attachment combs:
- 3 mm attachment comb (5)
- 6 mm attachment comb (6)
- 9 mm attachment comb (7)
- 12 mm attachment comb (8)
Additional accessories include a comb (9), scissors (10), lubricating oil (11), and a cleaning brush (12).
Usage Features
General Use:
- The unit is intended for cutting only natural human hair, which should be clean and dry.
- It is crucial to ensure the mains voltage matches the unit's operating voltage before first use.
- The power cord must not touch hot objects, be immersed in water, run over sharp edges, or be used as a handle.
- The hair clipper, power cord, and plug should never be immersed in water or other liquids. Do not wash the blades under a water jet.
- Avoid touching the clipper body and power cord with wet hands.
- Do not use the unit in areas with high temperature and humidity exceeding 80%.
- Keep the unit away from baths or sinks filled with water. If the unit falls into water, unplug it immediately before retrieving it.
- The unit is for indoor use only.
- Never use the unit if attachment combs or blades are broken or damaged.
- Always switch off the hair clipper during breaks or when not in use, and never leave it unattended while operating.
- For optimal results, cut small amounts of hair at a time.
- If the hair clipper pulls hair, the blades are blunt and should be replaced.
Blade Shifter (2) (pic. 2):
- The blade shifter allows for cutting length adjustment when using the clipper without attachment combs.
- In the upper position, the haircut will be the shortest.
- In the lower position, the cutting length is approximately equivalent to using the 3 mm attachment comb (5).
- Changing the shifter's position during cutting allows for selection of the desired length.
- If hair jams the blades, move the shifter (2) from the upper to the lower position several times to release the hair without removing the blades.
- When the clipper is on, moving the shifter (2) several times from upper to lower position helps remove cut-off hair from the blades.
Attachment Combs:
- The length of hair left depends on the attachment comb used: 3 mm (5), 6 mm (6), 9 mm (7), or 12 mm (8).
- To install, place the selected comb on the blades with teeth facing up and press on the ledge at the bottom until it locks. Ensure the comb is securely locked before cutting.
- To remove, press the clamp and pull off the attachment.
Hair Styling Instructions:
- Step One (pic. 3, 4, 5): Attach the 3 mm (5) or 6 mm (6) comb. Switch on the clipper (4) to "I". Hold the clipper with blades pointing upwards. Start cutting from the hairline, moving slowly upwards. Cut the back of the head and near the ears.
- Step Two (pic. 6): Switch off the clipper (4) to "O" and unplug. Attach the 9 mm (7) or 12 mm (8) comb for longer hair. Switch on and continue cutting hair near the top of the head.
- Step Three (pic. 5): Switch off and unplug the clipper. Attach the 3 mm (5) or 6 mm (6) comb and cut hair in the temples. Then attach the 9 mm (7) or 12 mm (8) comb and continue cutting towards the top of the head.
- Step Four (pic. 6): Using the 9 mm (7) or 12 mm (8) comb, cut hair on the top of the head against the hair growth direction. Cutting against growth results in shorter hair than cutting along growth. For very short haircuts, use 3 mm (5) and 6 mm (6) combs. For longer hair, use 9 mm (7) or 12 mm (8) combs.
- To leave hair longer, grip hair locks between fingers and cut with the clipper (pic. 7).
- Use the comb (9) to lift hair locks and cut above the comb (pic. 8).
- Always start cutting from the back of the head.
- Use scissors (10) to trim hair.
- Step Five (pic. 9): For the final stage, remove the attachment comb, turn the blades towards the hair, and carefully trim hair on the temples and neck. Do not press the clipper strongly to avoid injuries or cuts.
Cone-shaped haircut (pic. 10):
- Attach the desired comb and start cutting from the back of the head towards the crown. Cut hair against growth from the front to the crown and from the sides.
- For a flat top haircut, use the comb to lift and cut hair along it. Comb hair to reveal uneven locks.
- After cutting, switch off the clipper (4) to "O", unplug it, and place the protective cover (1) on the blades.
Maintenance Features
Cleaning and Care:
- After each use, clean the attachments and blades with the cleaning brush (12) to remove cut hair.
- Wipe the accessories and the unit body (3) with a slightly wet cloth, then dry with a soft cloth.
- Do not immerse the unit in water or other liquids.
- Do not use solvents or abrasives for cleaning the clipper body.
Lubricating the Blades:
- Regularly lubricate the blades with the supplied oil (11) to maintain the unit in good condition.
- Switch off the clipper (4) and unplug it.
- Apply one to two drops of oil (11) to the teeth and the back of the upper blade. Switch the unit on to ensure smooth blade movement.
- Switch off the unit and wipe off excess oil with a dry cloth.
- Attention: Use only the oil supplied with the unit. Do not use vegetable oil, fat, or oil mixed with solvents, as solvents evaporate, leaving thick grease that can slow down blade movement.
Storage:
- Before storing, clean and lubricate the blades with oil (11) and place the protective cover (1) on them.
- Store the hair clipper in a dry, cool place, out of reach of children and disabled persons.
- If the unit has been transported or stored at low temperatures, allow it to reach room temperature for at least three hours before use.
Safety Measures:
- The unit is not intended for use by children or persons with reduced physical, sensory, or mental capabilities, or lack of experience/knowledge, unless supervised or instructed by a person responsible for their safety.
- Close supervision is necessary when children or disabled persons are near the operating unit.
- Do not allow children to play with the unit.
- Keep polyethylene packaging bags out of reach of children to prevent suffocation.
- Do not attempt to repair or disassemble the unit yourself. In case of malfunction or dropping, unplug the unit and contact an authorized service center.
- Transport the unit only in its original packaging.
- For additional protection in bathrooms, consider installing a residual current device (RCD) with a nominal operating current not exceeding 30 mA.