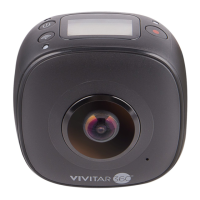
This document describes the Vivitar DVR978HD / PDV3632 360 Panoramic Camera, a digital panoramic camera equipped with two lenses, designed to capture panoramic videos and photos.
Function Description
The Vivitar 360 Panoramic Camera allows users to record panoramic videos and take panoramic photos, offering an immersive experience of a brand new panoramic world. It supports various playback modes for panoramic content on smart mobile phones, tablet computers, or PCs, including Plane mode, Fisheye mode, Tiny planet mode, and VR mode. The device can also share video files to platforms like YouTube, Facebook, WeChat, and QQ.
Important Technical Specifications
- Image Sensor: 2.0 M (CMOS) × 2
- Functional Mode: Recording & shooting
- Lens: F1.8, f=3.4mm
- Video Resolution:
- 4K (25fps)
- 2K (25fps)
- 960P (30fps)
- Picture Resolution:
- 16M (5760x2880)
- 12M (4896x2448)
- 8M (4000x2000)
- 4M (2880x1440)
- File Format:
- Video: H.264 (MP4)
- Image: JPG
- Storage Medium: TF card (supports up to 32GB)
- USB Interface: High-speed USB2.0 interface
- Power Supply: Built-in high voltage lithium battery 1200mAh
- Size: 63.0 × 62.0 × 48.0mm
Usage Features
Quick Start:
- Install SD Card: Insert a Class 6-10 Micro SD card (up to 32GB) into the designated slot.
- Power On/Off: Press and hold the Power button for about 2 seconds to power on. The LCD screen will display "WELCOME" and then the default shooting mode interface. To power off, press and hold the Power button for about 3 seconds until "GOODBYE" is displayed. The camera also has a Power-save mode that automatically powers off after 3 minutes of inactivity (default setting).
- Charging: Use the included data cable for charging. The blue indicator lights up constantly during charging and goes out when fully charged. Ensure any other charger used provides 5V/1.5A or above.
Recording and Shooting:
- Mode Switching: After power-on, press the MODE (Power button) to switch between Recording mode and Shooting mode.
- Video Recording: In Recording mode, press the Shutter button to start recording. The display screen will show the video recording timing. Press the Shutter button again to stop recording, and the video will be saved to the SD card.
- Photo Shooting: In Shooting mode, press the Shutter button to take photos. The display will show the estimated number of pictures that can be saved on the SD card.
Menu Settings:
- Accessing Menu: Press and hold the WIFI button for about 2 seconds to enter the menu settings.
- Navigation: In Menu mode, press the WIFI button to move the cursor and the Shutter button to confirm. Press and hold the WIFI button to go back to the previous menu or exit.
- Menu Functions:
- Movie Size: Set video resolution (4K, 2K, 960P).
- Resolution: Set picture resolution (16M, 12M, 8M, 4M).
- Power Save: Set the camera to enter power-save mode after 1, 3, or 5 minutes, or turn it off.
- Date & Time: Manually set the system time.
- Language: Set the system language (English is default).
- Factory Reset: Restore default settings.
- System: Check system and storage card information.
- Format: Format the storage card (caution: this will delete all data).
Accessories:
- Tripod: Screw the tripod nut into the screw hole at the bottom of the camera. It can be used as a hand-held or fixed device.
- Watch Remoter (Optional): Features a Power button, Shooting button, and Recording button for remote control.
Playing Panoramic Video/Picture:
- Mobile Phone/Tablet:
- Download APP: Scan the QR Code in the manual or search for "VRCAM720" on Apple Store or Google Play.
- Connect WIFI: Press the camera's WIFI button to turn on WIFI. The display will show "WI-FI ON" and "P3632SL_XXXXX" with an initial password of "1234567890". Connect your mobile device to this AP hot spot.
- Activate APP: Open "VRCAM720" APP and click the upper right corner to "Search for Camera".
- Download/Play: Enter the camera folder, select files to download or play directly.
- PC/Notebook:
- Download Player: Install "SYMAX360 Player" from the included CD-ROM or download it from www.symax360.com.
- Download Files: Connect the camera to the PC via USB cable. The camera display will show "MSDC". Open "My computer", navigate to "Removable disks", and select "VIDEO" or "JPG" folders to download files.
- Run Player: Open the downloaded video or picture files in the SYMAX360 Player. The player allows for different viewing modes (Plane/Planet/Invert) and 360-degree navigation.
Sharing:
- Videos can be shared via YouTube, Facebook, WeChat, QQ, etc. Shared videos can be played with Plane mode, Fisheye mode, Tiny planet mode, and VR mode effects. Merged video files are in .mov format.
Maintenance Features
- Battery Safety: The product has a built-in battery. Do not expose it to fire to prevent explosion or other dangers.
- Heat Radiation: The product may radiate heat during long-time use or direct sunlight exposure, which is normal.
- Reset Function: If the camera stops working or becomes unresponsive, press and hold the Reset button (using a needle) for about 3 seconds to restart.
- Environmental Conditions:
- Do not use the camera in temperatures below 0°C or above 40°C, as it may not function normally.
- Avoid humid environments to prevent damage to internal components.
- Do not immerse the camera in water.
- Charging Usage: Do not use the camera while charging, as this may cause system halts or other failures due to improper heat radiation.
- Lens Protection: Avoid contact between the lens and hard objects to prevent damage.
This equipment complies with FCC radiation exposure limits for an uncontrolled environment and should be installed and operated with a minimum distance of 20cm between the radiator and your body. Any changes or modifications not expressly approved by the party responsible for compliance could void the user's authority to operate this equipment.