Do you have a question about the Volt Fat Boy Mini Spotlight and is the answer not in the manual?
Follow local codes, NEC, and ensure power is OFF. Keep luminaires away from pools/spas. Use specified voltage/AMPS and UL listed connectors.
Lighted lamps are HOT. Turn off/unplug before replacing. Avoid touching hot parts. Keep away from flammable materials.
Lists the components included in the package, primarily the fixture body.
Illustrates and specifies the physical measurements of the luminaire.
Determine location, hammer stake flush to grade. Use a board to protect stake, or a shovel for hard ground.
Clear ground at wireway slot, lay wires, and attach fixture to stake until snug.
Strip pigtail leads, use UL listed connectors to connect luminaire leads to the main supply cable.
Loosen set screw to remove glare guard and lens from the fixture for bulb access.
Insert MR11 bulb with correct wattage/type. Do not exceed fixture's maximum wattage.
Place lens and glare guard back onto fixture, align holes, and hand-tighten the set screw.
Loosen adjustment screw, position luminaire, and tighten screw to secure desired direction.
Replace MR16 lamp with correct type. Reinstall lens and guard to protect from moisture/dust.
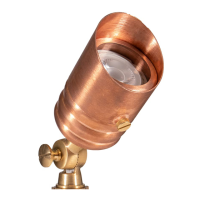
The VOLT® Fat Boy Mini Spotlight (VAL-2014-X-XXX) is a low voltage landscape lighting luminaire designed for outdoor use, providing focused illumination in various landscape settings. This spotlight is intended for installation in accordance with local codes and the National Electric Code (NEC) to ensure safe and proper operation.
The VOLT® Fat Boy Mini Spotlight is a compact and adjustable lighting fixture that utilizes an MR16 bulb to project light. Its primary function is to highlight specific features in a landscape, such as trees, shrubs, architectural elements, or pathways. The fixture is designed to be mounted on a stake, which is driven into the ground, allowing for flexible positioning within the landscape. The luminaire body is adjustable, enabling users to direct the light beam to the desired area, providing accent lighting or general illumination as needed. The design incorporates a glare guard and lens to protect the bulb and control light output, ensuring effective and aesthetically pleasing illumination.
Installation of the VOLT® Fat Boy Mini Spotlight involves several straightforward steps. First, the stake is installed in the desired location by hammering it into the ground until its flange is flush with the grade. A board can be placed on top of the stake during hammering to prevent damage. If the ground is hard, a crosscut with a flat shovel can assist in installation. Once the stake is in place, the fixture body is attached to the stake. The supply wires are laid into the wireway slot on top of the stake, and the fixture is tightened until snug.
Electrical connections are made by stripping the leads from the luminaire pigtail and connecting them to the main supply cable leads using two UL-listed wire connectors suitable for outdoor use (sold separately). It is crucial to ensure that the power is turned OFF before making any electrical connections or performing any servicing. The luminaire is designed to be used with a power supply (transformer) rated for a maximum of 300 watts (25 AMPS) at 15 volts. All luminaires must be installed 10 feet (3.05M) or more from pools, spas, or fountains to mitigate the risk of electrical shock. The low voltage wire and wire connector should be positioned within 6 inches (15.2 cm) from a building structure, a luminaire, or a fitting. The main low voltage cable is intended for shallow burial, less than 6 inches (152 mm) deep.
Before installing the MR16 bulb, the glare guard and lens must be removed by loosening a set screw. The MR16 bulb, with the correct wattage and type as marked on the fixture label, is then inserted into the socket and secured. It is important not to exceed the maximum wattage specified on the luminaire label. After the bulb is installed, the lens and glare guard are reinstalled, aligning the holes and securing them with the set screw until snug.
A key feature of this spotlight is its adjustability. The luminaire direction can be adjusted by loosening an adjustment screw at the joint, allowing the user to rotate the fixture to the desired angle. Once the desired direction is achieved, the adjustment screw is tightened to secure the luminaire in place. This flexibility in aiming the light allows for precise control over the illuminated area, enhancing the aesthetic appeal and functionality of the landscape lighting design.
Maintenance of the VOLT® Fat Boy Mini Spotlight primarily involves lamp replacement and ensuring the integrity of the fixture. When replacing the lamp, it is essential to turn off or unplug the power and allow the lamp to cool down before handling. The glare guard and lens must be removed to expose the MR16 lamp. The old lamp is then replaced with a new one of the correct wattage and type, as indicated on the fixture label. After replacement, the lens and glare guard must be reinstalled.
A critical maintenance consideration is the protection of the MR16 lamp from moisture and dust. The manual explicitly states that the MR16 lamp must be protected at all times, and therefore, the lens and glare guard should always be reinstalled when removed. This ensures the longevity and optimal performance of the bulb and the fixture.
Users are warned that the lighted lamp gets hot quickly, and contact should only be made with the switch/plug when turning it on. The hot lens, guard, or enclosure should not be touched. The lamp should be kept away from flammable materials. When handling the lamp, a soft cloth should be used, as oil from the skin can damage the lamp. The luminaire fitting should not be operated with a missing or damaged shield, as this could compromise safety and performance. Adhering to these safety and maintenance guidelines will ensure the continued safe and effective operation of the VOLT® Fat Boy Mini Spotlight.
| Finish | Bronze |
|---|---|
| Light Source | Integrated LED |
| Operating Voltage | 12V AC/DC |
| Voltage | 12V |
| Wattage | 3W |
| Material | Brass |
| Color Temperature | 2700K |
| IP Rating | IP65 |
| Lifespan | 40, 000 hours |
| Construction | Cast brass |
| Lens | Clear Convex Glass |
| Mounting | Ground spike |