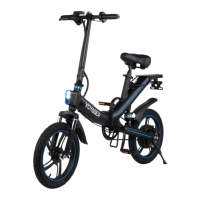
The Voyager Radius Pro Electric Bike (model BIKE4050RP) is a folding electric bicycle designed for personal transportation. It offers three riding modes: manual, pedal assist, and full electric, providing flexibility for various riding preferences and conditions.
Function Description:
The Voyager Radius Pro is an electric bike that can be ridden like a traditional bicycle using pedals, or with electric assistance. In manual mode, the bike operates solely on pedal power. Pedal assist mode provides electric motor assistance when the rider pedals, making it easier to maintain speed or climb inclines. Full electric mode allows the bike to be propelled entirely by its motor, controlled via a twist throttle, without the need for pedaling. The bike is foldable, enhancing portability and storage convenience. It features a digital LCD display that shows power levels and speed, a front headlight for visibility, and a horn for safety.
Important Technical Specifications:
- Motor Power: 450W Rated / 500W Max
- Battery: 48V/7.5AH Lithium-Ion
- Charging Time: Approximately 5 hours
- Display Type: Digital LCD Display
- Max Speed: Approximately 24-25 MPH
- Max Load: 300 lbs.
- Max Climbing Ability: ~30°
- Max Range: Up to 18 Miles (on a fully charged battery)
- Tire Size: 16 Inch Pneumatic
- Weight: 42 lbs.
- Brakes: Rear Mechanical Disc Brake
- Suspension: Cushioned
- Folded Size (L/W/H): 28 / 13.3 / 27.3 inches
- Unfolded Size (L/W/H): 53.5 / 15 / 42.5 inches
- Recommended Charging Temperature Range: 0°C-45°C (32°F-113°F)
- Recommended Operating Temperature Range: -20°C-45°C (-4°F-113°F)
- Recommended Storage Temperature Range: -20°C-45°C (-4°F-113°F)
Usage Features:
- Unfolding the Bike: To unfold, release the latch in the center of the frame and ensure connecting wires are recessed to prevent pinching.
- Connecting the Handlebars: Insert the handlebar stem into the recessed hole above the front wheel. Lift the handlebar into the upright position and press down on the latch to lock it. Align the handlebar and front wheel, then unlatch the handlebar, fold it down to access the locking bolt, and tighten with the provided Allen key. Finally, lift the handle to the upright position and lock it.
- Attaching the Seat: Loosen the seat angle bolt with the provided wrench tool to adjust the seat to a comfortable upright position, then tighten the bolt. The seat clamp allows for height adjustment and secure attachment to the bike body. The clamp tension can be adjusted by twisting a pin.
- Charging the Battery: Remove the rubber gasket from the charging port, connect the charger, and plug it into a power outlet. The LED on the charger will be RED during charging and turn GREEN when complete. It is recommended to charge for 5-8 hours before first use and at least once a month. Do not power on the bike while charging.
- Powering On/Off: Press and hold the power button to turn the bike on or off. Ensure the battery is fully charged and tires are properly inflated before riding.
- Display Screen: The digital LCD display shows the power meter (battery level) and current speed.
- Light Switch: Slide the switch to ON for the front headlight, improving visibility for the rider and making the bike more visible to others. Slide to OFF to turn it off.
- Horn: Press the horn button to sound the horn, primarily for safety in appropriate situations.
- Handbrake: Squeeze the handbrake to reduce speed or stop. Avoid abrupt braking at high speeds to ensure safety and prolong tire life. The right handlebar brake is used for deceleration and stopping in all modes.
- Riding Modes:
- Manual Mode: Bike is powered off. Rider pedals with legs and feet. Left handlebar brake for deceleration/stop.
- Pedal Assist Mode: Bike is powered on. Rider pedals with legs and feet, and the motor provides assistance. Twist the right handlebar throttle for additional speed. Left handlebar brake for deceleration/stop.
- Full Electric Mode: Bike is powered on. Twist the right handlebar throttle for full motor power without pedaling. Left handlebar brake for deceleration/stop. The display screen button allows switching between three electric speed modes: Slow (Mode 1), Medium (Mode 2), and Fast (Mode 3).
Maintenance Features:
- Brakes: Regularly check brake levers for looseness and ensure full braking force can be applied without levers touching the handlebar. Contact a qualified repair person for any issues.
- Control Cables: Inspect outer casing for kinks, stretched coils, or damage. Check cables for kinks, rust, broken strands, or frayed ends. Replace damaged cables before riding.
- Bearing Adjustments: Ensure hub bearings are lubricated, run freely, and show no excess movement, grinding, or rattling. Consult a qualified bicycle mechanic for adjustments if needed.
- Wheel Adjustments: Spin each wheel to check for clearance between the wheel and brake, and ensure wheels do not wobble. Take the bike to a qualified bicycle repair expert for any issues.
- Lubrication: Regularly apply a few drops of bicycle chain grease to the chain and brake calipers. Wipe off excess oil. Use a lithium-based grease on brake cables.
- Reflectors: Verify all reflectors are securely attached before riding. Reflectors are crucial for safety and should not be removed.
- Maximizing Range: Factors affecting range include rider weight (heavier riders require more power), surface and weather conditions (smooth, flat, dry conditions are ideal), temperature (extreme temperatures affect battery performance), maintenance (properly inflated tires and good bike condition), and riding style (avoid sudden stops and frequent starting/stopping).
- Keeping Your Bike Clean: Clean with a slightly damp cloth and ensure it's completely dry before use. Avoid harsh chemicals or detergents and never submerge the bike in water.
- Battery Maintenance: Keep the bike and battery away from excessive heat, fire, flames, physical shock, water, or moisture. Do not attempt self-repair; contact the manufacturer or a qualified technician for service. Charge the battery at least once a month.
- Tire Maintenance: Regularly check tire pressure. Both front and rear tires should have a pressure of 2.8 Bar (~40psi). Contact a qualified bicycle repair technician for tire replacement.
- Storage: Store the bike in a cool, dry place, away from dust and debris. Charge the battery at least once a month. Do not charge in cold environments below 50°F.
- Local Laws: Riders are responsible for researching and complying with all local and country-specific laws and regulations regarding motorized vehicles.