Do you have a question about the Walmart Mainstays Oversized Zero Gravity Swing and is the answer not in the manual?
Lists essential documents and information needed for warranty claims.
Instructions for cleaning cushions, frames, and proper storage to prevent damage.
Details the duration of coverage and specific components protected, plus excluded damages.
Connects top bars and attaches a plate using specific bolts and nuts.
Joins long leg connectors using specified bolts, washers, and nuts.
Connects rear and front legs to top bars and connectors using specific hardware.
Secures long leg connectors to rear legs with M8x45 bolts and nuts.
Attaches short leg connectors to front and rear legs using M8x65 bolts.
Connects the support to the cup holder using screws.
Secures the support to the bottom frame with M8x35 bolts and nuts.
Installs the basket onto supports using velcro straps.
Attaches the back leg of the seat assembly using M8x78 bolts and nuts.
Connects seat assemblies to the bottom frame with M8x35 bolts and nuts.
Installs the hanging bar into the frame and connects it to a hook.
Secures the canopy to the top bars using knobs.
Hangs the main hook onto the top bar and tightens all bolts for final assembly.
This document provides assembly instructions, care and maintenance guidelines, and warranty information for the Mainstays Oversized Zero Gravity Swing, a product sold at Walmart.
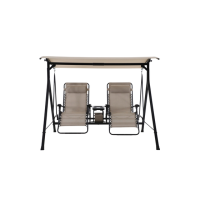
The Mainstays Oversized Zero Gravity Swing is an outdoor furniture item designed for relaxation. It features a swing mechanism that allows users to recline in a "zero gravity" position, which is intended to distribute body weight evenly and reduce pressure. The swing includes two individual seat assemblies, a canopy for shade, and a basket for storage or holding items. It is designed for outdoor use, providing a comfortable seating option for a patio, deck, or garden. The assembly process involves constructing the main frame, attaching the seat assemblies, and adding the canopy and accessories.
| Brand | Walmart |
|---|---|
| Model | Mainstays Oversized Zero Gravity Swing |
| Category | Outdoor Furnishing |
| Language | English |