Starting Out
16
QPAC User's Manual
How to Install and Wire the QPAC, Chapter 2
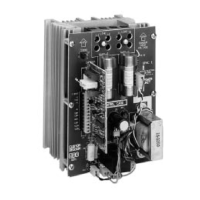
Wire QPAC-32
QPAC-32 Power and Load Wiring
ç
CAUTION:
Check terminals for tightness before applying power and then recheck terminals
after one day of operation. Loose connections can damage the SCR.
Figure 19 -
QPAC-32 Wiring
for 30 - 50A Units
Figure 20 -
QPAC-32 Wiring
for 75-100A Units
① NOTE:
A contactor is
required if a high
limit control is used.
② NOTE:
A separate discon-
nect is required for
the fan(s) if used.
QPAC-32 75 to 100A
L3L1 L2
T1
T2 T3
Circuit
Breakers
or
Disconnects
Contactors
If Required
Heater Load
Fan 120VAC/20W
L1
L2
L2
L1
Top end of heatsink
Bottom end
of heatsink
Factory supplied,
customer installed
external semiconductor fuse
Factory supplied, customer
installed external
semiconductor fuse
L3
QPAC-32 30 To 50A
Circuit
Breakers
or
Disconnects
Contactors
If Required
Factory supplied,
customer installed
external semi-
conductor fuse
Heater Load
Fan 120VAC/20W
L1
L2
L3
L2
L1
L2L1 L3 T1 T2 T3
Factory supplied, customer installed
external semiconductor fuse
②
①
②
①
 Loading...