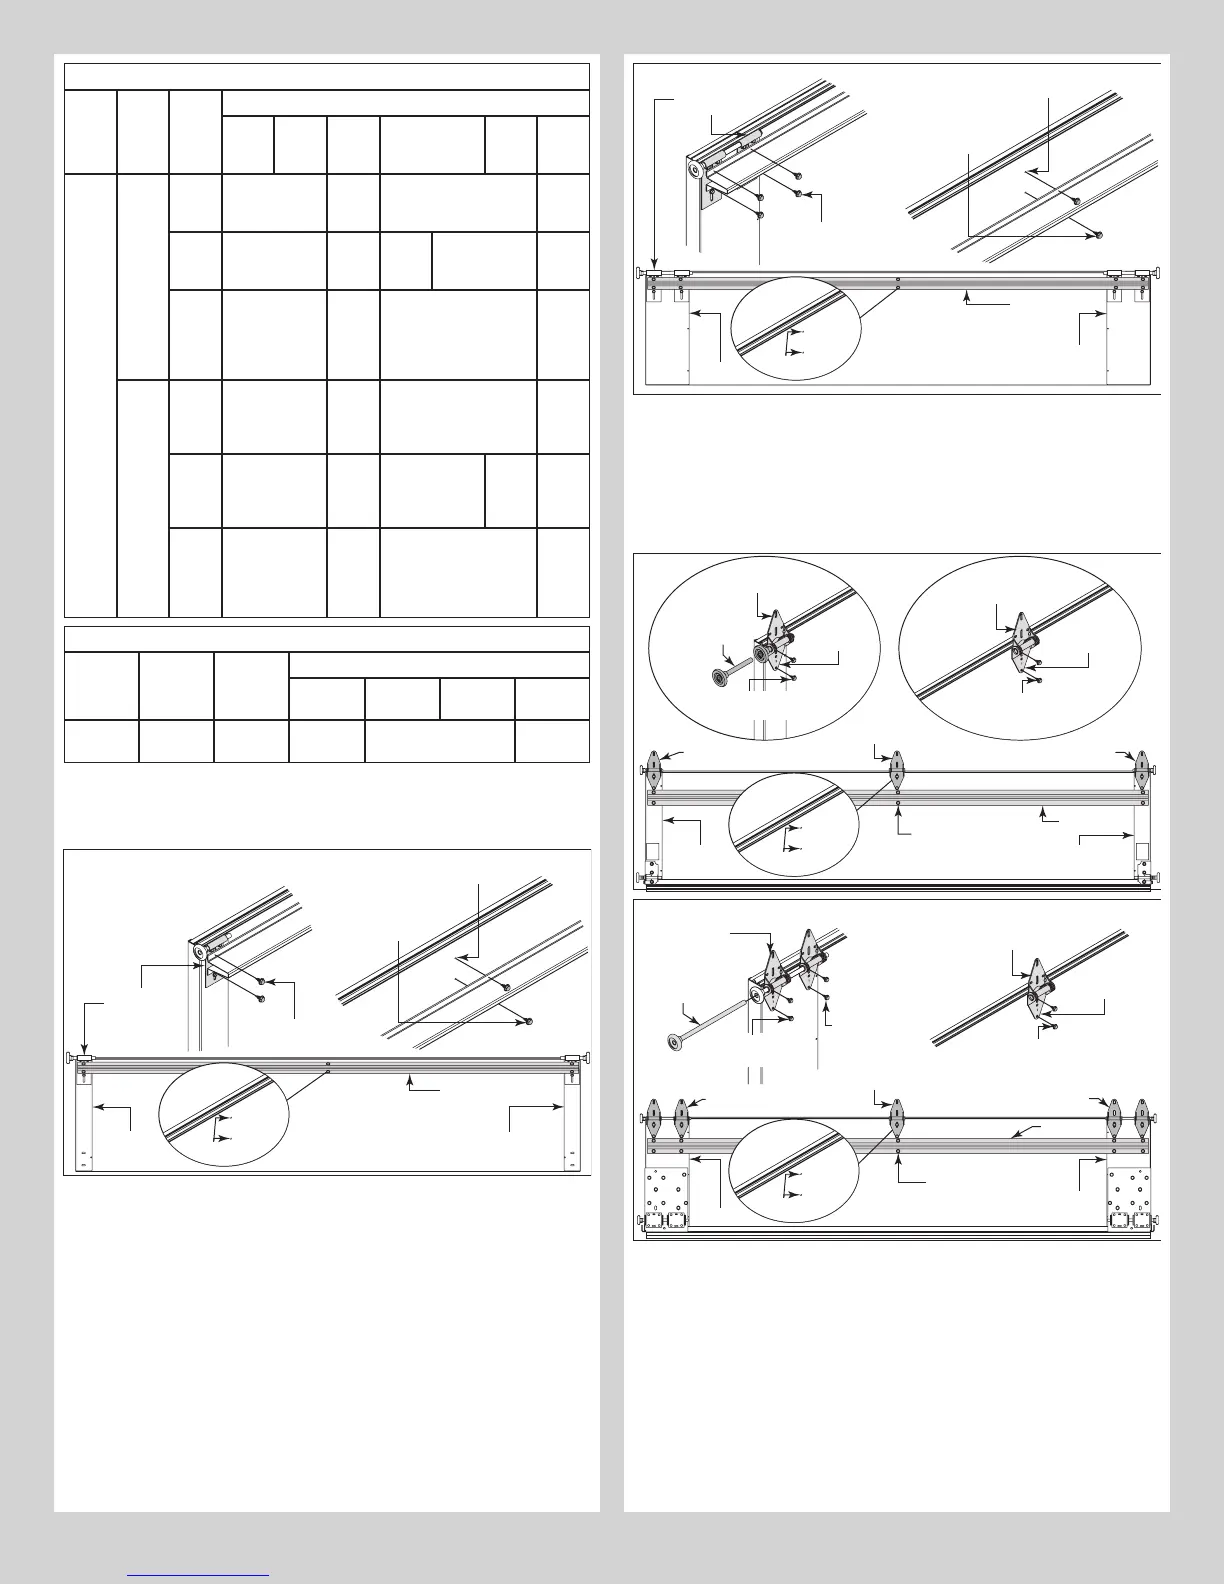
Strutting Schedule For Model 8500 Aluminum (White, Almond and Taupe Colored Doors)
Door Sec-
tion
Quan-
tity
Door
Con-
figu-
ration
Door Widths
6’ 0” -
8’0”
9’ 0” -
10’0”
12’
0” -
14’0”
15’ 0” - 16’0” 17’
0” -
18’0”
20’ 0”
< = 8’
0”
4 Solid TS TS, LS TS, LS, BS TS,
INT1,
LS, BS
Top
(Win-
dows)
TS TS, LS TS, LS,
BS
TS, INT1, LS, BS TS,
INT1,
LS, BS
Inter-
medi-
ate
(Win-
dows)
TS TS, IW TS, IW, BS TS, IW,
INT1,
BS
5 Solid TS TS, LS TS, LS, BS TS,
INT3,
INT1,
BS
Top
(Win-
dows)
TS TS, LS TS, LS, BS 3S TS,
2S LS,
2S BS
TS,
INT3,
INT1,
BS
Inter-
medi-
ate
(Win-
dows)
TS TS, IW TS, IW, BS TS, IW,
INT1,
BS
Strutting Schedule For Model 8500 Aluminum (Brown, Black and Woodgrain Colored Doors)
Door
Heights
Section
Quantity
Door
Configu-
ration
Door Widths
6’ 0” - 10’
0”
12’ 0” -
16’ 0”
17’ 0” -
18’ 0”
20’ 0”
< = 8’ 0” 4 or 5 Solid /
Windows
TS TS, LS, BS ES
INSTALLATION ON TOP SECTION: Using sawhorses, lay the top section on a flat smooth
surface. Locate and center the strut onto the section surface and up against the top edge of
the top section. Center the strut side to side on the section. Secure strut to top section using
1/4” - 20 x 7/8” self drilling screws at each end and at each dimple location(s), as shown.
End stile End stile
Top section
Dimples
1/4”-20 x 7/8”
Self drilling
screws
Strut
1/4”-20 x 7/8”
Self drilling screws
Strut
Top fixture (if
applicable)
Dimples
Strut
End stile
End stile
Top
section
1/4”-20 x 7/8”
Self drilling screws
Dimples
1/4”-20 x 7/8”
Self drilling
screws
Strut
Strut
Top fixtures
(if applicable)
Dimples
Strut
INSTALLATION ON ALL SOLID SECTIONS (EXCEPT TOP SECTION): Using sawhorses, lay
the section on a flat smooth surface. Starting on the left hand side of the section, align the
lower leafs of the appropriate graduated end hinges over the holes at the top of the end caps
located at the top of the section. Next, align the lower hinge leafs of the #1 center hinges
with the dimples at the center location(s) located at the top of the section. Secure the gradu-
ated end and center hinges to the section using (2) 1/4” - 20 x 11/16” self drilling screws.
Locate and center the strut onto the section surface and up against the bottom edge of the
hinges. Center the strut side to side on the section. Secure strut to section using 1/4” - 20 x
7/8” self drilling screws at each end and at each dimple location(s), as shown.
1/4”-20 x 11/16” Self
drilling screws
#1Center
hinge(s)
#1 Graduated
end hinge
Lower
hinge leaf
Short stem
track roller
End stile End stile
Bottom section
#1Center
hinge(s)
#1 Graduated end hinge
#1 Graduated end hinge
Lower
hinge leaf
1/4”-20 x 11/16” Self
drilling screws
Dimples
1/4”-20 x 7/8”
Self drilling screws
Strut
1/4”-20 x 11/16” Self
drilling screws
#1Center
hinge(s)
#1 Graduated
end hinges
Lower
hinge leaf
Long stem
track roller
End stile
End stile
Bottom section
#1Center
hinge(s)
#1 Graduated end hinges
#1 Graduated end hinges
Lower
hinge
leafs
1/4”-20 x 11/16”
Self drilling screws
Dimples
1/4”-20 x 7/8”
Self drilling screws
Strut
INSTALLATION ON ALL SECTION WITH WINDOWS (EXCEPT TOP SECTION): Using
sawhorses, lay the section on a flat smooth surface. Starting on the left hand side of the
section, align the lower leafs of the appropriate graduated end hinges over the holes at the
top of the end caps located at the top of the section. Next, align the lower hinge leafs of the
#1 center hinges / half center hinges with the dimples at the center location(s) located at
the top of the section. Locate and center the strut onto the section surface and on top of the
hinges. Center the strut side to side on the section. Secure strut and hinges to section using
strut clips and 1/4” - 20 x 7/8” self drilling screws at each end hinges and at each dimple
location(s), as shown.
NOTE: If your Intermediate Section has windows in it and a strut needs to be installed on that
section, strut clips will need to be used to attach it to the section.
9




 To Next Page