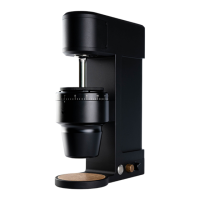
The Weber Workshops Key Coffee Grinder (Model KEY-V2) is a high-quality coffee grinder designed for both home and cafe use, offering precise control over grind settings and RPM for optimal coffee preparation. This instruction manual, version Mk ii, provides comprehensive guidance on its setup, operation, and maintenance.
Function Description:
The Key Coffee Grinder is engineered to grind whole coffee beans into various consistencies suitable for different brewing methods, from espresso to pour-over. It features a robust design with a focus on precision and user experience. The grinder is designed to be compatible with a wide range of power supplies, operating on 100-240V at 50/60Hz, eliminating the need for a separate transformer in most regions. It uses a standard C13 style power cable, commonly found with computer equipment, which can be sourced locally if needed. The grinder's core function revolves around its burr system, which can be adjusted to achieve the desired particle size. It incorporates a "Magic/Static Wiper" system to minimize static and retain coffee grounds, ensuring a cleaner grinding process and consistent dosing. The grinder supports both "Hot Start" (grinder spinning before beans are added) and "Cold Start" (beans added before grinder is turned on) methods, with "Hot Start" being the recommended approach for optimal performance.
Important Technical Specifications:
- Product Name: KEY COFFEE GRINDER
- Model Number: KEY-V2 MODEL
- Rated Voltage: 100-240V
- Frequency: 50/60Hz
- Power: 315-385W
- Power Cable: Uses a Type C13 computer cable.
- Grind Adjustment: Features an adjustment/locking ring with numbered settings (larger numbers for coarser grind).
- RPM Adjustment: Adjustable RPM knob, with a recommended starting range of 50-70 RPM.
- Tumbler Compatibility: Supports both Magic Tumbler (for 58mm portafilter, MOKA pot, pour-over) and Standard Tumbler (for 58mm or 49mm portafilter, pour-over).
- Safety Certifications: CE marked.
Usage Features:
The Key Coffee Grinder is designed for intuitive operation with several features enhancing its usability:
- Placement: Requires a flat, dry counter space near a power outlet.
- Unboxing: The grinder is heavy and should be carefully removed from its packaging using both hands.
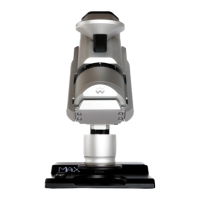
- Magic/Static Wiper Attachment: The grinder comes with a Magic/Static Wiper that needs to be attached to the lower axle. This involves removing a screw with a 5mm hex key, placing the washer and wiper, and then securely tightening the screw. If the bottom bolt is stuck, the gearbox cover can be removed, and a metal rod or Allen key can be inserted through a hole in the shaft to lock it in place for easier screw removal. The Magic Wiper also features a replaceable stirring rod, which can be swapped by pushing out an insert block on the backside of the wiper.
- Burr Zeroing: The manual indicates a "TBD" step for zeroing the burrs, but emphasizes verifying that the locking ring sits flush with the burr collar and that the pins are completely engaged to ensure the burrs are locked.
- Tumbler Selection and Placement: Users can choose between the Magic Tumbler and the Standard Tumbler based on their brewing needs.
- Magic Tumbler: Requires ensuring the tumbler plug is properly seated before attaching it to the magnetic mount. Care must be taken not to damage the static wiper or stirring rods. It is compatible with 58mm portafilters, MOKA pots, and pour-over setups.
- Standard Tumbler: Involves attaching the lower funnel to the magnetic mount and ensuring the tumbler plug is properly seated. The tumbler self-centers with magnets beneath the lower funnel. It is compatible with 58mm or 49mm portafilters and pour-over setups.
- Powering On/Off: The main power switch is located on the back of the unit, next to the power cord inlet. The grinder is turned on/off using a dedicated button on the front, which illuminates when the burrs are spinning. Users are cautioned against leaving the grinder on for excessive periods.
- RPM Adjustment: A knob allows users to adjust the RPM level, with a recommended starting point in the 50-70 RPM range.
- Grind Setting Adjustment: Grind settings are adjusted by lifting the locking ring and turning it. Larger numbers correspond to coarser grinds. The grinder ships pre-set for espresso, but adjustments will be necessary for different coffee types and brewing methods.
- Grinding Coffee: Once the grind setting is satisfactory, coffee beans can be added to the Bean Dish. A typical 20g dose takes approximately 20-30 seconds to grind, depending on grind size and RPM. The "Hot Start" method (grinder spinning before beans are added) is recommended.
- Safety Information: The manual includes critical safety warnings, such as avoiding misuse, unplugging before servicing or cleaning, not operating without the tumbler or funnel in place, and never placing fingers or foreign objects inside the grind chamber. Adult supervision is required.
Maintenance Features:
The Key Coffee Grinder is designed with ease of maintenance in mind to ensure longevity and consistent performance:
- Cleaning: A dedicated cleaning brush is included for cleaning the burr, funnel, and base-plate.
- Brush Storage: The cleaning brush can be stored in the grinder's base. To re-insert the brush, the brass outer sleeve should be pulled back to cover the bristles. Upon re-insertion, the cap will be pushed back, making the brush ready for immediate use upon removal.
- Power Off for Maintenance: It is crucial to power off the grinder at the mains before any servicing, inspection, or cleaning to prevent injury.
- Regular Cleaning: Regular cleaning helps remove coffee remnants, which can accumulate during shipping and use. The manual notes that some coffee remnants might be present upon delivery due to factory testing.
- Long-term Power Off: For cafes, it is recommended to power down the grinder at the mains overnight. For home users, it should be powered off during any prolonged periods of non-use.