4
ASSEMBLY
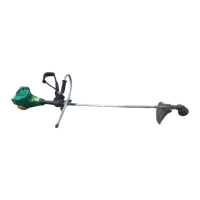
CARTON CONTENTS
Check carton contents for the following:
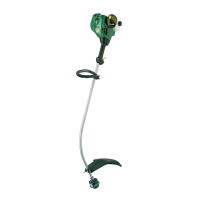
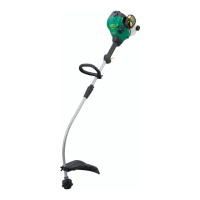
S brushcutter
S handlebar screws (2)
S blade shield screws (4)
S cupped washer
S large nut for installing blade
S long hex wrench
S short hex wrench
S bracket cover
S metal shield
S plastic shield
S shoulder strap with warning
S weed blade
S trimmer head
S handlebar
S container of oil
Examinepartsfordamage.Donotusedam-
aged parts.
NOTE:Ifyouneedassistanceorfindparts
missing or damaged, call 1-800-554-6723.
Itisnormalforthefuelfiltertorattleintheempty
fuel tank.
Findingfueloroilresidueonmufflerisnormal
duetocarburetoradjustmentsandtestingdone
by the manufacturer.
ASSEMBLY
WARNING:Ifreceivedassembled,repeat
all steps to ensureyour unitis properlyas-
sembled and all fasteners are secure.
TOOLS REQUIRED
S 2 hex wrenches (provided)
S adjustable wrench
S phillips screwdriver.
ATTACHING THE HANDLEBAR
DANGER:Thebarrierportionofthehandlebar
mustbeinstalledasshowntoprovideabarrier
between operator and the spinning blade.
S Locatethedecalonthehandlebar.Thisde-
calincludestwoarrows.Positionthehan-
dlebarwiththemountingbracketbetween
these arrows.
S Positionthebracketcoveroverthehandle-
bar.Againmakesurethehandlebarisbe-
tween the arrows.
S Insert screws and hand tighten only. Be
sure the handlebar is installed correctly;
then,tighteneachscrewsecurelywiththe
short hex wrench.
BracketCover
Screw
Mounting
Bracket
Handlebar
ASSEMBLY OF SHOULDER STRAP
WARNING:Propershoulderstrapandhan-
dlebaradjustmentsbeforestartingtheengine
are required.
S Tryonshoulderstrapandadjustforfitand
balancebeforestartingtheengineorbegin-
ning a cutting operation.
S Insertyourrightarmandheadthroughthe
shoulderstrapandallowit torest onyour
leftshoulder.Makesurethedangersignis
on your back and the hook is to theright
side of your waist.
NOTE:Aone-halftwistisbuiltintheshoulder
straptoallowthestraptorestflatontheshoul-
der.
S Adjust the strap, allowing the hook to be
about 6 inches below the waist.
S Fastenthestraphooktotheclamplocated
betweenthetriggerhandleandthemount-
ing block and lift the tool to the operating
position.
CONFIGURING YOUR UNIT
You can configure your unit using acutting
head for grass and light weeds, or a weed
bladeforcuttinggrass,weeds,andbrushup
to1/2inchindiameter.Toassembleyourunit,
gotothesectionforthedesiredconfiguration
and follow the instructions.
ASSEMBLY INFORMATION --
TRIMMER HEAD
TRIMMER
HEAD
NOTE:Ifyourunithasbeenassembledfor
weed blade use, refer to the section AS-
SEMBLYINFORMATIONFORUSINGYOUR
UNITWITHAWEEDBLADEandreversethe
stepstoremovethemetalshieldandbladebe-
foreyoumounttheplasticshieldandtrimmer
head.
ATTACHING THE PLASTIC SHIELD
AND TRIMMER HEAD
WARNING: The shield must be properly
installed.Theshieldprovidespartialprotection
fromtheriskofthrownobjectstotheoperator
andothersandisequippedwithalinelimiter
whichcutsexcesslinetotheproperlength.The
linelimiter(onundersideofshield)issharpand
can cut you.
S Remove wing nut from shield.
S Insert bracket into slot on shield.
S Pivotshielduntilboltpassesthroughholein
bracket.
S Tighten the wing nut securely.
S If your unit has a plastic cover over the
threadsonthethreadedshaft,removethe
covering to expose the threads.
S Before installing the trimmer head, make
surethedustcupandretainingwasherare
positionedonthegearboxasshownbelow.
 Loading...