EasyManua.ls Logo

Weinmann ACCUVAC Pro - User Manual

Weinmann ACCUVAC Pro
2 pages
Print Icon
To Next Page IconTo Next Page
Loading...
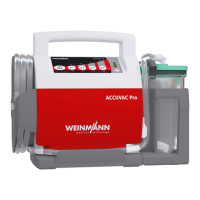
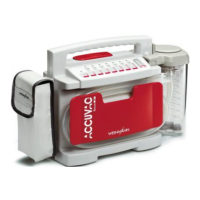
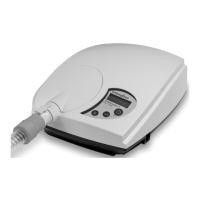
ACCUVAC Pro/ACCUVAC Lite
WM 15208
Montageanleitung und Bohrschablone
Assembly instructions and drilling template
Notice de montage et gabarit de perçage
Wandhalterung für ACCUVAC
Wall mounting for ACCUVAC
Support mural pour ACCUVAC
WM 16209d – 06/2015
110
m
m
ø 3
m
m
Allgemeine Hinweise
Die Kontur der ACCUVAC auf dieser
Bohrschablone stellt den Platzbedarf des
Gerätes und seiner Komponenten dar.
Berücksichtigen Sie bei der Montage auch
die individuellen Entnahmewege und den
Platzbedarf der Hände bei der Entnahme.
Der Befestigungsuntergrund muss eine
ausreichende Festigkeit aufweisen, um
die Wandhalterung und die ACCUVAC
nach EN 1789 Krankenkraftwagen sicher
zu halten.
Verwenden Sie die beiliegenden Blech-
schrauben nur für metallische Untergründe,
z. B. in Fahrzeugen. Verwenden Sie für
nichtmetallische Untergründe zu dem je-
weiligen Untergrund passende Schrauben
(nicht im Lieferumfang).
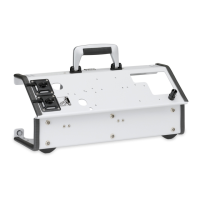
Wandhalterung montieren
1. Planebene und senkrechte Befestigungsstelle
wählen.
2. Bohrschablone anhalten und mit Wasserwaa-
ge ausrichten.
3. Die beiden linken Bohrungen an der Befesti-
gungsstelle markieren.
4. Bohrschablone von der Befestigungsstelle
entfernen.
5. Wandhalterung an die Befestigungsstelle
halten.
6. Die beiden rechten Bohrungen mit Hilfe der
Wandhalterung markieren.
7. Befestigungslöcher mit einem Bohrer Ø 3mm
bohren.
8. Wandhalterung mit den beiliegenden Blech-
schrauben festschrauben.
9. Stecker der 12-V-Verbindungsleitung (alle
ACCUVAC) oder des Steckerladegerätes (nur
ACCUVAC Basic) in die Führungsschiene der
Wandhalterung schieben, bis er einrastet.

Questions and Answers

  • S
    Shannon TaylorAug 7, 2025
    What to do if Weinmann Medical Equipment is not charging?
    • B
      Briana HaneyAug 7, 2025
      If your Weinmann Medical Equipment is not charging, there are several potential causes. First, the AC adapter/charger plug may be defective, requiring professional repair. Second, the external power supply might be inadequate; ensure it's between 12.0 and 13.8 volts. Third, check fuses F1 and F2, or the fuse in the vehicle plug, and replace if defective. Finally, verify that the snap-in connection between the circuit board and power pack is properly engaged.
  • H
    Harry DavisAug 11, 2025
    Why Weinmann ACCUVAC Pro does not start, and the O/I indicator does not show ready for operation?
    • D
      Daniel CollinsAug 11, 2025
      If your Weinmann Medical Equipment isn't starting and the O/I indicator isn't lit, check the following: First, replace fuse F1 or F2 in the appliance, or the fuse in the vehicle plug, if defective. Next, if the power pack is fully discharged, perform several charge/discharge cycles, and replace the power pack if this doesn't work. Also, ensure the vehicle power socket has the correct polarity, correcting it and replacing fuse F1 if necessary. Finally, make sure the snap-in connection between the circuit board and power pack is properly engaged.
  • J
    johnsjuliaAug 16, 2025
    What to do if Weinmann ACCUVAC Pro Medical Equipment does not reach maximum vacuum?
    • K
      Kimberly ShermanAug 16, 2025
      If your Weinmann Medical Equipment does not reach the maximum vacuum of –0.8 bar in 20 seconds, but the voltage indicator shows ready for operation, first check all tubes are firmly connected and the disposable bag is securely installed to rule out leaks in the suction side of the appliance. If not, charge the power pack. If the issue persists, there may be a fault in the pump, requiring professional repair.
  • T
    Tiffany GrahamAug 20, 2025
    How to fix the Weinmann ACCUVAC Pro Medical Equipment if the top LED of voltage indicator lights up after charging, but pump does not run when powered by power pack?
    • C
      Cory CamposAug 20, 2025
      If the top LED of the voltage indicator lights up after charging, but the pump doesn't run when powered by the power pack, check the internal connection between the printed circuit board (X1) and the power pack. Also, replace fuse F2 if it is defective.
  • R
    Robin CooperAug 25, 2025
    Why Weinmann ACCUVAC Pro power pack is not fully charged after charging for 14 hours?
    • H
      hoganronaldAug 25, 2025
      If the power pack in your Weinmann Medical Equipment isn't fully charged after 14 hours, and the top LED in the voltage indicator doesn't light up, ensure you are using the correct charger: AC adapter/charger plug WM 10750 or charger WM 2645. Verify that the vehicle electrical system is supplying between 12.0 – 13.8 V. The power pack may also be damaged from being fully discharged, requiring replacement.
  • P
    Patricia JacksonAug 29, 2025
    What causes Fuse F2 to frequently blow in Weinmann Medical Equipment?
    • C
      Cindy LewisAug 29, 2025
      Fuse F2 in your Weinmann Medical Equipment might frequently blow because the pump is often switched on under vacuum conditions, so avoid switching on the pump under vacuum. Alternatively, the pump may be defective, requiring professional repair.
  • C
    csmithSep 2, 2025
    What to do if Weinmann ACCUVAC Pro does not start, but O/I indicator and voltage indicator show ready for operation?
    • E
      Erin WadeSep 2, 2025
      If your Weinmann Medical Equipment does not start, but the O/I indicator and voltage indicator show ready for operation, the pump may be faulty. Have repairs carried out by factory or by expert personnel.

Weinmann ACCUVAC Pro Specifications

General IconGeneral
BrandWeinmann
ModelACCUVAC Pro
CategoryMedical Equipment
LanguageEnglish

Related product manuals