1 / 4
A
03809*
(2x)
A
A
B
B
B
A
B
If drilling a new door, use the supplied template and the complete
door drilling instructions available at weiserlock.com/doorprep
13/8" –2"
35 – 51 mm
A B
C
D
Is the door edge chiseled?
Is the D-shaped hole centered in the door hole?
Which latch are you installing?Hold the latch in front of the door hole, with the latch
face lush against the door edge.
1"
25 mm
YES
YES
NO
NO
Use latch “A”. If the
latch bolt is not already
extended, extend the
latch bolt as shown.
No adjustment is required.
Proceed to next step.
D-shaped hole D-shaped hole
Rotate latch face as
shown to extend latch.
UP is
on top.
UP is
on top.
wood
block
Use latch “B”. If the
latch bolt is not already
extended, extend the
latch bolt as shown.
Latch “A” Latch “B”
E
Install the strike on the door frame.
Make sure the hole in the door frame is drilled a
minimum of 1" (25 mm) deep.
or
chiseled
not
chiseled
or
1
2
Prepare the door and check dimensions
Install the latch and strike
or
23/8" or 23/4"
60 or 70 mm
backset
Measure to conirm that the backset is
either 23/8" or 23/4" (60 or 70 mm).
Measure to conirm that the hole
in the door edge is 1" (25 mm).
Measure to conirm that the door is between
13/8" and 2" (35 mm and 51 mm) thick.
Remove your existing deadbolt
from your door.
C D E F
B
Latch A
Keys
Exterior Assembly
Adapter
Ring
Batteries
Mounting
Plate
Parts List
For Latch / Strike
Interior Assembly
SmartKey
Tool
Measure to conirm that the hole in the door is either
21/8" (54 mm) or 11/2" (38 mm).
or
21/8"
54 mm
11/2"
38 mm
Note: Additional door
preparation may be
required for doors with
11/2" (38 mm) holes.
Consult the deadbolt
drilling instructions at
weiserlock.com/doorprep
A
Make sure your door is compatible. If you have a standard deadbolt mounted
separately from the handle below it, your door is compatible.
Mortise
Lock
Not CompatibleNot Compatible
Rim
Lock
Compatible Not Compatible
Integrated
Interior
door frame
46780
(4x)
Longer screws
install closest to
the door jamb.
actual size
Strike
03809
46780
48654
49191 64109 68611
Latch B
For Lock
03809
46780
or
or
*Use longer
screws if
holes are
worn out.
actual size
For
Latch / Strike
Bag
(2x) (2x)
(2x) (2x)
67611001
Rev 01
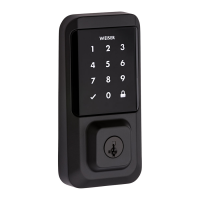
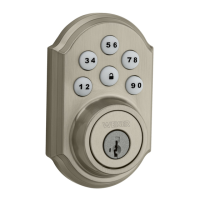
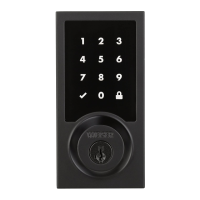
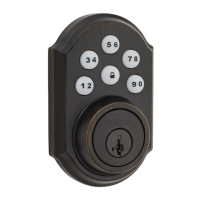
GED2500
Installation and User Guide
Weiser
1-800-501-9471
www.weiserlock.com
ENGLISH
Required tools
Ruler
Hammer Wood block Chisel
Phillips head screwdriver
Additional Tools (depending on application)