Do you have a question about the Weller WLC100 and is the answer not in the manual?
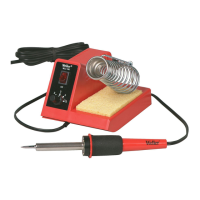
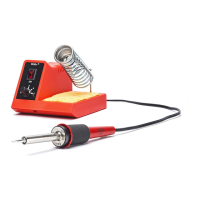
Details the Weller WLC100 soldering station's features, power adjustment, and included accessories like the iron stand and sponge.
Guides on unpacking, setting up the tool holder, wetting the sponge, connecting power, and initial heating and tinning procedures.
Provides essential advice for effective soldering, including cleaning surfaces, making connections, heating the joint, and avoiding excess heat.
Explains the proper technique of heating the joint, not the solder, and using a small amount of fresh solder for better heat transfer.
Defines optimal solder amounts for strong connections, covering minimum, optimum, and excessive solder application.
Illustrates and describes various types of bad solder joints, including those caused by insufficient heating or movement during cooling.
Details the composition of Weller ST series tips, noting they are copper plated with iron, nickel, and chromium, and pre-tinned.
Provides essential maintenance instructions for soldering tips, including tinning, flux usage, cleaning methods, and avoiding damage.
Lists available replacement parts and optional accessories for the WLC100, such as soldering tips and a polishing bar.
Highlights other soldering products offered by Weller, including stained glass soldering irons and stations.
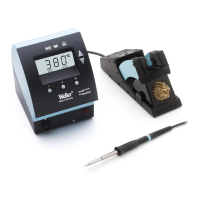
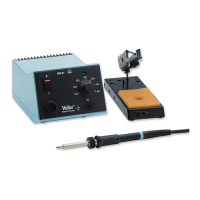
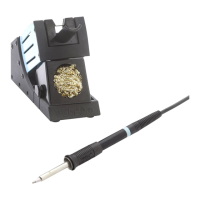
The Weller WLC100 Soldering Station is a versatile tool designed for adjustable temperature hand soldering. It allows users to control the tip temperature by varying the power level of the heater, ranging from 5 watts up to 40 watts, using a knob on the base unit. This adjustability ensures that sensitive components can be protected from heat damage by allowing the use of the lowest power setting suitable for the soldering task. The station also integrates a built-in iron stand and a tip cleaning sponge for convenience.
For usage, the WLC100 requires careful unpacking and setup. The tool holder should be placed in the designated slot on top of the unit. The sponge needs to be wet, preferably with distilled water, especially in areas with high mineral content tap water. The tool is then inserted into the holder. After plugging the line cord into a 120-volt A.C. receptacle, the unit is turned on with a rocker switch. To quickly heat the tool, the power control knob should be set to "5," and users should wait approximately one minute. Lower settings will naturally take longer to reach the desired operating temperature. Once heated, the control can be adjusted to a lower setting. Before use, the tool should be removed from the holder, and the tip should be tinned with solder. The WLC100 is U.L. listed, ensuring it meets safety standards.
Soldering with the WLC100 involves several key steps to achieve a stable and electrically efficient joint. The process relies on the solder, typically an alloy of tin and lead, having a low melting point and flowing into the joint. To make a successful soldered joint, four elements are crucial: a heat source, clean metal surfaces, a suitable grade of solder, and flux. Rosin core solder is recommended for most jobs as it eliminates the need for separate flux.
To begin, ensure that the items to be soldered are perfectly clean, which can be achieved with wire wool or fine emery cloth. A good mechanical connection should be made, such as wrapping wires around each other or a terminal. When applying heat, it's important to direct the heat to the base material (e.g., wires) rather than directly to the solder. This allows the base material to become hot enough to melt the solder and draw it into the joint. A small amount of fresh solder on the tip at the start of soldering can help transfer heat from the iron to the joint. Once solder has been applied smoothly, the iron should be slid away neatly. It's crucial to avoid moving the joint or wire immediately after removing the iron; blowing on the joint can speed up cooling. For electrical and electronic components, excessive heat should be avoided, and a heat sink can be used to dissipate heat away from the component if necessary. Applying too much solder can lead to short circuits. Pre-tinning components, especially stranded wire (by twisting strands together, heating, and saturating with solder), is advisable. Sweating a joint is made easier after tinning by twisting wires together and applying heat. To desolder a joint, heat should be applied, and a soldering aid like solder wick used to remove solder and separate the joint, followed by re-soldering with new solder. Adequate ventilation in the work area is important due to fumes from some fluxes.
Maintenance of the Weller WLC100 and its ST series tips is essential for longevity and performance. Weller tips are made of solid copper, plated with iron, nickel, and chromium. The chromium is removed from the working area, and the tips are pre-tinned with tin/lead solder. The nickel and chromium layers protect the shank from corrosion and solder creep.
To care for the tips, always keep them tinned and wipe them only before use. Rosin or activated rosin fluxes should be used, as acid-type fluxes significantly reduce tip life. The tip should be removed and cleaned with a suitable cleaner for the flux used. The frequency of cleaning depends on the type of work and usage, but tips in constant use should be cleaned at least once a week. Abrasive materials and files should never be used to clean the tip, as this will greatly reduce its life. Tip wettability can be affected by contact with organic substances like plastic rosins, silicone grease, and other chemicals. If a tip becomes unwettable, it can be cleaned with a Weller Polishing Bar (Part Number WPB1). However, this should not be overdone, as it can remove the iron plating and ruin the tip. The tip should be re-tinned immediately after cleaning to prevent oxidation. Finally, do not remove excess solder from a heated tip before storing, as the excess solder prevents oxidation of the wettable surface when the tip is reheated. The WLC100 is designed without user-serviceable parts inside; if the unit malfunctions, it should be returned to Weller for repair.
| Power | 40 Watts |
|---|---|
| Cord Length | 6 Feet |
| Tip Style | Conical |
| Stand Included | Yes |
| Warranty | 1 year |
| Voltage | 120V |
| Weight | 1.5 lbs |
| Tip | ST3 |