EasyManua.ls Logo

Weller WLC200 - User Manual

Weller WLC200
2 pages
Print Icon
To Next Page IconTo Next Page
Loading...
2
MODEL WLC200 SOLDERING STATION
PRODUCT DESCRIPTION
The Weller
â
WLC200 Soldering Station offers adjust-
able tip temperature by varying the heater wattage. By
turning the knob on the power base the wattage can be
varied from a minimum of 5 watts to a maximum of 80
watts.
The WLC200 comes with a built in iron stand, a tip
cleaning sponge, a flat blade set screw, an Allen set
screw, and is supplied with a MTG21 1/4" chisel tip.
The WLC200 is U.L. Listed.
OPERATING INSTRUCTIONS
Carefully unpack the unit. Install the iron stand into the slot provided and insert the iron. Wet
the sponge with distilled water. The use of tap water may contaminate the soldering tip and
solder joints due to minerals and chlorine.
Plug the line cord into a 120 volt AC receptacle. Turn the unit ON and set the power control
knob to 5. Wait 3 minutes. Turn the power control to a lower setting. Remove the iron from
the stand and tin the tip with solder, thoroughly coating the working surface. The WLC200 is
now ready for soldering.
STAINED GLASS SOLDERING IRON INSTRUCTIONS
The Weller
®
WLC200 soldering station bonds even the most intricate seams together.
Allow about three minutes for warm up using the 5 position, then adjust the iron to a lower
setting. On a piece of scrap lead practice soldering to determine the correct pressure, speed
and angle required. Clean the joint surfaces thoroughly. Make sure that all came joints, or
copper foil joints, are butted together as closely as possible before soldering. Stained glass
soldering fluxes are usually organic and water-soluble. They are extremely acidic and will
greatly reduce tip life. To extend tip life always wipe the tip clean after soldering and re-tin
the tip with solder. Do not allow this type of flux to remain on the tip while the iron is sitting at
idle. Clean each joint after soldering with a specific cleaner or with a general cleansing agent.
ALWAYS WORK IN A WELL-VENTILATED AREA WHEN SOLDERING.
DECORATIVE SOLDERING TECHNIQUES
Stippled Effect
First run a smooth even lead. Keep iron on the
same setting as you normally use for beading.
Re-flux the seam and using the side of the smallest soldering tip you have, start tapping the
seam. Dont over work one area. Move up and down the seam, tapping as you go. If the solder
starts to peak up, re-flux. If the dots you are making on the seam are to large, try to tap faster
or turn down the heat just a little.
WARNING: This product, when used for soldering and similar applications, produces
chemicals known to the State of California to cause cancer and birth defects
or other reproductive harm.
Solder Balls
Turn your soldering iron down to mid-range. You
want to be able to take solder from the spool and
hold it on the tip of your iron for a count of 5 or
more. Re-flux the seam. If your solder runs off the
tip top quickly, turn the heat down. The smaller your soldering tip the smaller balls you can
create. Try to take off an even amount of solder each time. Lower the tip down towards the
seam. Once the solder ball on the tip makes contact with the seam (about 1 second) quickly
lift the iron directly up and away from the ball. If the ball rolls off to the side of the seam, try
coming down more directly onto the seam (a 90° angle). If your solder ball is pointed or
frosted looking, re-flux the ball and quickly touch the ball with the edge of your soldering tip.
The ball should round out quickly. You can use this same technique to enlarge a small
solder ball, just add more solder, re-flux and re-heat the original ball. To space the balls more
evenly, use a ruler and mark off the distance between each ball.
Solder Beads or Pearls
These are created just like the balls except you
leave your iron on the seam, just a little longer.
The extra heat will make the balls lengthen and
form more bead shaped decorations.
Sponged Surfaces
Run a smooth high seam. Re-flux and re-heat a
small 1/4" section of the seam. While that area is
still hot, push a damp sponge directly onto the
seam. Keep you iron heat on the regular setting
for bead work.
Tree Bark
Run a smooth really high seam. Re-flux and re-heat a small 1/4" of the
seam, if needed add more solder at this time. Push the side of a damp flux
brush directly down onto the hot molten solder. Do not use a brushing
stroke. Use a hot setting on your iron.
Bamboo
Run a smooth really high seam. Re-flux and using
the flat part of your soldering tip, wipe it quickly
and firmly across the seam. Clean your tip off on a wet sponge and repeat that process every
1/2" down the seam. Use a hot setting on your iron.
Jewel Prongs
You may want to add jewels or decorations to
your decorative work without having to foil them
first. Instead you can create prongs just like a
jeweler. Do not use flux on the item being set. You will need to flux sparingly on the surface
where you are attaching the prongs. Using a cool setting on your iron, keep the solder in
contact with the smallest edge on your soldering tip and pull slowly and gently up and over the
edge of the jewel or item. This takes practice. You may have better luck if you elevate the
area so that you are soldering in a more horizontal position.
TIPS
If you want to combine one or more of these techniques together, be sure you wait until one
layer is completely cooled before you try to apply more hot solder. Use 60/40 solder or solders
with a 62+ tin content.
You may want to work with two or more irons when you are doing your decorative techniques.
Then you wont have to wait for irons to heat up or cool off before changing techniques.
Irons controlled with a rheostat are easier to control and better to use for decorative soldering
work. It is also helpful if you have an iron like the Weller
®
WLC200 that accepts several
different sized soldering tips.
1

Other manuals for Weller WLC200

Question and Answer IconNeed help?

Do you have a question about the Weller WLC200 and is the answer not in the manual?

Summary

Product Description and Features

Weller WLC200 Soldering Station Overview

Details adjustable tip temperature by varying heater wattage from 5 to 80 watts.

Included Accessories

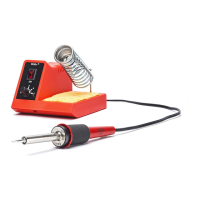
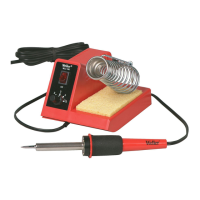
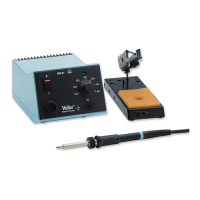
Lists items included with the WLC200, such as iron stand, cleaning sponge, and tips.

Operating and Soldering Instructions

Initial Setup and Operation

Guide on unpacking, installing iron stand, wetting sponge, plugging in, and tinning the tip.

Stained Glass Soldering Technique

Instructions for bonding intricate seams, adjusting iron settings, and cleaning joints.

Decorative Soldering Techniques

Methods for creating various decorative effects like stippling, solder balls, and tree bark.

General Soldering Tips

Advice on combining techniques, solder choice, using multiple irons, and iron control.

Safety Precautions and Care

General Safety Rules

Essential safety guidelines for using the soldering station and iron, including handling heat.

Work Area and Ventilation

Emphasis on working in a well-ventilated area due to potential toxic fumes.

Handling, Storage, and Damage

Instructions for safe handling, transport, storage, and procedures for damaged units.

Soldering Tip Care

Guidelines for cleaning, tinning, and maintaining soldering tips to prolong their life.

Parts and Accessories

Weller MTG Series Soldering Tips

Details on the material and construction of Weller MTG series tips.

Replacement and Optional Parts

List of available replacement parts for the WLC200, including tips and cleaning sponges.

Other Weller Soldering Products

Mentions of related products like the Stained Glass Soldering Iron and a 40 Watt Iron.

Overview

The Weller WLC200 Soldering Station is a versatile tool designed for soldering applications, particularly in stained glass work, offering adjustable tip temperature and a range of decorative soldering techniques.

Function Description

The primary function of the WLC200 is to provide a controlled heat source for soldering. It allows users to adjust the tip temperature by varying the heater wattage, enabling precise control over the soldering process. This adjustability makes it suitable for both general soldering and intricate decorative work. The station is designed to bond even the most intricate seams together, making it ideal for stained glass projects.

Important Technical Specifications

The WLC200 Soldering Station offers a wattage range from a minimum of 5 watts to a maximum of 80 watts. This wide range allows for flexibility in temperature control, accommodating different soldering needs. The unit is U.L. Listed, indicating compliance with safety standards. It operates on a 120 volt AC receptacle. The station comes with a MTG21 1/4" chisel tip, which is part of the Weller MTG series tips. These tips are made of solid copper, plated with iron, nickel, and chromium, with the working area pre-tinned with tin/lead solder. The nickel and chromium plating protects the shank from corrosion and solder creep.

Usage Features

The WLC200 is designed for ease of use. To begin, the unit should be unpacked, the iron stand installed, and the iron inserted. The tip cleaning sponge should be wetted with distilled water to prevent contamination of the soldering tip and solder joints. After plugging into a 120 volt AC receptacle, the unit is turned ON, and the power control knob is set to "5". A warm-up period of approximately 3 minutes is required. After warm-up, the power control can be adjusted to a lower setting, and the tip should be tinned with solder, thoroughly coating the working surface.

For stained glass soldering, it's recommended to practice on scrap lead to determine the correct pressure, speed, and angle. Joint surfaces must be thoroughly cleaned, and all joints should be butted together as closely as possible. Organic and water-soluble fluxes, commonly used in stained glass, are highly acidic and can reduce tip life, so it's crucial to wipe the tip clean and re-tin after soldering, avoiding leaving flux on the tip during idle periods. Always work in a well-ventilated area when soldering due to potential toxic fumes.

The station supports various decorative soldering techniques:

  • Stippled Effect: Achieved by tapping the seam with the side of the smallest soldering tip after re-fluxing a smooth lead. Tapping faster or reducing heat can create smaller dots.
  • Solder Balls: Created by turning the iron to mid-range, allowing solder to be held on the tip for 5 or more counts. After re-fluxing the seam, the tip is lowered directly onto the seam for about 1 second and then quickly lifted. Smaller tips create smaller balls. If balls are pointed or frosted, re-flux and touch with the edge of the tip to round them out.
  • Solder Beads or Pearls: Similar to solder balls, but the iron is left on the seam slightly longer, allowing the balls to lengthen and form bead shapes.
  • Sponged Surfaces: After creating a smooth high seam, re-fluxing, and re-heating a small section, a damp sponge is pushed directly onto the hot area.
  • Tree Bark: Achieved by creating a smooth, high seam, re-fluxing, and re-heating a small section (adding more solder if needed), then pushing the side of a damp flux brush directly onto the hot molten solder without brushing.
  • Bamboo: Involves creating a smooth, high seam, re-fluxing, and quickly wiping the flat part of the soldering tip firmly across the seam. The tip is cleaned on a wet sponge and repeated every 1/2" down the seam.
  • Jewel Prongs: For adding jewels without foiling, prongs can be created using a cool setting. Solder is kept in contact with the smallest edge of the tip and pulled slowly and gently up and over the jewel. Elevating the work area to a more horizontal position can improve results.

Tips for Decorative Soldering:

  • Allow one layer to completely cool before applying more hot solder when combining techniques.
  • Use 60/40 solder or solders with 62+ tin content.
  • Using two or more irons can eliminate waiting for heating/cooling when switching techniques.
  • Rheostat-controlled irons, like the WLC200, offer better control for decorative work and accept various tip sizes.

Maintenance Features

Proper maintenance is crucial for extending the life of the soldering station and tips.

  • Tip Care: Keep the tip tinned and wipe only before using. Acidic fluxes, common in stained glass, significantly reduce tip life. The tip should be removed and cleaned periodically (at least once a week for constant use) with a suitable cleaner for the flux used.
  • Cleaning: Avoid abrasive materials or filing the tip, as this will reduce tip life. If the tip becomes unwettable due to contact with organic materials, it can be cleaned with a Weller Polishing Bar (Part Number WPB1). Overdoing this can remove the iron plating and ruin the tip. Re-tin immediately after cleaning to prevent oxidation.
  • Storage: Do not remove excess solder from the heated tip before storing, as the excess solder prevents oxidation of the wettable surface when the tip is reheated.
  • Safety: Always wear safety glasses or goggles during soldering to protect against popping and sputtering of flux and solder. Ensure the station is unplugged and the heater and tip are cool before changing the tip.
  • General Maintenance: Periodically remove the tip and set screw from the soldering iron to prevent them from seizing.
  • Troubleshooting: If the unit shows any sign of damage to the iron handle or power base, it should be returned to Weller for repair. There are no user-serviceable parts inside.

Safety Precautions

The WLC200 operates at high temperatures, and the tool should be kept out of reach of children.

  • Keep the soldering iron away from flammable materials.
  • Always assume the tip is hot to avoid burns.
  • Do not allow the hot tip to touch electrical cords, as this can melt insulation and create a shock hazard.
  • Never use or plug in the unit if the iron or power cord is burned.
  • Carry the unit by the power base and handle, not by the cords.
  • Do not dip the tool in liquid or use it where it could fall into liquid containers.
  • Always work in a well-ventilated area when soldering to avoid inhaling unpleasant or toxic fumes.
  • After unplugging, allow the tip and heater to cool completely before storing.

Replacement and Optional Parts

  • Soldering Tips: Refer to the tip chart for specific part numbers (e.g., MTG20, MTG21, MTG22).
  • Replacement Tip Cleaning Sponge: WCC104.
  • Weller Polishing Bar: WPB1.

Other Quality Weller Soldering Products

  • Stained Glass Soldering Iron: SPG80.
  • 40 Watt Iron and Station with Adjustable Power Control: WLC100.

Weller WLC200 Specifications

General IconGeneral
BrandWeller
ModelWLC200
CategorySoldering Gun
LanguageEnglish

Related product manuals