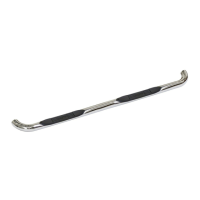
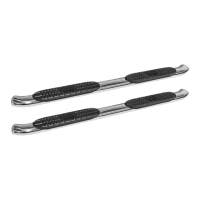
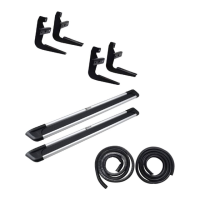
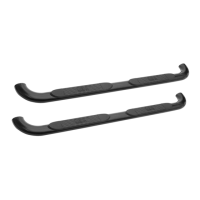
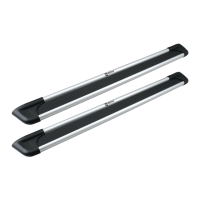
1,2 2 STEP BAR, PASSENGER (1) AND DRIVER (2)
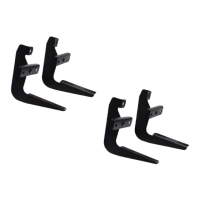
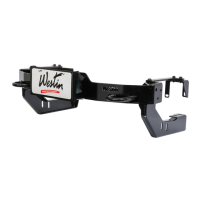
3,4 2 FRONT BRACKET, PASSENGER (3) AND DRIVER (4)
5,6 2 REAR BRACKET, PASSENGER (5) AND DRIVER (6)
7 4 1/2-13 X 1.75” HEX HEAD BOLT
8 4 1/2” FLAT WASHER
9 4 1/2” LOCK WASHER
10 8 M8 HEX HEAD BOLT
11 16 M8 FLAT WASHER
12 8 M8 LOCK WASHER
13 8 M8 HEX NUT
14 4 M8 SELF THREADING, FLANGE HEAD BOLT -
QTY
CONTENTS - CONTENIDO - CONTENU
TOOLS - HERRAMIENTA
- OUTILS
12MM SOCKET
3/4” WRENCH
3/4” SOCKET
13MM SOCKET
13MM WRENCH
RATCHET
TORQUE WRENCH
APPLICATION: 1997-2007 FORD EXPEDITION; 2007 FORD EXPEDITION EL
ITEM
APLICACIÓN: FORD EXPEDITION, MOD. 1997-2007, FORD EXPEDITION EL, MOD. 2007
APPLICATION: FORD EXPEDITION 1997-2007; FORD EXPEDITION EL 2007
AUTOMOTIVE PRODUCTS, INC.
STEP BAR ASSEMBLIES
ENSAMBLES DE ESTRIBOS
MONTAGES DE MARCHE-PIEDS
INSTRUCTIONS-INSTRUCCIONES-CONSIGNES
75-0282 REVISION A 2/21/12
STEP 1. Remove the contents from box and check for damage. Verify all parts are present. Read instructions completely before beginning.
STEP 2. Determine front and rear brackets. The front brackets have seven slots. SEE FIGURE 2.
STEP 3. Remove black tape over two holes on inside face of rocker panel. Attach front brackets with downward sloping end towards front using
M8 fasteners as shown. Place bolts through holes as shown. SEE FIGURE 2. Leave loose. NOTE: 2003-UP models use hole pattern
towards back end of bracket. 2007-UP Expedition EL models use hole pattern toward front end of bracket. SEE FIGURE 2.
STEP 4. Attach rear brackets with downward sloping end towards rear using M8 fasteners as shown. Place bolts through holes as shown. SEE
FIGURE 2. Leave loose.
STEP 5. 1997-2002 models: Install self tapping bolts with 12MM socket into holes previously covered by factory tape. NOTE: Do not use air
tool on this fastener.
(1) (2)
(3) (4)
(5) (6)
1,2 2 ESTRIBOS, LADO DEL ACOMPAÑANTE Y EL CONDUCTOR
3,4 2 SOPORTES LADO DEL ACOMPAÑANTE Y EL CONDUCTOR
2 SOPORTES LADO DEL ACOMPAÑANTE Y EL CONDUCTOR
7 4 PERNOS CON CABEZA HEXAGONAL DE 1/2-13 X 1,75”
8 4 ARANDELAS PLANAS DE 1/2”
9 4 ARANDELAS DE PRESIÓN DE 1/2”
10 8 PERNOS CON CABEZA HEXAGONAL DE M8
11 16 ARANDELAS PLANAS DE M8
12 8 ARANDELAS DE PRESIÓN DE M8
13 8
DELANTERAS,
, 5,6 TRASERAS
TUERCAS HEXAGONALES DE M8
14 4 PERNOS AUTOROSCANTES CON CABEZA DE BRIDA DE M8
(1) CONDUCTEUR (2)
(3) CONDUCTEUR (4)
(5) CONDUCTEUR (6)
BOULON A TETE HEXAGONALE 1/2-13 X 1,75 PO
RONDELLE PLATE 1/2 PO
RONDELLE A FREIN DE 1/2 PO
BOULON A TETE HEXAGONALE M8
11 16 RONDELLE PLATE M8
12 8 RONDELLE A FREIN M8
13 8
1,2 2 MARCHE-PIEDS, PASSAGER ET
3,4 2 , PASSAGER ET
5,6 2 , PASSAGER ET
7 4
8 4
9 4
10 8
SUPPORT AVANT
SUPPORT ARRIERE
ÉCROU HEXAGONAL M8
14 4 BOULON AUTOFILETEUR A TETE HEXAGONALE A EPAULEMENT M8
DADO DE 12MM
DADO DE 3/4”
LLAVE DE TUERCAS DE 3/4"
DADO DE 13MM
LLAVE DE TUERCAS DE 13MM
MANERAL
LLAVE DE TORQUE
CLE 12MM
DOUILLE 3/4 PO
CLE 3/4 PO
DOUILLE 13MM
CLE 13MM
CLIQUET
CLE DE COUPLE
ECO# W11-0128:
3
5
4
6
23-0925
23-0930
1
2