EasyManua.ls Logo

Whirlpool AD50USS - User Manual

Whirlpool AD50USS
40 pages
Print Icon
To Next Page IconTo Next Page
Loading...
CONSUMER SERVICES TECHNICAL
EDUC
ATION GROUP PRESENTS
R-103
JOB AID
Part No. 8178563
DEHUMIDIFIERS
Models: AD25BSS, AD35DSS, AD50DSS Models: AD35USS, AD50USS, AD70USS

Questions and Answers

  • R
    rachel93Aug 7, 2025
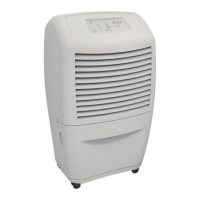
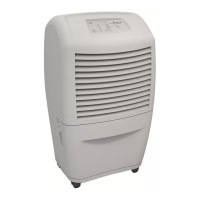
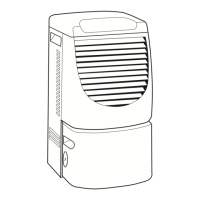
    Why is my Whirlpool Dehumidifier not dehumidifying?
    • E
      Eric PayneAug 7, 2025
      Your Whirlpool Dehumidifier may not be dehumidifying because: * The unit could be out of refrigerant. You should follow the sweep charge procedure to find and repair any leaks. * The humidity might be too low. In this case, turn the unit off until the humidity rises. * The evaporator could be dirty, or the air filter might be blocked. Try cleaning the air filter and/or the evaporator.
  • H
    haynesalexAug 13, 2025
    What to do if my Whirlpool AD50USS Dehumidifier is not dehumidifying enough?
    • A
      Angela JimenezAug 13, 2025
      If your Whirlpool Dehumidifier isn't dehumidifying enough, consider these possibilities: * The area might not be sealed off properly; check for open doors and/or windows and close them. * The grilles could be obstructed. Ensure that the unit and surrounding items are positioned so that the grilles aren't blocked. * The evaporator could be dirty, or the air filter might be blocked. Try cleaning the air filter and/or the evaporator. * There might be a low refrigerant charge. Follow the sweep charge procedure to locate and repair any leaks. * The unit might be too small for the area. Try closing off the area to make it smaller.
  • Y
    yvonnestewartAug 19, 2025
    How to fix a Whirlpool Dehumidifier fan that won't run but the compressor does?
    • D
      dean24Aug 19, 2025
      If the fan on your Whirlpool Dehumidifier isn't running but the compressor is, it could be due to these reasons: * The fan motor might not be getting power. Check the wiring and repair or replace as necessary. * The fan motor might be defective. Replace the fan motor. * The fan blade could be jammed. Remove any obstruction, and replace the blade if it's damaged.
  • A
    anthony96Aug 26, 2025
    What to do if Whirlpool AD50USS Dehumidifier fan runs but the compressor doesn't?
    • A
      April DiazAug 26, 2025
      If the fan runs but the compressor doesn't on your Whirlpool Dehumidifier, consider the following: * For mechanical models: the deicer thermostat may be open. Allow the evaporator coil to thaw. If it remains open after thawing, replace the deicer thermostat. * For electronic models: the thermistor may be out of range, or the evaporator temperature is less than 30°F. If the unit is in defrost mode, raise the room temperature. Otherwise, run diagnostics and replace the electronic control if needed. * The compressor overload or relay could be defective. Check both components and replace if defective. * The compressor windings might be open. Check continuity and replace if one or both windings are open.
  • S
    Sara NicholsSep 1, 2025
    Why won't my Whirlpool AD50USS run? (no fan or compressor)
    • B
      Brittney McdanielSep 1, 2025
      If your Whirlpool Dehumidifier won't run (no fan or compressor), here's what to check: * Ensure the unit is turned “ON” and set dry enough. Set the control to “CONTINUOUS” to allow the fan and compressor to run regardless of the ambient humidity. * Verify the unit has power: * Make sure the power supply cord is plugged in. * Ensure the outlet has power; if not, have a qualified electrician correct the issue. * Check the bucket: * Empty the bucket. * Make sure the bucket is installed properly. * Check the bucket In/Water Level switch; replace it if defective. * Inspect the power supply cord and internal wiring. Repair or replace any defective parts. * Run diagnostics to check the humidistat. Replace the electronic control if needed.

Summary

Introduction and Objectives

Job Aid Introduction

Introduction to the Job Aid, its purpose, and scope regarding dehumidifier operation and service.

Service Technician Goals

Outlines the main goal and specific objectives for service technicians using this Job Aid for dehumidifier repair.

General Safety Information

Safety Alert Symbols and Warnings

Emphasizes the importance of safety messages and defines DANGER and WARNING signals for user protection.

Model and Serial Number Identification

Model Number Structure

Explains the coding system for model numbers, including product group, capacity, features, series, and year of introduction.

Serial Number Structure

Details the components of the serial number, such as manufacturing site, year, week of production, and product sequence number.

Label Identification

Model;Serial Number Label Placement

Identifies the location of the model and serial number label, typically found behind the water bucket.

Wiring Diagram Label Placement

Shows the location of the wiring diagram label, usually found inside the front half of the cabinet.

Dehumidifier Operation Theory

Understanding Humidity

Defines humidity and explains its relationship with temperature and its impact on comfort and property.

Refrigeration System Operation

Explains how a dehumidifier removes moisture using a refrigeration system with evaporator and condenser.

Dehumidifier Performance and Controls

Operational Characteristics Overview

Describes initial frosting and operation in cool, dry conditions, and limitations for mechanical models.

Low Temperature Performance

Details low-temperature performance for mechanical and electronic models, including compressor cycling.

Electronic Control Sensor Functions

Explains the function of the humidistat and thermistor in electronic control models.

Electronic Control Default Operation

Describes the default operation mode for electronic models when sensors fail.

Control Panel Functions

Fan Speed Adjustment

Explains how fan speed settings (High, Low, Auto) affect moisture removal and noise.

Dryness Level Adjustment

Describes how the dryness control adjusts moisture removal levels for desired humidity.

Bucket Indicator Light

Explains the function of the light indicating bucket issues and how to resolve them.

Dehumidifier Usage (Types 1 & 2)

Setting Controls (Types 1 & 2)

Provides instructions for starting, stopping, and setting controls for dehumidifier models with Type 1 and Type 2 controls.

Bucket Light Operation (Types 1 & 2)

Details what the light signifies and the necessary actions if it is illuminated.

Fan Speed Control (Type 2)

Explains the fan speed options available for dehumidifier models with Type 2 controls.

Dehumidifier Usage (Type 3)

Dryness Control Function

Explains how the dryness control regulates room moisture and initial usage recommendations.

Setting Controls (Type 3)

Guides users on starting, stopping, and setting controls for Type 3 models.

Bucket Light Operation (Type 3)

Describes the meaning of the bucket light and troubleshooting steps for Type 3 models.

Fan Speed Control (Type 3)

Details fan speed selections (Low, High, Auto) for Type 3 models.

Advanced Controls and Water Drainage

Desired Humidity Setting (Type 3)

Explains how to select desired humidity levels (Normal, Dry, Max Dry, Continuous Run) on Type 3 models.

Dehumidifier Draining Overview

Introduces methods for draining collected water, including a warning about consumption.

Manual Bucket Drainage

Details the procedure for manually emptying the water bucket when a floor drain is not used.

Draining Methods and Operational Sounds

Continuous Drainage via Hose

Describes how to connect a garden hose for continuous draining of collected water.

Draining and Bucket Notes

Provides important notes regarding hose removal and proper bucket alignment for operation.

Understanding Normal Sounds

Lists common sounds produced by the dehumidifier during normal operation, such as compressor and fan noise.

Dehumidifier Maintenance

Air Filter Cleaning

Provides instructions for removing, cleaning, and reinstalling the air filter for optimal efficiency.

Exterior Cleaning

Guides on cleaning the exterior surfaces of the dehumidifier, advising professional interior servicing.

Water Bucket and Float Care

Explains how to clean the water bucket and the importance of the water level float alignment.

Component Access and Safety Precautions

Internal Component Locations

Illustrates the locations of key internal components like the fan motor, compressor, and electronic control.

Electrical Safety Warning

Crucial safety warning about disconnecting power before servicing any components.

Cabinet Removal

Cabinet Removal Steps 1-2

Details initial steps for removing the cabinet, including unplugging and removing the water bucket.

Cabinet Removal Steps 3-5

Continues cabinet removal by detailing air filter removal and unscrewing the front and side panels.

Cabinet Separation Process

Cabinet Removal Steps 6-7

Describes removing rear screws and separating the front and rear halves of the cabinet.

Electronic Control Assembly Removal

Disconnecting Control Wiring

Instructions on disconnecting wire connectors from the electronic control unit.

Removing Control Assembly Screws

Details removing the screws securing the electronic control assembly.

Electronic Component Disassembly

Thermistor and Ground Wire Removal

Steps to unclip and remove the thermistor and its ground wire.

Bucket Switch and Capacitor Disconnection

Instructions for disconnecting wires from the bucket switch and compressor capacitor.

Power Cord and Control Assembly Removal

Steps to remove the power supply cord and the entire electronic control assembly.

Mechanical Controls and Light Removal

Mechanical Humidistat Removal

Steps to remove the humidistat knob, screws, and the unit itself.

Indicator Light Removal

Instructions for disconnecting wires and unclipping the indicator light from the cover.

Power Supply Cord Removal Procedure

Power Cord Wire Disconnection

Details disconnecting the power supply cord wires from the compressor capacitor and bucket switch.

Power Cord Ground Wire Removal

Instructions for removing the ground wire screw and the power supply cord from the dehumidifier.

Fan Capacitor and Motor Removal

Fan Capacitor Removal

Steps to discharge, disconnect wires, and remove the fan capacitor.

Fan Motor Removal

Instructions to loosen the blower screw, disconnect motor wires, and remove the fan motor.

Fan Motor Removal Details

Fan Motor Ground Wire Disconnection

Describes removing the top green ground wire screw from the condenser.

Securing and Removing Fan Motor

Details removing the screws holding the fan motor and pulling the motor out.

Compressor Capacitor and Bucket Switch Removal

Compressor Capacitor Removal

Steps to discharge, disconnect wires, and remove the compressor capacitor.

Bucket Switch Removal Procedure

Bucket Switch Wire Disconnection

Instructions for disconnecting wires from the bucket switch terminals for electronic and mechanical models.

Bucket Switch Holder Removal

Steps to release the switch holder and unclip the bucket switch.

Component Testing

Pre-Testing Component Checks

General checks like connector corrosion and required VOM/DVM sensitivity before testing components.

Testing the Mechanical Humidistat

Steps to test the mechanical humidistat using an ohmmeter at different knob positions.

Testing Capacitors

Procedure for testing fan and compressor capacitors using an ohmmeter after discharging them.

Testing Fan Motor and Bucket Switch

Fan Motor Resistance Test

Instructions for testing the fan motor resistance using an ohmmeter based on motor type and capacity.

Bucket Switch Continuity Test

Steps to test the bucket switch continuity in both normal and actuated states using an ohmmeter.

Diagnostics and Troubleshooting Guide

Entering Diagnostic Mode

Procedure to enter diagnostic mode using a specific key sequence on the control panel.

Diagnostic Test Procedures

Details the steps in the diagnostic mode, including LED indicators for bucket switch, thermistor, humidistat, fan, and compressor.

Troubleshooting Common Problems

Unit Not Running Troubleshooting

Addresses problems where the unit won't start, listing causes like control settings, power, or switch issues.

Fan Runs, Compressor Off Troubleshooting

Troubleshoots scenarios where the fan operates but the compressor does not, citing thermostat, thermistor, or compressor issues.

Fan Off, Compressor On Troubleshooting

Covers issues where the compressor runs but the fan is not operating, due to power or motor problems.

Evaporator Coil Frosted Troubleshooting

Explains causes like cold temperatures or deicer thermostat issues when the coil is frosted.

No Dehumidification Troubleshooting

Addresses lack of dehumidification due to low temperature, dirty filter, or refrigerant issues.

Insufficient Dehumidification Troubleshooting

Covers causes for poor dehumidification like unsealed areas, blocked grilles, or unit size.

Wiring Diagrams Overview

Wiring Diagram 1 Details

Presents the first wiring diagram, illustrating electrical connections for the dehumidifier system.

Wiring Diagrams (Continued)

Wiring Diagram 2 Details

Shows the second wiring diagram, detailing electrical paths for fan switch and other components.

Wiring Diagrams (Final)

Wiring Diagram 3 (Electronic Control)

Provides the third wiring diagram, specifically for models with electronic controls.

Product and Warranty Information

Product;Warranty Info (US)

Lists contact numbers for product specifications and warranty information for US customers.

Technical Assistance;Literature (US)

Provides contact details for technical assistance and literature orders for US customers.

Product;Warranty Info (Canada)

Lists contact numbers for product specifications and warranty information for Canadian customers.

Technical Assistance (Canada)

Provides contact details for technical assistance for Canadian customers.

Whirlpool AD50USS Specifications

General IconGeneral
BrandWhirlpool
ModelAD50USS
CategoryDehumidifier
LanguageEnglish

Related product manuals