Begin the
installation
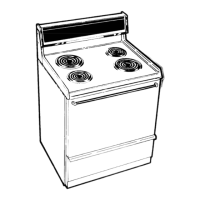
Remove racks and all other contents from oven
before moving appliance. Be sure to remove all
packaging material (cardboard, protective film, etc.)
from range before use.
A, Remove shipping skid
318’
BOL
Remove the 4 cardboard pads from shipping box. Place
them on floor as shown to protect appliance’s finish.
Rest appliance (on its back) on pads.
Remove the two 318” shipping bolts from wooden skid.
Discard the skid.
B. Extend leveling legs
BOTTOM OF
LEVELING LEG
Once skid is removed, 4 leveling legs are exposed at
bottom of frame.
Loosen legs by applying an adjustable wrench to the
13/e” base of the leveling legs. Back each of them out
about 4 complete turns.
Stand appliance on its base.
Begin electrical
connection
Grounding Instructions
WARNING:
THIS APPLIANCE MUST BE CONNECTED TO A
GROUNDED, METALLIC, PERMANENT WIRING
SYSTEM, OR AN EQUIPMENT GROUNDING CON-
DUCTOR SHOULD BE RUN WITH THE CIRCUIT
CONDUCTORS AND CONNECTED TO THE EQUIP-
MENT GROUNDING TERMINAL OR LEAD ON THE
APPLIANCE.
CAUTION: Before connecting flexible armored cable
for permanent wiring, disconnect power at fuse box or
circuit breaker.
A. Remove terminal block cover
3/B” BRASS NUTS
TERMINAL
BLOCK ,
COVER
W
Terminal block is located on back of the appliance near
the bottom.
Remove retaining screws to expose electrical terminal
block.
USE ONLY the supplied y8” brass nuts when connect-
ing cord.
USE ONLY ring type terminals to connect cord.
4