Shenzhen Bayite Technology Co., Ltd
Email: service@bayite.com
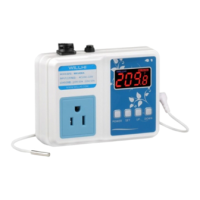
Menu Key:
Temperature at which the unit
supplies output power.
Temperature at which the unit
shuts off output power.
Optional. If displayed temperature is 3 degree
higher than the actual temperature, set CA to -3.
Compressor Time Delay
(unit: minute)
Optional. It defines the time interval of 2
compressor cycles(On-Off)
Optional. It will beep once if temperature exceeds
AH. Press any key to stop alarm.
Optional. It will beep once temperature is below
AL. Press any key to stop alarm.
Auto shut off timer
(unit: minute)
*Please refer to advanced
settings
To shut off the device plugged in the controller
rather than the controller itself.
This parameter only appears after you enable
timer in advanced menu by setting dL=ON.
Trouble Shooting:
A. The output device won’t power on.
Check that the controller and the output device are securely plugged in and the
value for power on temperature “ON” is set correctly.
B. The controller displays EEE while beeping.
The probe is not inserted completely into the jack or it may be defective. Email
us at service@bayite.com for a free probe replacement.
C. The display shows LLL or HHH.
The temperature is outside the unit’s measurement range either too high (HHH)
or too low (LLL)
D. The unit keeps beeping at a certain temperature.
The alarm function can be disabled by setting “AH” to 230 and “AL” to -58.
E. The display shows “---“, or there is some other malfunction.
Restore factory default settings by powering off the unit then powering it on
and holding SET and UP buttons for 10 seconds while the unit cycles through
showing “888” and “---“.
 Loading...