This document describes the Xindak V10/V20/V30 Vacuum Tube Amplifier, providing instructions for its use, safety, and specifications.
Function Description:
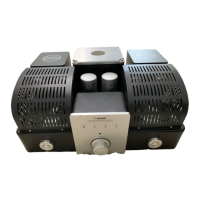
The Xindak V10/V20/V30 is a vacuum tube amplifier designed to enhance audio signals for playback through loudspeakers. It features multiple input options for connecting various audio sources and provides a controlled output for an immersive listening experience. The amplifier utilizes vacuum tubes for its amplification stage, which are known for their distinct audio characteristics. The device is equipped with a front panel for direct control and a remote controller for convenient operation from a distance.
Important Technical Specifications:
The amplifier series offers different power outputs depending on the model (V10, V20, V30) when driving an 8-ohm load:
- V10: 30 watts per channel
- V20: 18 watts per channel
- V30: 50 watts per channel
Key specifications common across the series include:
- Frequency response: 10Hz - 70KHz (-1dB)
- Signal-to-noise ratio: 90dB Typical
- Distortion (THD + noise): 0.2%
- Dimensions (WXDXH): 430mm X 356mm X 219mm
- Input sensitivity: 390mV
- Consume power: 300W
- Net weight: 24Kg
- Supply voltage: Specified on the rear panel
The vacuum tube configurations vary by model:
- V10: 12AX7(ECC83) x 2, 6SN7GT(G) x 2, 350Cx4
- V20: 12AX7(ECC83) x 2, 6SN7GT(G) x 2, EL34x4
- V30: 12AX7(ECC83) x 2, 6SN7GT(G) x 2, KT88(6550)x4
Usage Features:
Front Panel Controls:
The front panel provides essential controls for operating the amplifier:
- Power supply on-off button: Toggles the power to the unit.
- Power indicator: Illuminates when the unit is powered on and during warm-up.
- IR Sensor Remote control signal receiver: Receives signals from the remote controller.
- Sound volume control button: Adjusts the sound volume clockwise to increase and anticlockwise to decrease.
- S1-S3 indicators: Show the currently selected signal input.
- Input signal selection button: Cycles through available input paths with each press.
Rear Panel Connections:
The rear panel facilitates connections to other audio components and power:
- Signal input jack: Connects input signals via RCA cables from sources like CD, DVD, or SACD players.
- Speaker binding post: Allows connection to left and right channel loudspeakers. Users should select the appropriate binding post (4 ohm or 8 ohm) based on their loudspeaker's impedance.
- Power supply input jack and safety cutout jack: Connects to the main power supply using the provided power cord.
Remote Controller:
A remote controller is included for convenient operation:
- Mute button: Toggles mute mode.
- S-1, S-2, S-3 buttons: Select specific sound source inputs (path 1, 2, or 3 respectively).
- Volume+/Volume- buttons: Continuously increase or decrease the sound volume.
The remote controller has a maximum valid distance of 5 meters and requires direct line-of-sight to the IR sensor on the amplifier's front panel.
Installation and Setup:
- Battery Installation: The remote controller requires 2 AAA batteries. Users must install them with correct polarity and ensure the rear cover is reinstalled.
- Audio Connections: Before use, connect audio sources (CD player, DVD player, SACD player) to the signal input jacks using RCA cables. Verify correct and reliable signal connections for both left and right channels.
- Speaker Connections: Connect the amplifier to left and right channel speakers using speaker cables. It is recommended to consult the dealer to ensure speaker cables are compatible and to verify correct channel and polarity.
- Power Connection: Connect the power cable to the power supply input jack. Ensure the power supply is cut off before connecting the power cable. If using alternative power cables, verify they meet the machine's specifications.
Maintenance Features:
General Safety Instructions:
The manual emphasizes several critical safety instructions:
- Risk of Fire/Electric Shock: Do not expose the appliance to rain or moisture.
- No User-Serviceable Parts: Do not remove the cover; refer servicing to qualified personnel.
- Dangerous Voltage: The lightning flash symbol warns of uninsulated dangerous voltage inside the enclosure.
- Important Instructions: The exclamation point symbol indicates important operating and maintenance instructions in the manual.
- CE Marking: Indicates compliance with EMS (Electromagnetic Compatibility) and LVD (low voltage directive) standards.
Before Use Precautions:
- Read and keep all instructions and warnings.
- Do not use near water.
- Clean only with a dry cloth.
- Keep out of reach of children.
- Avoid installation near heat sources.
- Protect the power cord from damage.
- Unplug during lightning storms or when unused for long periods.
- Disconnect from AC mains before connecting/disconnecting cables or cleaning.
- Must be terminated with a three-conductor AC mains power cord with earth ground connection.
- AC extension cords are not recommended.
- Never use flammable or combustible chemicals for cleaning.
- Never operate with the cover removed.
- Never pour or spill liquids onto the unit.
- Do not block ventilation slots or heat sinks.
- Never bypass or replace fuses with incorrect values/types.
- Do not attempt to repair; contact your dealer for problems.
- Avoid extreme high or low temperatures.
- Do not operate in an explosive atmosphere.
Battery Replacement:
- Use a tool to remove the rear cover of the remote controller.
- Remove old batteries and install 2 new AAA batteries with correct polarity.
- Reinstall the rear cover.
- Cautions: Do not mix new and old batteries, use correct battery types, remove batteries if unused for long periods, and replace batteries if the remote's range shortens.
- For Users (private household): The product is marked with a symbol indicating it should not be mixed with general household waste. In the EU, used electrical and electronic equipment should be returned to designated collection facilities free of charge. Local retailers or authorities may provide further details. Batteries/accumulators should be disposed of separately according to local requirements. Proper disposal helps prevent negative environmental and health effects. Outside the EU, contact local authorities for disposal methods. In Switzerland, equipment can be returned to dealers free of charge, even without purchasing a new product.
- For Business Users: In the EU, contact the local dealer for product take-back information, as costs for take-back and recycling may apply. Small products/amounts might be accepted by local collection facilities. Outside the EU, contact local authorities for disposal methods.
The manual emphasizes that all specifications, dimensions, and weights are subject to change without notice.