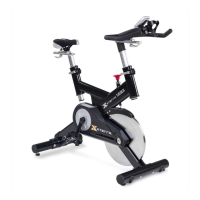
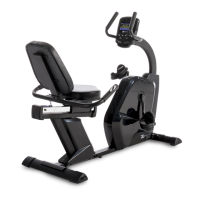
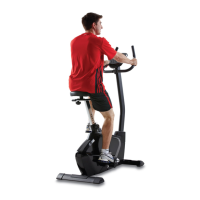
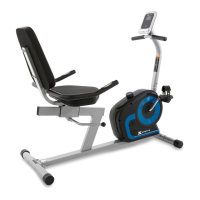
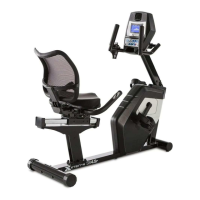
The XTERRA Fitness MB8.5 Indoor Cycle is a fitness equipment designed for residential use, offering a comprehensive workout experience. It is a stationary bike that allows users to engage in indoor cycling, providing a means for cardiovascular exercise and fitness training within the comfort of their home.
Function Description:
The MB8.5 Indoor Cycle serves as a personal fitness device, enabling users to perform cycling exercises indoors. It features a console that displays various workout metrics, a resistance system to adjust the intensity of the workout, and adjustable components to accommodate different user body types and preferences. The bike is designed to simulate the experience of outdoor cycling, allowing users to control their speed, cadence, and resistance.
Important Technical Specifications:
- Model: MB8.5 Indoor Cycle
- Intended Use: Residential only. Any other application voids the warranty.
- Power Source (Console): 2 AAA batteries
- Power Source (Speed Sensor Transmitter): 2 AAA batteries
- Warranty:
- Frame: Lifetime
- Parts: 1 Year
- Labor: 1 Year
- Dimensions (Clearance for Safe Operation): At least 1 foot (30cm) of free space to either side of the unit and 2 feet (60cm) of free space to the rear.
- Pedal System: Dual-function pedals with adjustable straps and cleat compatibility. The left pedal has left-hand threads.
- Resistance System: Controlled by a tension knob, allowing for increased or decreased resistance.
- Braking System: Pressing down on the tension knob applies the brake.
- Console Display: Features a "Low Battery" indicator, RPM/Cadence bar graph, and displays metrics such as Speed, Distance, Time, Clock, Heart Rate (with optional chest strap), Calories (KCAL), and Average Speed.
- Console Water Resistance: Water resistant, but NOT waterproof. Excessive exposure to water will void the warranty.
- Speed Sensor Transmitter: Wireless, counts magnet passes on the crank assembly to send coded signals for speed and cadence to the console.
Usage Features:
- Pre-Assembly and Assembly: The manual provides detailed instructions for assembling the indoor cycle, including attaching stabilizer tubes, rear stabilizer cover, handlebars, water bottle holder, and pedals. It also specifies the hardware and tools required for each step.
- Console Operation:
- Battery Installation: Requires 2 AAA batteries for both the console and the speed sensor transmitter. A "Low battery" indicator alerts users when batteries need changing.
- Synchronization: The transmitter and console must be synchronized after battery installation. This involves holding down keys on the console and the blue button on the transmitter for specific durations.
- Installation: The console attaches to the handlebar via a mounting clamp and thumb screw, allowing for angle adjustment for optimal visibility. The transmitter installs on the back of the chain cover, ensuring the sensor wire is routed correctly and away from the flywheel.
- Quick Start Mode: The console can be woken from Power Saving Mode by holding down any key, entering "QUICK Start" active state.
- Metric/Standard Data Toggle: Users can switch between metric and standard units for distance and speed by following a specific sequence of key presses on the console.
- Mode Select: The left-hand key allows users to select between displaying SPEED, DISTANCE, TIME, or CLOCK at the bottom of the display.
- Heart Rate Features:
- Heart Rate Display: Requires a separately sold chest strap. The console displays approximate heart rate.
- Heart Rate Alarm: Can be activated to flash an icon and beep if the heart rate is above or below a selected target zone.
- Heart Rate Target Zones: Users can set maximum and minimum heart rate limits. This involves holding down the right-hand key until TIME flashes, then using the left-hand key to select target zone settings and the right-hand key to adjust limits.
- Gender and Bodyweight Settings: Users can input their gender and bodyweight (in Lb or Kg) to improve calorie calculation accuracy. This is done through a similar key-press sequence as setting heart rate zones.
- Data Reset: Exercise TIME, AVG SPEED, AVG PULSE, DISTANCE, and KCAL can be reset by selecting TIME and holding down the right-hand key.
- Adjusting the Bike for Proper Fit:
- Seat Height Adjustment: Users should adjust the seat to hip height, ensuring a slight bend in the knee when the foot is at the bottom of the pedal stroke. A quick release lever allows for easy adjustment.
- Seat Forward/Aft Adjustment: The seat can be slid forward or backward to align the small bump on the shin with the pedal axle, important for road bike training simulation.
- Handlebar Height Adjustment: The handlebar height is a matter of preference, affecting riding posture. A quick release allows for adjustment.
- Handlebar Forward/Aft Adjustment: The handlebar can be slid forward or backward to allow for a comfortable grasp with a slight bend at the elbow.
- Pedal Usage:
- Pedal Straps: Adjustable nylon straps secure the feet. The spring-loaded clasp allows for easy tightening or loosening.
- Cleat Pedals: Compatible with cleated shoes. Users engage by pushing down and disengage by twisting the heel outwards. Binding tension is adjustable with an Allen key.
- Basic Operation:
- Starting a Workout: Begin pedaling at a slow pace with low resistance, maintaining proper posture.
- Resistance Control: The tension knob adjusts pedaling resistance (clockwise for more, counterclockwise for less).
- Braking: Pressing down on the tension knob applies the brake. Users should stop the flywheel before dismounting.
- Safety Warning: Users are advised to stop exercising immediately if they experience chest pain, muscular discomfort, faintness, or shortness of breath, and to consult a medical doctor if conditions persist.
Maintenance Features:
- Regular Examination: The bike should be regularly examined for damage and wear. Inoperable components must be replaced immediately, and the equipment should not be used until repaired.
- Pedals:
- Action: Ensure pedals are tight in crank arms, all screws on pedals are tight, and pedal straps are not frayed.
- Frequency: Before each use.
- Lubricant: N/A
- Note: Do not service internal parts of pedals; replace if worn.
- Frame:
- Action: Wipe down using a soft, damp clean cloth.
- Frequency: Daily.
- Cleaner: Water.
- Lubricant: N/A
- Flywheel:
- Action: Wipe down by spraying WD-40 on a rag and applying a light coat to the sides of the flywheel.
- Frequency: Weekly.
- Cleaner: N/A
- Lubricant: WD-40 spray.
- Brake Pad:
- Action: Inspect for excessive wear or squealing.
- Frequency: Weekly.
- Cleaner: N/A
- Lubricant: Silicone Spray.
- General Maintenance:
- Using lubricants or cleaning solutions other than those specified will diminish performance and shorten the life span of parts.
- Failure to follow guidelines may compromise effectiveness, expose users to injury, and reduce equipment longevity.
Troubleshooting:
- No Display on Console:
- Hold any key to enter "Quick Start" mode.
- Check battery installation and replace with fresh batteries if needed.
- No Heart Rate Signal Displayed (chest strap transmitter sold separately):
- Ensure chest strap is worn correctly and electrodes are moist.
- Relocate the bike away from potential radio frequency interference sources (e.g., DVD player, TV).
- Cadence Number Jumps High or Low:
- Re-synchronize the transmitter and console.
- Relocate the bike away from RF interference areas.
- Heart Rate Signal Interrupted or Drops Out (chest strap transmitter sold separately):
- Maintain a minimum distance of 36 inches between bikes.
- Verify chest strap is secure and electrodes contact the chest.
- Caution: External interference from other electronic devices (TVs, stereos, speakers, electrical wiring) can affect the console display. Moving the bike(s) away from these sources is recommended.