en - Original instructions
40
- Press and hold (4) for a few seconds to access
the menu. The LED (4) switches off.
- Press (1) or (2) to select the alarm, and press
(5) to confirm.
- Press (5) several times and the following data
are displayed in sequence: alarm code, status
(OFF, ON), and day, month, year, hour, minute,
to indicate the time of occurrence.
- Press (4) to exit or (1) or (2) to select another
alarm in the list.
Example in figure 65
Alarm number 20, type A53,
- deactivated (OFF) 12/11/2015 at 21h:36m
- activated (ON) 12/11/2015 at 20h:58m
5.4.3
Configuration menu
This is used for quick application selection (see
Figures 11 to 64
).
SELECTION MUST BE DONE ONLY DURING
POWER-UP.
1. Refer to figure 6: Turn on the main switch (2).
2. Refer to figures 1 and 2: Press buttons (1)
and (2) at the same time during power-up;
LED (9) is illuminated and “cnf” appears on
the display.
3. Press (5), and the actual configuration is
shown.
4. Press button (1) or (2) to edit the type of con-
figuration:
• SE: Sewage.
• bS: booster pressurisation.
5. Press button (5) to confirm
6. 1P or 2P are shown on the display.
7. Press button (1) or (2) to edit the number of
pumps:
• 1P: one pump
• 2P: two pumps
8. Press button (5) to confirm.
9. P or S are shown on the display. Press button
(1) or (2) to edit.
If pressurisation mode is set (bS):
• P: Pump control from pressure switch.
P1, P2, PMAX, PMIN enabled.
• S: Pump control from electronic pres-
sure sensor (A IN). A IN, P MAX, P
MIN enabled.
If sewage mode is set (SE):
• G: Pump control from pressure switch
floats. G1, G2, GMAX, GMIN enabled.
10. Press button (5) to confirm
11. Turn the control panel off and then on again.
The new application is now activated.
5.4.4
Parameter menu
All the operating parameters can only be selected
and modified in STANDBY mode (StY) (see
Tab 2
or
Tab 3).
After 3 minutes of inactivity and if no button is
used, automatic mode is restored.
The pump remains in standby during configuration.
Refer to figures
1 and 2
1. Press and hold (4) to access STANDBY (StY)
mode.
2. LEDs (2) and (5) switch off. LED (9) is ON.
3. Press (5) to access the parameter menu.
4. “000” flashes.
5. Press (1) or (2) to edit the password 066.
6. Press (5) to confirm. If password is wrong
press (4) for read-only mode.
7. Press (1) and (2) to view the parameter
8. Press (5) to edit the parameter. It flashes.
9. Press (1) or (2) to modify the value.
10. Press (5) to confirm.
11. Press (1) or (2) to confirm and move on to the
next parameter or press (4) for AUTOMATIC
or MANUAL mode.
12. Repeat points 7 to 9.
13. Press (4) for AUTOMATIC or MANUAL mode.
14. Switch off and back on.
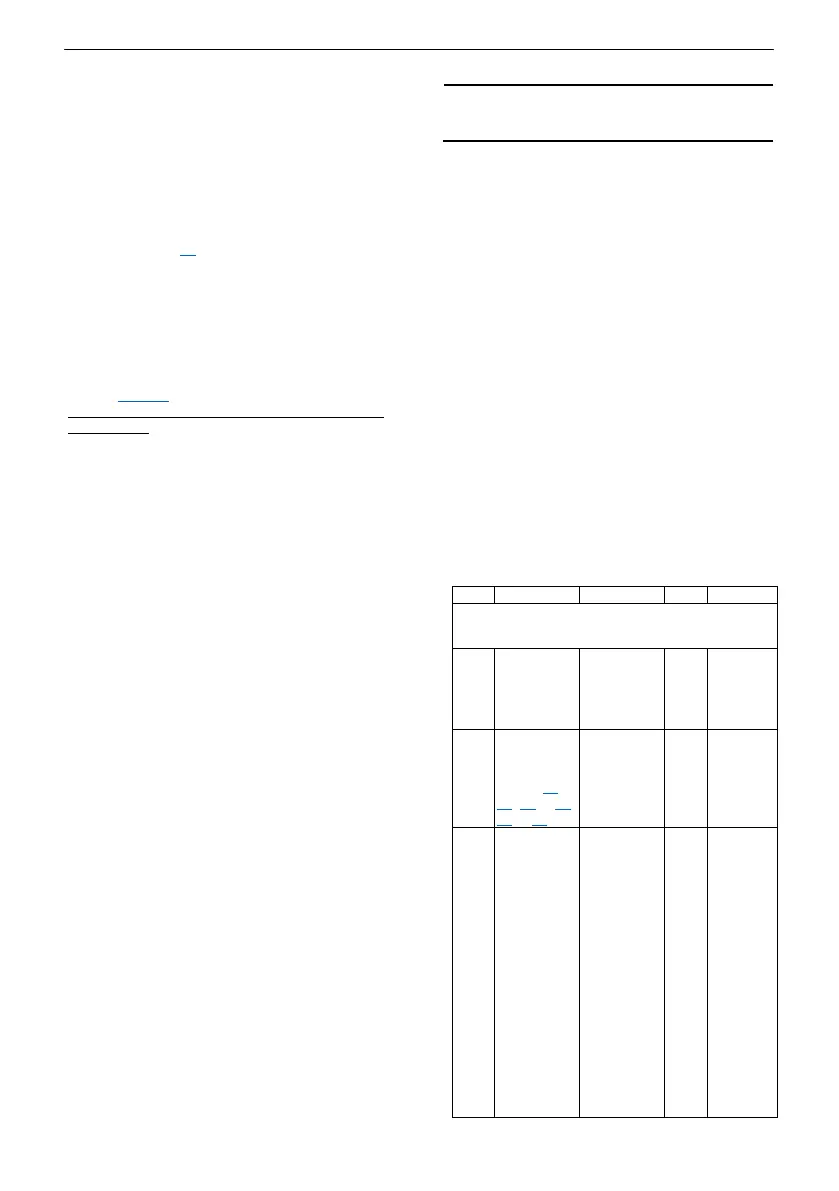
Tab 2 SEWAGE Application
(parameter SE is selected, section
5.4.3)
SYSTEM
pumps
2= 2 pumps
ing on the
control
panel
tion.
(Refer to
figures 11
to
16, 39 to 46
1= Enabled
sensor that
is used.
switches
2= Sensor
level
3= Probes
4= Level
sensor with
automatic
switching to
float if sen-
sor is faulty
5= Level
sensor with
automatic
switching to
probes if
sensor is
 Loading...