EasyManua.ls Logo

Yakima SmarT-Slot Kit 1 User Manual

Yakima SmarT-Slot Kit 1
2 pages
To Next Page IconTo Next Page
Page #1 background imageLoading...
Page #1 background image
1035841B-1/2
SmarT-Slot Kit 1
C
O
N
T
E
N
T
S
C
O
N
T
E
N
U
C
O
N
T
E
N
I
D
O
3X
3X3X
1
2 3
Slide all 3 covers
back (front mount
and rear mount).
Faire glisser les trois caches vers
l’arrière (selles avant et arrière).
Deslice las 3 cubiertas hacia atrás
(fijaciones delantera y trasera).
Lift levers up
and back to
clear detents.
Soulever les leviers et les faire
pivoter pour dégager les ergots.
Levante las palancas hacia arriba
y hacia atrás para destrabarlas
de los topes de bloqueo.
Drop levers
through the
carrier.
Faire passer les leviers à travers le cadre.
Deje caer las palancas a
través del armazón.
Flex the metal
loops to remove
the barrel nuts and
thumbscrews.
À l’aide d’un tournevis, dégager
les trois vis de réglage.
Using a
screwdriver
pop up the 3
thumbscrews.
Utilice un destornillador para hacer
salir los 3 tornillos moleteados.
Doble los flejes de metal para retirar las
tuercas barril y los tornillos moleteados.
Plier les crochets de métal
pour dégager les vis de
réglage et les écrous à
portée cylindrique.
For use on: Yakima HighSpeed and HighRoad bike mounts.
À utiliser avec les porte-vélos Yakima HighSpeed et HighRoad.
Para usar con: portabicicletas HighSpeed y HighRoad de Yakima.
Question and Answer IconNeed help?

Do you have a question about the Yakima SmarT-Slot Kit 1 and is the answer not in the manual?

Yakima SmarT-Slot Kit 1 Specifications

General IconGeneral
BrandYakima
ModelSmarT-Slot Kit 1
CategoryAutomobile Accessories
LanguageEnglish

Summary

Prepare Carrier Covers and Levers

Slide Mount Covers Back

Slide all three covers back on the front and rear mounts.

Lift and Clear Levers

Lift levers up and back to disengage them from the detents.

Drop Levers Through Carrier

Pass the levers downwards through the carrier frame.

Release Thumbscrews and Nuts

Pop Up Thumbscrews

Use a screwdriver to release the three thumbscrews.

Remove Barrel Nuts

Bend metal loops to detach barrel nuts and thumbscrews.

Attach Carrier to Crossbars

Insert T-Bolts

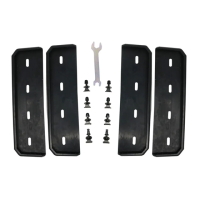
Insert T-Bolts into the Jetstream bar docking slot.

Lower Carrier onto T-Bolts

Adjust T-Bolt position and lower carrier onto the T-Bolts.

Thread Nuts by Hand

Thread the nuts onto the T-Bolts by hand.

Tighten Nuts with Tool

Use the supplied tool to fully tighten the nuts.

Finalize Installation

Snap New Levers and Close Covers

Snap new levers into detents, close them, then slide covers.

Test Installation Security

Ensure carrier does not slide or move on crossbars; redo step 8 if needed.

Related product manuals