EasyManua.ls Logo

Yakima Super Joe 2 - User Manual

Yakima Super Joe 2
8 pages
Print Icon
To Next Page IconTo Next Page
Loading...
(SuperJoe
3)
(LittleJoe
3)
1033309E-1/24
IMPORTANT WARNING
IT IS CRITICAL THAT ALL YAKIMA RACKS AND ACCESSORIES BE PROPERLY AND SECURELY ATTACHED TO YOUR VEHICLE. IMPROPER ATTACHMENT COULD RESULT IN
AN AUTOMOBILE ACCIDENT, AND COULD CAUSE SERIOUS BODILY INJURY OR DEATH TO YOU OR TO OTHERS. YOU ARE RESPONSIBLE FOR SECURING THE RACKS AND
ACCESSORIES TO YOUR CAR, CHECKING THE ATTACHMENTS PRIOR TO USE, AND PERIODICALLY INSPECTING THE PRODUCTS FOR ADJUSTMENT, WEAR, AND DAMAGE.
T
HEREFORE, YOU MUST READ AND UNDERSTAND ALL OF THE INSTRUCTIONS AND CAUTIONS SUPPLIED WITH YOUR YAKIMA PRODUCT PRIOR TO INSTALLATION
OR USE. IF YOU DO NOT UNDERSTAND ALL OF THE INSTRUCTIONS AND CAUTIONS, OR IF YOU HAVE NO MECHANICAL EXPERIENCE AND ARE NOT THOROUGHLY
FAMILIAR WITH THE INSTALLATION PROCEDURES, YOU SHOULD HAVE THE PRODUCT INSTALLED BY A PROFESSIONAL INSTALLER SUCH AS A QUALIFIED GARAGE OR
AUTO BODY SHOP.
SuperJoe
2
&
3, LittleJoe
UPPER STRAPS
SIDE
STRAPS
LOWER STRAPS
BIKE STRAPS
(SUPER JOES)
STABILIZER
CRADLE
CRADLE
LOWER
FRAME
HUB—
(RED TRIGGER)
LOWER
HOOKS
UPPER
FRAME
LOAD ARMS
SIDE
HOOKS
UPPER
HOOKS
GLASS
HATCH HOOKS
for glass or plastic
hatch or trunk edge.
LOAD
STOPS
SuperJoe 2
Maximum load
is 2 bikes (60 lbs.
(27kg) total)
SuperJoe 3
Maximum load is 3 bikes
(90 lbs. (41kg) total)
The use of Glass Hatch Hooks
with upper straps will limit the
load to 2 bikes only.
BEFORE
DRIVING AWAY:
READ CAUTIONS
AND WARNINGS
AT END OF
INSTRUCTIONS.
LittleJoe 3
Maximum load is 3 bikes
(90 lbs. (41kg) total)
The use of Glass Hatch
Hooks with upper straps will
limit the load to 2 bikes only.
Part #1033309 Rev.E
EXTRA WHEEL STRAP
(SUPER JOES)

Other manuals for Yakima Super Joe 2

Question and Answer IconNeed help?

Do you have a question about the Yakima Super Joe 2 and is the answer not in the manual?

Overview

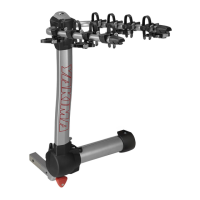
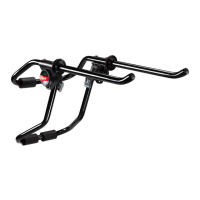
This document describes the Yakima SuperJoe 2 & 3 and LittleJoe 3 bicycle carriers, providing detailed instructions for installation, usage, and important warnings.

Function Description

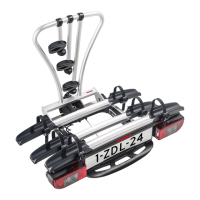
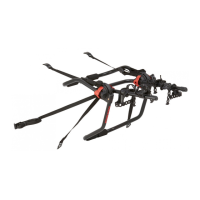
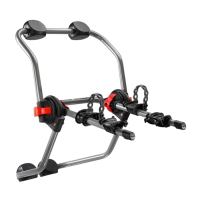
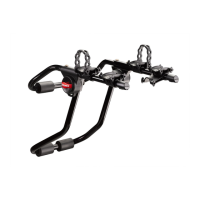
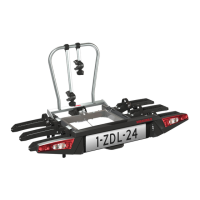
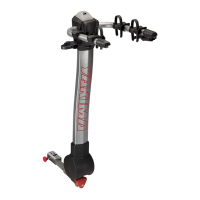
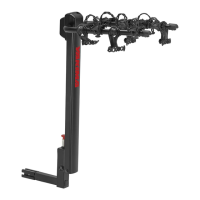
The Yakima SuperJoe 2, SuperJoe 3, and LittleJoe 3 are trunk-mounted bicycle carriers designed to transport bicycles on the rear of a vehicle. They utilize a system of upper, lower, and side straps with hooks to secure the carrier to the vehicle's trunk or hatch. The carriers feature load arms with cradles to hold bicycle frames. The SuperJoe models include additional cradle straps for enhanced security, while the LittleJoe requires users to tie bike frames to the load arms with durable straps. The design aims for stability and secure transport of bicycles, with specific instructions for various vehicle types and attachment points.

Important Technical Specifications

  • Load Limits:

    • SuperJoe 2: Maximum weight load is 60 lbs (27kg) for 2 bikes.
    • SuperJoe 3 / LittleJoe 3: Maximum weight load is 90 lbs (41kg) for 3 bikes.
    • Weight Restrictions: Do not carry heavy bikes (over 35 lbs / 16kg).
    • Bike Types: Not suitable for tandem or recumbent bicycles.
    • Glass Hatch Hooks Impact: Attaching Glass Hatch Hooks to upper straps will limit the load to 2 bikes for all models.
  • Components:

    • Upper Straps & Hooks: Secure the top of the carrier to the vehicle. Glass Hatch Hooks are available for glass or plastic hatch/trunk edges.
    • Lower Straps & Hooks: Secure the bottom of the carrier.
    • Side Straps & Hooks: Provide lateral stability.
    • Upper Frame: The main structural component that rests against the vehicle.
    • Lower Support Frame: Provides support and contact with the lower part of the vehicle.
    • Hub (Red Trigger): Mechanism for adjusting and securing frame positions.
    • Load Arms: Extend from the carrier to hold bicycles.
    • Cradles: Located on the load arms, these hold the bicycle frames. SuperJoe models include stabilizer cradles.
    • Cradle Straps (SuperJoe Only): Rubber straps to secure bike frames to cradles.
    • Bike Straps (SuperJoes): Additional straps for securing bikes.
    • Extra Wheel Strap (SuperJoes): For securing the front wheel of the bike closest to the car.
    • Load Stops: Prevent bikes from sliding too far inward on the load arms.

Usage Features

  • Vehicle Compatibility: Users must consult the "Joe Fit Sheet" or "Fit List" to determine if their vehicle is compatible. "No Fit" vehicles should not use the carrier. Unlisted vehicles require following specific guidelines provided in the manual.
  • Frame Positioning:
    • The upper frame is adjusted by pulling and turning red triggers on the outer hubs.
    • Frames are positioned apart on a flat surface, with measurements taken from the inside edges of the tubes (for listed vehicles).
    • For unlisted vehicles, the upper frame should rest on the vehicle, and the lower frame should be placed in a well-supported area (e.g., license plate depression), avoiding glass, plastic, or thin metal.
    • The frame position is secured by pushing and turning the red triggers until they are seated.
  • Hook Placement:
    • Upper Hooks: Placed into the leading edge of the hatch or trunk. Glass Hatch Hooks are used if the leading edge has trim, or if hooks do not fit, or if attaching to glass/plastic. Hooks must be removed before opening the hatch/trunk.
    • Lower Hooks: Typically attached to the bottom of the trunk/hatch, under the bumper (if rigid metal point exists), or to tie-down hooks/holes in the vehicle's frame. Avoid hot exhaust, sharp metal edges, and plastic bumpers.
    • Side Hooks: Mounted to the side of the trunk/hatch, positioned to prevent sliding.
  • Strap Tightening: All straps (upper, lower, side) must be tightened firmly with two hands. Extra strap ends should be bundled into the provided band.
  • Carrier Centering: The carrier must be centered on the car after hook placement.
  • Load Arm Adjustment: Load arms should be adjusted to be just above horizontal. For unlisted vehicles, if frame adjustment is needed for this, note the new pad and frame location and refer back to step 2a.
  • Bike Loading:
    • Load the heaviest bike first, with the chain away from the vehicle.
    • Alternate bike directions to avoid interference.
    • Arrange bike frames in the cradles for greatest stability.
    • SuperJoe: Secure bikes with rubber cradle straps diagonally over the bike frame and seat tube.
    • LittleJoe: Bike frames must be securely tied to the load arms using any type of durable strap.
    • The front wheel of the bike closest to the car should be secured (e.g., with an extra wheel strap or durable strap).
    • Crucially, bikes must be secured to the support frame.
  • Post-Loading Check: After bikes are loaded, all upper and side straps must be tightened again, as the weight of the bikes may cause slack or dislodge hooks.
  • Warnings:
    • Pre-Drive Check: Read all warnings before driving away with bikes.
    • Strap Tension: Straps must be tightened after loading bikes and checked periodically during travel. Straps loosen over time; check before each use.
    • Vehicle Contact: Do not allow any part of the carrier to contact the spoiler.
    • Wiper Interference: Wiper may not be usable; do not allow contact with the carrier.
    • Hatch/Trunk Opening: Never open the trunk/hatch with the carrier installed, as this can cause damage.
    • Off-Road Driving: Never drive off-road with loaded bicycles.
    • Heat/Edges: Do not let bike tires or straps hang near hot exhaust. Keep straps away from sharp metal edges.
    • Trailers/RVs: Do not install on trailers, campers, or RVs.
    • Convertibles: Do not rest the upper frame on a convertible top or raise/lower the top with the carrier installed.
    • Soft Attachment Points: Excessive tightening can damage softer body materials.
    • Tight Seams: For vehicles with tight trunk/hatch seams, slide hooks from the outside edge or open the trunk/hatch carefully to insert hooks.

Maintenance Features

  • Cleaning: Clean contact points on the vehicle and keep pads free of debris.
  • Lubrication: No lubrication is required.
  • Water Exposure: Do not immerse in water.
  • Car Wash: Remove the carrier before entering an automatic car wash.
  • Strap Replacement: Replace any worn or frayed straps.
  • Periodic Inspection: Periodically inspect products for adjustment, wear, and damage.
  • Professional Installation: If lacking mechanical experience or familiarity with installation procedures, have the product installed by a professional.

Warranty and Support:

The product is covered by Yakima's "Love It Till You Leave It" Limited Lifetime Warranty. For warranty information, visit www.yakima.com, email yakwarranty@yakima.com, or call (888) 925-4621. For technical assistance or replacement parts, contact your dealer or call (888) 925-4621 Monday through Friday, 7:00 am to 5:00 pm PST. Yakima cannot warranty installations onto vehicles not listed in the Yakima Fit List or Joe Fit Sheet.
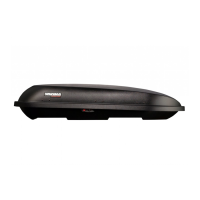
Yakima Super Joe 2 Specifications

General IconGeneral
BrandYakima
ModelSuper Joe 2
CategoryAutomobile Accessories
LanguageEnglish

Related product manuals