EasyManua.ls Logo

Yamaha Atmosfeel - User Manual

Yamaha Atmosfeel
1 page
Print Icon
Loading...
Part Names/Control Descriptions
Replacing the Batteries
q
Slide the tab on the endpin section in the direction indicated by the arrow in the diagram
below to release the lock, then pull out the battery holder.
w
Insert two AA batteries making sure that the battery poles are properly aligned with the
polarity markings on the battery holder.
e
Slide the battery holder back into the endpin section until the tab is locked.
NOTICE
When using nickel metal-hydride batteries, take care not to damage the battery
casing or poles when installing and removing the batteries.
PRECAUTIONS
PLEASE READ CAREFULLY BEFORE PROCEEDING
Please keep this manual in a safe and handy place for future reference.
WARNING
Always follow the basic precautions listed below to avoid the possibility of serious injury
or even death from electrical shock, short-circuiting, damages, fire or other hazards. These
precautions include, but are not limited to, the following:
Do not open
s 4HISINSTRUMENTCONTAINSNOUSERSERVICEABLEPARTS$ONOTOPENTHEINSTRUMENTORATTEMPTTO
DISASSEMBLEORMODIFYTHEINTERNALCOMPONENTSINANYWAY)FITSHOULDAPPEARTOBEMALFUNCTION
INGDISCONTINUEUSEIMMEDIATELYANDHAVEITINSPECTEDBYQUALIlED9AMAHASERVICEPERSONNEL
Water warning
s
4OAVOIDDAMAGEDONOTEXPOSETHEGUITARTODAMPRAINYCONDITIONSORPLACEITNEARANYCONTAINERS
SUCHASVASESBOTTLESORGLASSESTHATHAVETHEPOTENTIALTOSPILLINTOANYOFTHEGUITARSOPENINGSOR
ELECTRONICCOMPONENTS3HOULDANYMOISTURELIQUIDSEEPINTOTHEGUITARSUCHASWATERTURNOFFTHE
POWERIMMEDIATELYANDHAVETHEINSTRUMENTINSPECTEDBYQUALIlED9AMAHASERVICETECHNICIAN
If you notice any abnormality
s
3HOULDONEOFTHEFOLLOWINGPROBLEMSOCCURIMMEDIATELYTURNOFFTHEPOWERREMOVEALLBATTERIES
FROMTHEINSTRUMENTANDHAVETHEINSTRUMENTINSPECTEDBYAQUALIlED9AMAHASERVICETECHNICIAN
 %MISSIONOFUNUSUALSMELLSORSMOKE
 !NOBJECTHASBEENDROPPEDINTOTHEINSTRUMENT
 !SUDDENLOSSOFSOUND
CAUTION
Always follow the basic precautions listed below to avoid the possibility of physical injury to
you or others, or damage to the instrument or other property. These precautions include, but are
not limited to, the following:
Connection
s
"EFORECONNECTINGTHEINSTRUMENTTOOTHERELECTRONICCOMPONENTSTURNOFFTHEPOWERFORALLCOM
PONENTS"EFORETURNINGTHEPOWERONOROFFFORALLCOMPONENTSSETALLVOLUMELEVELSTOMINIMUM
s "ESURETOSETTHEVOLUMESOFALLCOMPONENTSATTHEIRMINIMUMLEVELSANDGRADUALLYRAISETHE
VOLUMECONTROLSWHILEPLAYINGTHEINSTRUMENTTOSETTHEDESIREDLISTENINGLEVEL
Location
s $ONOTPLACETHEINSTRUMENTINANUNSTABLEPOSITIONWHEREITMIGHTACCIDENTALLYFALLOVER
Handling caution
s $ONOTRESTYOURWEIGHTONORPLACEHEAVYOBJECTSONTHEINSTRUMENTANDDONOTUSEEXCES
SIVEFORCEONTHECONTROLLERSORCONNECTORS
* Yamaha cannot be held responsible for damage caused by improper use or modifications
made to this instrument.
* Information regarding the batteries can be found in the Specifications Section of this
owner’s manual.
Thank you for purchasing the Yamaha Guitar with the Atmosfeel™ technology.
Featuring Yamaha’s newly developed three-way system with built-in piezoelec-
tric sensors, the acoustic guitar sound is captured as is, with amazing accuracy
across the entire frequency range - from low to high - creating an expressive,
natural warm stereophonic sound.
To obtain the best performance and potential
from this instrument, we encourage you to read this manual before use.
Note that this manual covers only the electronic parts of this product. For infor-
mation on the other non-electronic parts, refer to the separate Acoustic Guitar
Owner’s Manual.
Endpin section
q
Release the lock
AA battery
x2
Battery holder
Tab
q
Master Volume
When a cable is connected to the
r
Output Jack, the LED located inside the Master
Volume lights green for one second, then the Atmosfeel™ feature will be turned ON.
Turn the Master Volume control all the way down to the minimum before connecting/dis-
connecting a cable. The output level can be adjusted by turning this control to the right
(clockwise) to increase the level, or to the left (counterclockwise) to reduce the level.
w
Mic Blend
Adjusts the level of the sound picked up with the microphones installed inside the body.
Turning this control to the right (clockwise) to enhance the reverberation and spacious-
ness of the sound. In this condition, the output level is not changed.
NOTE
Feedback might occur depending on the usage conditions. Use the
w
Mic Blend or
the
e
Bass EQ to adjust the sound.
e
Bass EQ
Adjusts the level of the low frequencies. Turning this control to the right (clockwise)
gradually boosts the lower frequencies. Turning it to the left (counterclockwise) gradu-
ally cuts the lower frequencies. Turn it to the left when you play in a band, turn it to the
right when you play solo and emphasize the bass.
r
Output jack/battery holder
The output jack and battery compartment are combined into a single unit. Inserting a
plug into the output jack switches the internal preamplifier ON. To prolong the life of
your battery, unplug the cable from the output jack when not in use.
Controls
EN
Acoustic Electric Guitar
Owner’s Manual
Specifications
l
System:
System74
l
Pickup:
Hybrid 3-way System
l
Control:
Master Volume, Mic Blend, Bass EQ
l
Output Jack:
Combination end pin/line out power switch
l
Output Impedance:
1 kΩ
l
Power:
AA battery x2 (alkaline or nickel-metal hydride)
*
1
l
Battery Life:
Approximately 28 hours using alkaline batteries, approximately
24 hours using nickel metal hydride batteries.
*
2
l
Accessories:
Neck adjustment hex wrench x1, AA battery x2
Remaining Battery Level
The LED located inside the Master Volume flashes red when it is time to change the
batteries. Once the LED begins flashing, the remaining operation time is approximately
two hours with alkaline batteries and about one hour when using nickel metal hydride
batteries (Time varies according to operating conditions). Please replace the batteries
as soon as possible.
*1 For best performance, we recommend the use of alkaline or nickel-metal hydride bat-
teries. When using nickel-metal hydride batteries, please follow the instructions in the
manual provided with the batteries.
*2 Depends upon operating conditions.
*Thecontentsofthismanualapplytothelatestspecicationsasoftheprintingdate.
Since Yamaha makes continuous improvements to the product, this manual may not
applytothespecicationsofyourparticularproduct.Toobtainthelatestmanual,access
theYamahawebsitethendownloadthemanualle.
Question and Answer IconNeed help?

Do you have a question about the Yamaha Atmosfeel and is the answer not in the manual?

Overview

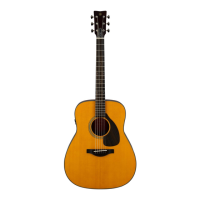
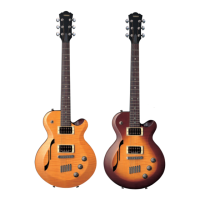
The Yamaha Atmosfeel Acoustic Electric Guitar is an instrument featuring Yamaha's newly developed three-way system with built-in piezoelectric sensors. This system is designed to capture the acoustic guitar sound with high accuracy across the entire frequency range, from low to high, aiming to create an expressive, natural, and warm stereophonic sound.

Usage Features:

The guitar's electronic controls are integrated into a single unit, providing intuitive adjustments for various sound parameters.

  • Master Volume (1): This control manages the overall output level of the guitar. When a cable is connected to the Output Jack (4), an LED inside the Master Volume knob illuminates green for one second, indicating that the Atmosfeel™ feature is activated. Before connecting or disconnecting a cable, it is recommended to turn the Master Volume control all the way down to its minimum setting. The output level can be increased by turning the control clockwise and decreased by turning it counterclockwise.

  • Mic Blend (2): This knob adjusts the level of the sound picked up by the microphones installed inside the guitar body. Turning this control clockwise enhances the reverberation and spaciousness of the sound without altering the overall output level. It's noted that feedback might occur depending on usage conditions, and users can adjust either the Mic Blend or Bass EQ to manage the sound.

  • Bass EQ (3): This control allows for adjustment of the low frequencies. Turning the control clockwise gradually boosts the lower frequencies, which can be useful for solo playing to emphasize the bass. Conversely, turning it counterclockwise gradually cuts the lower frequencies, a setting that might be preferred when playing in a band.

  • Output Jack/Battery Holder (4): This component combines the output jack and the battery compartment into a single unit. Inserting a plug into the output jack automatically switches the internal preamplifier ON. To conserve battery life, it is advised to unplug the cable from the output jack when the instrument is not in use.

Maintenance Features (Battery Replacement):

The guitar's battery system is designed for user-friendly replacement.

  1. Release the Lock: To access the battery holder, slide the tab on the endpin section in the direction indicated by the diagram to release the lock.
  2. Remove Holder: Once unlocked, pull out the battery holder.
  3. Insert Batteries: Insert two AA batteries, ensuring that their polarity markings are correctly aligned with those on the battery holder.
  4. Secure Holder: Slide the battery holder back into the endpin section until it locks securely.

Important Notice for Nickel-Metal Hydride Batteries: When using nickel-metal hydride batteries, care should be taken not to damage the battery casing or poles during installation and removal.

Remaining Battery Level Indicator:

The LED located inside the Master Volume knob serves as a battery indicator. It flashes red when the batteries need to be changed. Once the LED starts flashing, the remaining operation time is approximately two hours with alkaline batteries and about one hour with nickel-metal hydride batteries. This time can vary depending on operating conditions. It is recommended to replace the batteries as soon as possible when the LED flashes red.

Important Precautions:

  • Do Not Open: The instrument contains no user-serviceable parts. Users should not attempt to open, disassemble, or modify the internal components. In case of malfunction, discontinue use and have it inspected by qualified Yamaha service personnel.
  • Water Warning: To prevent damage, avoid exposing the guitar to damp or rainy conditions. Do not place it near containers that could spill liquids into the guitar's openings or electronic components. If moisture or liquid enters the guitar, immediately turn off the power and have it inspected by a qualified service technician.
  • Abnormality Detection: If any of the following problems occur, immediately turn off the power, remove all batteries, and have the instrument inspected: unusual smells or smoke, an object dropped into the instrument, or a sudden loss of sound.
  • Connection: Before connecting to other electronic components, turn off the power for all components. Set all volume levels to minimum before powering components on or off. Gradually raise volume controls to achieve the desired listening level while playing.
  • Location: Do not place the instrument in an unstable position where it might accidentally fall over.
  • Handling Caution: Avoid resting weight on or placing heavy objects on the instrument. Do not use excessive force on the controllers or connectors.

Important Notes:

Yamaha is not responsible for damage caused by improper use or modifications. Information regarding batteries can be found in the Specifications Section of the owner's manual.

Important Technical Specifications:

  • System: System74
  • Pickup: Hybrid 3-way System
  • Control: Master Volume, Mic Blend, Bass EQ
  • Output Jack: Combination end pin/line out power switch
  • Output Impedance: 1 kΩ
  • Power: Requires 2 AA batteries (alkaline or nickel-metal hydride). For best performance, alkaline or nickel-metal hydride batteries are recommended. When using nickel-metal hydride batteries, users should follow the instructions provided with those batteries.
  • Battery Life: Approximately 28 hours with alkaline batteries, and approximately 24 hours with nickel-metal hydride batteries. Actual battery life depends on operating conditions.
  • Accessories: Includes a neck adjustment hex wrench (x1) and AA batteries (x2).

The contents of this manual apply to the latest specifications as of the printing date. Yamaha continuously improves its products, so this manual may not always reflect the exact specifications of a particular product. For the latest manual, users are advised to access the Yamaha website and download the relevant file.

Yamaha Atmosfeel Specifications

General IconGeneral
BrandYamaha
ModelAtmosfeel
CategoryMusical Instrument
LanguageEnglish

Related product manuals