EasyManua.ls Logo

Yamaha Clavinova CLP-220 User Manual

Yamaha Clavinova CLP-220
50 pages
To Next Page IconTo Next Page
Page #1 background imageLoading...
Page #1 background image
U.R.G., Pro Audio & Digital Musical Instrument Division, Yamaha Corporation
© 2005 Yamaha Corporation
WE93800 506APAP?.?-01A0
Printed in ?????
Clavinova Web site (English only)
http://www.yamahaclavinova.com/
Yamaha Manual Library
http://www.yamaha.co.jp/manual/
EN
DE
FR
ES
CLP-220
CLP-220
ENGLISHDEUTSCHFRANÇAISESPAÑOL
Owner's Manual
Bedienungsanleitung
Mode d'emploi
Manual de instrucciones
IMPORTANT
Check your power supply
Make sure that your local AC mains voltage matches the voltage specified on
the name plate on the bottom panel. In some areas a voltage selector may be
provided on the bottom panel of the main keyboard unit near the power cord.
Make sure that the voltage selector is set for the voltage in your area. The
voltage selector is set at 240V when the unit is initially shipped. To change the
setting use a "minus" screwdriver to rotate the selector dial so that the correct
voltage appears next to the pointer on the panel.
WICHTIG
Überprüfung der Stromversorgung
Vergewissern Sie sich vor dem Anschließen an das Stromnetz, daß die örtliche
Netzspannung den Betriebsspannungswerten auf dem Typenschild an der
Unterseite des Instruments entspricht. In bestimmten Verkaufsgebieten ist das
Instrument mit einem Spannungswähler an der Unterseite neben der
Netzkabeldurchführung ausgestattet. Falls vorhanden, muß der
Spannungswähler auf die örtliche Netzspannung eingestellt werden. Der
Spannungswähler wurde werkseitig auf 240 V voreingestellt. Zum Verstellen
drehen Sie den Spannungsregler mit einem Schlitzschraubendreher, bis der
Zeiger auf den korrekten Spannungswert weist.
IMPORTANT
Contrôler la source d'alimentation
Vérifiez que la tension spécifiée sur le panneau inférieur correspond à la
tension du secteur. Dans certaines régions, l'instrument peut être équipé d'un
sélecteur de tension situé sur le panneau inférieur du clavier à proximité du
cordon d'alimentation.
Vérifiez que ce sélecteur est bien réglé en fonction de la tension secteur de
votre région. Le sélecteur de tension est réglé sur 240 V au départ d'usine.
Pour modifier ce réglage, utilisez un tournevis à lame plate pour tourner le
sélecteur afin de mettre l'indication correspondant à la tension de votre région
vis à vis du repère triangulaire situé sur le panneau.
IMPORTANTE
Verifique la alimentación de corriente
Asegúrese de que tensión de alimentación de CA de su área corresponde con la
tensión especificada en la placa de características del panel inferior. En algunas
zonas puede haberse incorporado un selector de tensión en el panel inferior
de la unidad del teclado principal, cerca del cable de alimentación. Asegúrese
de que el selector de tensión esté ajustado a la tensión de su área. El selector
de tensión se ajusta a 240V cuando la unidad sale de fábrica. Para cambiar el
ajuste, emplee un destornillador de cabeza "recta" para girar el selector de
modo que aparezca la tensión correcta al lado del indicador del panel.
DIC413
Question and Answer IconNeed help?

Do you have a question about the Yamaha Clavinova CLP-220 and is the answer not in the manual?

Yamaha Clavinova CLP-220 Specifications

General IconGeneral
BrandYamaha
ModelClavinova CLP-220
CategoryMusical Instrument
LanguageEnglish

Summary

Power Supply Verification

Checking Local Voltage Compatibility

Ensure local AC mains voltage matches the unit's rating before connection.

Important Product Notices

Safety Precautions

Electrical Hazard Prevention

Basic precautions to avoid electrical shock, short-circuiting, fire, and other electrical hazards.

General Safety and Damage Prevention

Precautions to avoid physical injury, instrument damage, and environmental hazards.

Key Features and Controls Overview

Powering On the Instrument

Connecting Power Cord and Voltage Check

Steps for correctly connecting the power cord and verifying voltage.

Volume and Headphone Usage

Setting Master Volume Level

How to adjust the overall listening level using the master volume control.

Instrument Part Identification

Control Panel and Port Locations

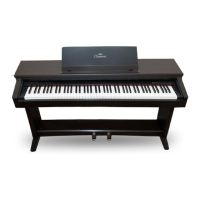
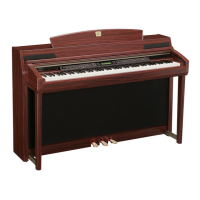
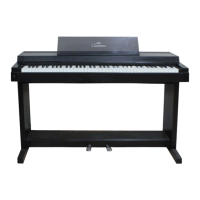
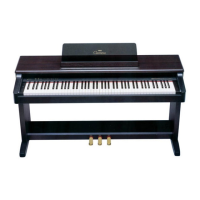
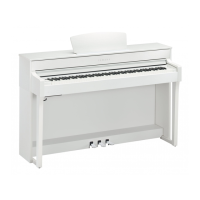
Identifies and locates buttons, knobs, and connectors on the instrument.

Selecting and Playing Voices

Choosing Instrument Voices and Characteristics

How to select different instrument sounds and their characteristics.

Using the Pedals

Damper Pedal Functionality

Explains the sustained notes function of the right damper pedal.

Sostenuto and Soft Pedal Operation

Details the operation of the center sostenuto and left soft pedals.

Recording Your Performance

Engaging and Starting Recording

Steps to prepare the instrument for recording a performance.

Stopping the Recording Process

Procedures for initiating and concluding the recording process.

Playing Back Recorded Performances

Starting and Stopping Playback

How to play back recorded user songs and stop the playback.

Data Backup and Initialization

Troubleshooting and Options

Common Problems and Solutions

Addresses common issues and their resolutions for the Clavinova.

Keyboard Stand Assembly

Attaching Main Stand Components

Steps for identifying parts and assembling the base structure of the stand.

Keyboard Stand Assembly (Continued)

Mounting and Securing the Keyboard Unit

Instructions for attaching the main keyboard unit to the assembled stand.

Keyboard Stand Assembly (Final Steps)

Connecting Cords and Final Checks

Connecting pedal/power cords, attaching hanger, and post-assembly checks.

Important Safety Instructions

General Electrical Safety Guidelines

Comprehensive safety warnings and precautions for using electrical products.

Product Usage and Environmental Safety

Guidelines on ventilation, temperature, water exposure, and product placement.

Related product manuals