EasyManua.ls Logo

Yamaha FX Audio Kit User Manual

Yamaha FX Audio Kit
3 pages
To Next Page IconTo Next Page
Page #1 background imageLoading...
Page #1 background image
7/2019 F3X_H81E0_T0_A MANUAL, INSTALL
AUDIO SET
Page 1 of 3
©Yamaha Motor Corporation, U.S.A. All rights reserved.
INSTALLATION INSTRUCTIONS
DESCRIPTION: FX Audio Kit
PART NUMBER: F3X-H81C0-T0
MODEL: 2019~ FX WaveRunner
®
Please read and understand these instructions
completely before installation to avoid possible
injury, or damage to the accessory or vehicle.
WARRANTY INFORMATION:
In the United States, see your Yamaha dealer for a copy
of the Genuine Yamaha Accessories Limited Warranty
statement.
DEALER OR INSTALLER:
These instructions contain important information for
future reference and must be given to the customer.
NOTICES:
This installation requires a torque wrench and should be
performed by an authorized Yamaha dealer or other quali-
fied technician.
PARTS LIST:
No. Part Number Description Qty
-- F3X-H81C0-T0 FX Audio Kit --
-- EcoXGear speaker 2
-- Speaker mounting base 2
F3X-U7823-11 M6 Flanged Button Head bolt 3
* Part supplied with kit only and not available separately.
1
1
3
3
2
2
Question and Answer IconNeed help?

Do you have a question about the Yamaha FX Audio Kit and is the answer not in the manual?

Yamaha FX Audio Kit Specifications

General IconGeneral
BrandYamaha
ModelFX Audio Kit
CategorySpeakers
LanguageEnglish

Summary

Installation Instructions Overview

Product Identification

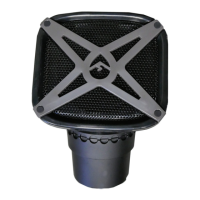
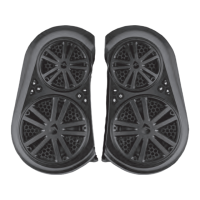
FX Audio Kit, Part Number F3X-H81CO-TO, for 2019~ FX WaveRunner®.

Safety Warning

Read and understand instructions completely before installation to avoid injury or damage.

Installation Notices

Requires torque wrench and should be performed by an authorized technician.

Parts List

Lists all components included in the FX Audio Kit, such as the speaker, mounting base, and bolts.

Preparation and Installation Steps

Preparation

Ensure vehicle is secure, clean mounting surfaces, and have service manual ready.

Step 1: Base and Extension Removal

Remove the Multi-Mount Base and Cup Holder Extension, retaining hardware for later.

Step 2: Install Mounting Base

Install the EcoXGear mounting base into the cup holder using provided or retained screws.

Step 3: Tighten Screws

Secure the mounting base by tightening screws to 44 in-lb (5Nm).

Steps 4-7: Speaker Mounting and Securing

Attach and secure the speaker to the mount base using the quick-release knob mechanism.

Step 8: Repeat Installation

Repeat the installation process for the opposite side of the WaveRunner®.

Product Care and Service

Maintenance

Periodically check and re-torque all hardware to maintain secure installation.

Care and Cleaning

Clean plastic parts with mild soap and water; rinse with freshwater after salt water use.

Customer Service

Contact your Yamaha dealer for additional information and support.

Related product manuals