Do you have a question about the Yamaha MR Series and is the answer not in the manual?
Safety advice regarding environmental conditions to prevent damage to the unit.
Safety advice emphasizing careful handling to prevent damage from physical impacts.
Warning against user servicing; maintenance should be done by qualified personnel.
Crucial safety step to turn off power before connecting or disconnecting cables.
Guidance on properly plugging and unplugging cables by the connector, not the cord.
Recommendation to use only a soft, dry cloth for cleaning, avoiding solvents.
Ensure the power supply voltage matches the local AC mains supply.
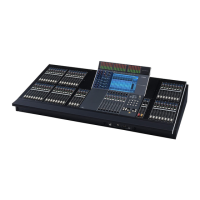
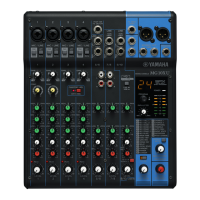
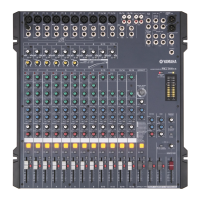
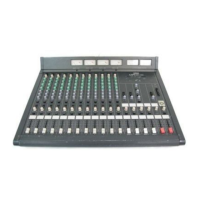
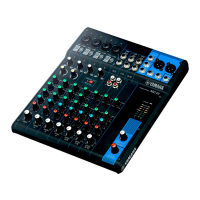
Details controls for each input channel, including TAPE, PAD, GAIN, CLIP, EQ, AUX, PAN, CUE.
Explains HIGH, MID, LOW EQ controls and MID FREQ adjustment for tonal shaping.
Details controls for AUX 1 and AUX 2 sends and their routing options for effects or monitoring.
Explains AUX 3 send control and its interaction with the TAPE switch for monitor mixes.
Explains how to assign channels to group busses and the PAN control's function.
Describes how the PAN control pans signals between group busses.
Details the function of the CUE switches for channel monitoring without fader changes.
Describes the provided space for labelling channels for easy identification.
Explains the main level control for each input channel and its effect on the mix balance.
Adjusts output levels for AUX mixes and allows monitoring of AUX signals.
Controls levels and assigns AUX return signals to group or stereo busses.
Pans group signals across the master stereo buss for stereo imaging.
Allows independent monitoring of selected group signals via the monitor system.
Adjusts the overall level of group mix signals to output connectors and stereo buss.
Controls monitor output source selection and level for headphones and monitor outs.
Adjusts cue signal level and indicates when the cue system is active.
Delivers selected monitor signal to headphones for monitoring.
Connector for talkback microphone, enabling communication with performers.
Adjusts talkback signal level and controls its activation.
Determines which busses the talkback signal is applied to.
Independently adjusts left and right stereo buss output levels.
VU meters with PEAK LEDs for monitoring signal levels on groups, auxes, and stereo busses.
Controls the main power supply for the console.
Details the balanced XLR (LO-Z) and phone jack (HI-Z) input connectors.
Describes the -10 dB RCA pin jack for line-level sources like tape recorders.
Provides a patch point for external signal processors on input channels.
Output jacks for sending auxiliary mixes to external equipment.
Input jacks for returning auxiliary signals to group or stereo busses.
Patch points for inserting processors into group signal paths.
Direct inputs to the console's left and right stereo busses, used for cascading.
Direct inputs to the console's four group busses, used for cascading.
Main outputs for the console's four group busses, available balanced and unbalanced.
Outputs for the console's monitor system, providing left and right signals.
Main stereo outputs, available balanced and unbalanced.
Applies +48V phantom power to LO-Z and HI-Z input connectors for condenser mics.
Diagram and explanation of the primary signal flow through group and stereo busses.
Diagram illustrating the signal path for AUX sends, including differences for AUX 3.
Illustrates the signal path for auxiliary returns and their assignment to busses.
Explains the signal path for cue and monitor systems, including AUX 3 integration.
Guide to connecting various audio sources using LO-Z and HI-Z inputs.
Advice on connecting the console to other audio equipment using balanced and unbalanced outputs.
Procedure for setting input sensitivity to achieve optimum signal levels and avoid clipping.
Guidance on using EQ controls for tonal shaping and problem-solving.
Illustrates a typical setup for a small multitrack recording system using the console.
Demonstrates a system configuration for live sound reinforcement.
Specifies noise floor and residual output noise levels for various signal paths.
Details the maximum voltage gain achievable for different signal paths.
Indicates the level of signal bleed between adjacent channels and input/output paths.
Specifies the range and operation of the input channel gain control.
Lists the frequency ranges and types for the HIGH, MID, and LOW EQ controls.
Describes the illuminated VU meters and their calibration for signal level monitoring.
Explains the CLIP indicator LEDs and their function in signaling signal clipping.
Details the +48V DC phantom power supply for condenser microphones.
Information on power requirements matching local AC mains voltage and frequency.
Provides the physical dimensions (W x H x D) for the console models.
Lists the net weight for each MR series console model.
Detailed table of input terminals, impedance, sensitivity, and levels.
Detailed table of output terminals, impedance, levels, and connector types.
Instructions for connecting the mains plug and cord based on wire colours.
| Type | Analog |
|---|---|
| Series | MR |
| EQ | Yes (channel EQ) |
| Phantom Power | Yes |
| Outputs | Main, Monitor |
| Dimensions | Varies depending on the model |
| Weight | Varies depending on the model |
| Input Channels | 4-24 (depending on the model) |
| Channels | 4-24 (depending on the model) |
| Line Inputs | Varies by model |