The Yealink SmartVision40 is an advanced installation and deployment guide for a device designed to enhance communication and collaboration experiences. This document outlines the device's components, installation procedures, and various usage scenarios, ensuring optimal performance and integration into different environments.
Function Description
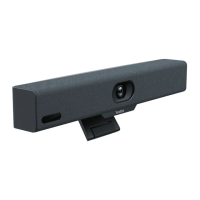
The SmartVision40 appears to be a sophisticated video conferencing or collaboration endpoint, likely incorporating a camera, microphone, and speaker system, designed for use in meeting rooms or similar professional settings. Its primary function is to facilitate high-quality audio and video communication, enabling remote participants to interact seamlessly. The device supports various mounting options, including wall mounting, tabletop placement, and integration with TV stand cart platforms, offering flexibility in deployment. It also features a comprehensive set of hardware interfaces for connectivity with other devices, such as microphones, power adapters, PCs, and external audio systems. The inclusion of a remote control and cable ties suggests a focus on user convenience and organized installation.
Important Technical Specifications
Based on the provided images and text, the SmartVision40 system includes several key components with specific dimensions and functionalities:
- SmartVision 40 Unit: The main endpoint device.
- VCR20 Remote Control: For convenient operation of the device.
- USB 3.0 (A - B) Cable: 2.5 meters (8.20 ft) long, likely for connecting the SmartVision40 to a PC or other host device for video output.
- Power Adapter: 48V/0.7A, with a cable length of 3.5 meters (11.48 ft), providing power to the unit.
- Mounting Bracket: Used for various installation methods.
- Screws:
- 6*30 mm, white, Polyamide (quantity: 2)
- 4*30 mm, FAHOZN3+ (quantity: 2)
- 1/4 inch*12 mm (quantity: 2)
- 1/4 inch*13 mm (quantity: 1)
- 1/4 inch*8 mm (quantity: 2)
- M2*4 mm, CMHOZN3+ (quantity: 2)
- TV-Clip Mount: For mounting the device on top of a TV.
- Velcro: Included (one on the M-2 bracket) for securing components.
- Cable Cover: For organizing and concealing cables.
- Cable Ties: 20*200 mm (quantity: 5), for cable management.
- Silicone Pad: 38*T1.2 mm (quantity: 2), likely for tabletop stability or vibration dampening.
- Tabletop Mount: Available for separate purchase, offering a dedicated stand for the device.
Hardware Interfaces:
The SmartVision40 features a range of ports on its rear panel:
- VCH (Video Conferencing Hub): Connects to microphones or MVC-BYOD-Extender.
- DC48V: Connects to the power adapter.
- HDMI Out: A reserved port for future features, likely for video output to a display.
- USB Type-B (USB 3.0): Connects to a PC as video output.
- USB Type-A (USB 2.0): Connects to a USB flash drive to export device logs.
- Line In: Connects a 3.5mm audio connector to use the SmartVision40 as an audio input device.
- Line Out: Connects a 3.5mm audio connector to output audio to a hearing assistance system.
- Reset: Resets the SmartVision40 to factory defaults.
- USB Type-C (USB 2.0): Pairs with WPP30 (Yealink Wireless Presentation Pod).
LED Indicator Statuses:
The device provides visual feedback through an LED indicator:
- Off: Not properly connected to the mini-PC.
- Flashing green: Incoming call.
- Solid green: Active.
- Solid red: Muted.
- Solid orange: Initializing or in sleep mode.
- Flash orange: Upgrading firmware.
- Flash red and green alternately: Paired with the VCM36-W (Yealink Wireless Microphone).
- Flash red: In recovery mode, firmware not upgraded.
Usage Features
The SmartVision40 is designed for versatile deployment and ease of use:
- Flexible Mounting Options:
- Flat Surface (Tabletop): Can be placed directly on a desk or integrated with a separately purchased TV stand cart platform using silicone pads for stability.
- Wall Mount: Recommended height of 110 cm above the ground for optimal camera view. The installation process involves drilling holes (30 mm depth, 6 mm diameter) and securing the mounting bracket.
- Embed in the Wall: Allows for a flush installation with specific clearance requirements (less than 0.5 cm on left, right, top; 5±0.5 cm distance at the back for cables).
- Mount Above a TV or Display: Utilizes the M-2 bracket, which can be inserted into the M-1 in two directions. A caution is provided against mounting on slim TVs due to device weight.
- Camera Tilt Adjustment: The device allows for manual adjustment of the camera tilt, ensuring optimal framing for different meeting scenarios.
- Remote Control: The VCR20 Remote Control provides convenient wireless operation of the device.
- Cable Management: The included cable cover and cable ties help maintain a neat and organized installation, preventing clutter.
- Connectivity: Extensive hardware interfaces allow for integration with various audio, video, and control systems, making it adaptable to different conferencing setups.
- Status Indicators: The LED indicator provides clear visual cues about the device's operational status, call activity, and potential issues.
Maintenance Features
While the manual primarily focuses on installation and deployment, some aspects hint at maintenance:
- Firmware Upgrades: The "Flash orange" LED status indicates firmware upgrading, suggesting that the device supports over-the-air or manual firmware updates to improve performance, add features, or fix bugs.
- Device Log Export: The USB Type-A port allows for exporting device logs, which can be crucial for troubleshooting and diagnostics by support personnel.
- Factory Reset: The "Reset" button enables users to restore the device to its factory default settings, a common troubleshooting step for resolving software-related issues.
- Accessory Recommendations: The "TIP" section emphasizes using Yealink-provided or approved accessories, which is a common recommendation to ensure compatibility, optimal performance, and potentially prevent damage, thereby reducing maintenance needs. Using unapproved third-party accessories, especially power adapters, is explicitly warned against as it "may cause damage to the endpoint." This highlights the importance of proper accessory usage for device longevity.
- Cable Organization: The inclusion of cable covers and ties, while primarily for aesthetics and safety during installation, also contributes to easier maintenance by preventing tangled cables that could be difficult to trace or replace.